Multi-node LLM training on Slurm means running one training job across several GPU servers at once. Slurm decides which servers to use and starts the work on all of them together. You describe the job in a short script, submit it with the sbatch command, and Slurm handles the rest.
Getting a job to start is the easy part. A run that can go on for days without losing work needs four more things: shared storage, a tested network between servers, regular checkpoints, and a way to catch failing hardware early. This post walks through each step in plain language, from your first script to a run you can trust.
Why does LLM training need more than one GPU server?
Bigger LLMs do not fit on one server, and even smaller ones can take too long to train there.
Training needs far more memory than the model itself. Besides the model's weights, the GPUs must also hold gradients and optimizer state. With the usual mixed-precision setup and the Adam optimizer, that comes to about 16 bytes per parameter. That is before counting the working data for each batch.
So a 7-billion-parameter model needs roughly 112 GB just for this. A 70-billion-parameter model needs about 1.1 TB. A typical GPU server has 8 GPUs, and eight 80 GB GPUs give you 640 GB in total. The bigger model does not fit.
Splitting the work across servers solves both problems. Each server holds a share of the model or the data, and all the GPUs work in parallel. The catch is that they must stay in sync, swapping results after every training step. That is why the network between servers, and the software that coordinates them, matter so much.
What is Slurm?
Slurm is free, open-source software that shares a group of computers among many users and jobs. It is widely used to schedule work on supercomputers and GPU clusters. By NVIDIA's own account, Slurm runs on more than half of the top 10 and top 100 systems in the TOP500 list of the world's fastest supercomputers.
Think of Slurm as the host at a busy restaurant. You tell the host how many seats you need and for how long. The host keeps a waiting list, seats your whole group together when enough tables are free, and clears the tables when you leave. Slurm does the same with GPUs. You ask for, say, 4 servers with 8 GPUs each for 24 hours, and Slurm starts your job only when all 32 GPUs are free at the same time.
That last part matters for training. A distributed job cannot start on half its GPUs and wait for the rest. Slurm starts every part together, or not at all.
Slurm is developed by SchedMD. NVIDIA acquired SchedMD in December 2025 and has said Slurm will stay open source and vendor-neutral.
Slurm terms you will see
| Term | What it means |
|---|---|
| Node | One server in the cluster. In a training cluster, a worker node usually has 8 GPUs. |
| Job | A piece of work you ask Slurm to run, such as a training run. |
| Partition | A named queue that covers a set of nodes, with its own rules such as time limits. |
sbatch | Submits a job script to the queue. You get your terminal back straight away. |
srun | Starts a program on the nodes Slurm gave you. Inside a job script, it launches training on every node. |
squeue | Shows the queue: which jobs are running and which are waiting. |
sinfo | Shows the nodes and whether each is free, busy or out of service. |
What does a Slurm training cluster look like?
A Slurm training cluster has five parts: a login node where you work, a controller that makes decisions, GPU worker nodes that do the training, a fast network between them, and storage that every node shares.
- Login node. You connect here over SSH to edit scripts and submit jobs. It is not meant for training. Heavy work here does not use the GPUs and can slow the node down for everyone.
- Controller. Runs the Slurm scheduler. It holds the queue, decides which job runs where, and keeps a history of past jobs.
- Worker nodes. The GPU servers that run your training. Slurm hands them out to jobs.
- Network fabric. A fast, low-delay network between workers, usually InfiniBand with RDMA. It lets GPUs on different servers swap data quickly, which multi-node training depends on.
- Shared storage. A file system mounted at the same path on the login node and every worker, so all nodes see the same code, data and checkpoints.
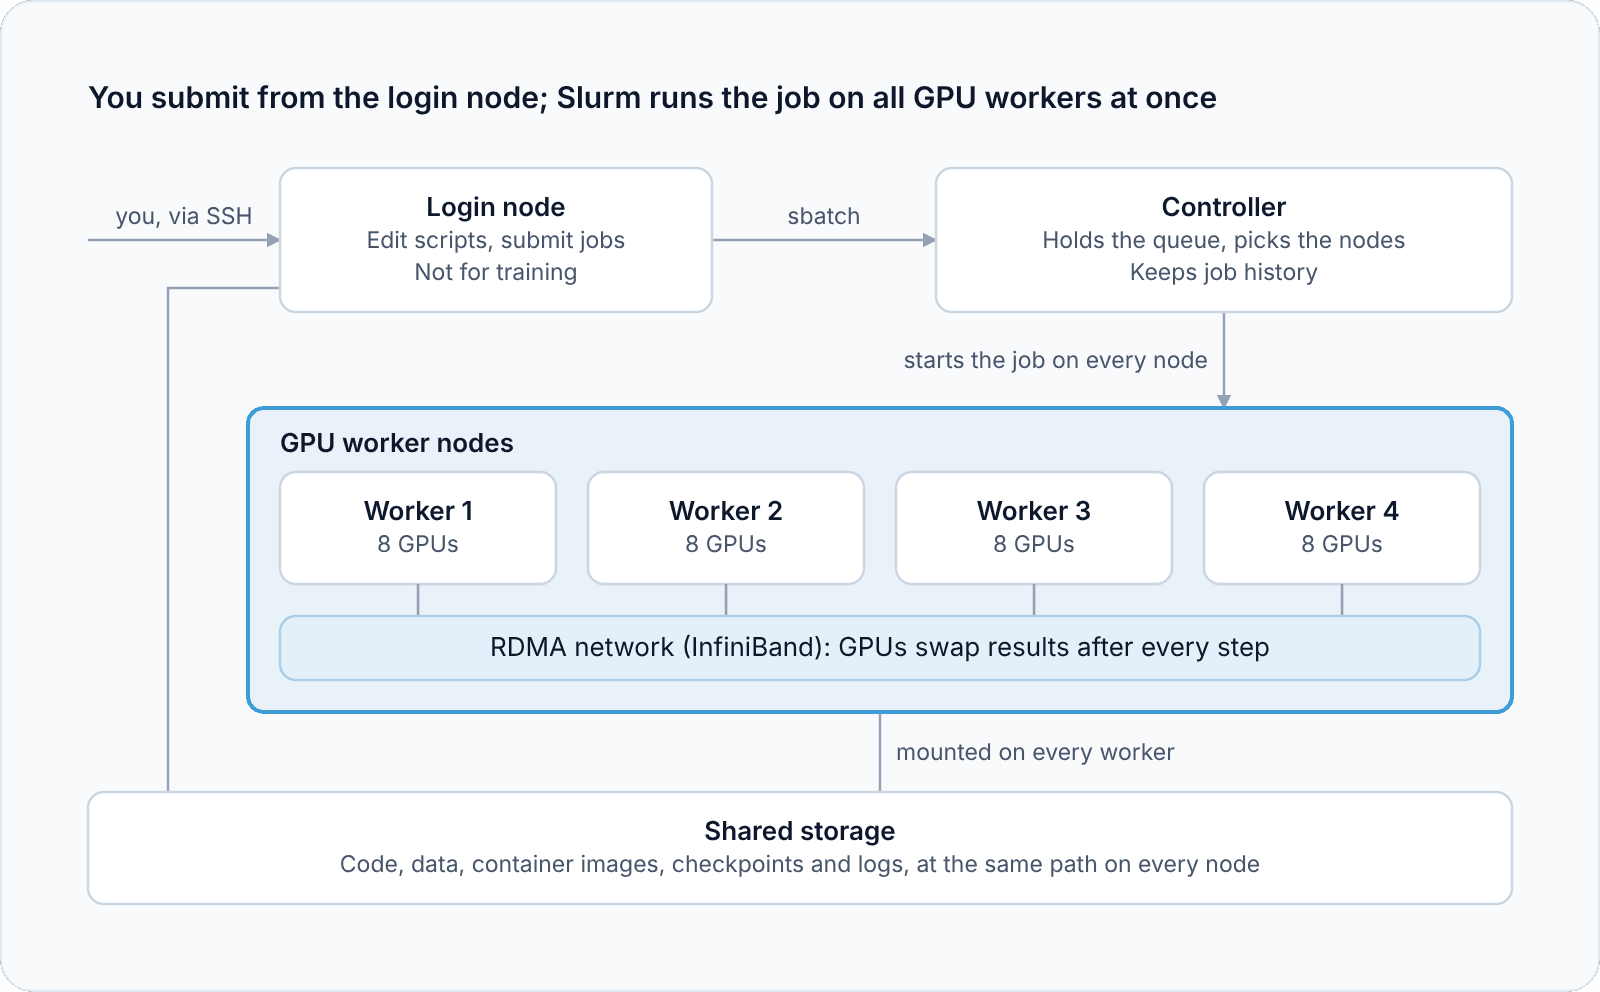
Slurm training cluster: login node, controller, four GPU workers and shared storage.
The login node and every worker see the same shared storage, and the RDMA network links the workers to each other.
From sbatch to first run: how a multi-node job works
A multi-node training job goes from a text file to 32 working GPUs in seven steps. The example below uses 4 nodes with 8 GPUs each.
- Connect to the login node. You SSH in. This is where you prepare and submit everything.
- Put your files on shared storage. Your code, dataset, container image and an empty checkpoint folder all go on the shared file system, so every node can reach them.
- Write a job script. This is a short shell script. The
#SBATCHlines at the top tell Slurm what you need: how many nodes, how many GPUs, how long, and where to write logs. - Submit it with
sbatch. Slurm puts the job in the queue and gives you a job ID. - Wait for resources. The job stays pending until 4 full nodes are free at once.
squeueshows why it is waiting, such asResources(not enough free GPUs) orPriority(another job is ahead). - Slurm starts the job on every node.
srunlaunches your container on all 4 nodes together. Inside each one, a launcher such astorchrunor DeepSpeed starts one training process per GPU, 32 in total. - The GPUs train together. After each step they share results over the network using NCCL, NVIDIA's library for GPU-to-GPU communication. Logs and checkpoints are written to shared storage as the run goes.
What a job script looks like
Here is a simplified script for the example above. The table after it explains what each part does.
#!/bin/bash
#SBATCH --job-name=llm-pretrain
#SBATCH --nodes=4
#SBATCH --ntasks-per-node=1
#SBATCH --gpus-per-node=8
#SBATCH --exclusive
#SBATCH --mem=0
#SBATCH --time=24:00:00
#SBATCH --output=/pfs/logs/%x-%j.out

export MASTER_ADDR=$(scontrol show hostnames "$SLURM_JOB_NODELIST" | head -n 1)
export MASTER_PORT=29500

export NCCL_IB_DISABLE=0
export NCCL_NET=IB
export NCCL_SOCKET_IFNAME=eth0
# export NCCL_IB_HCA==mlx5_0:1,mlx5_3:1   # pin the exact adapters on your nodes

srun --container-image=/pfs/images/pytorch.sqsh \
     --container-mounts=/pfs:/pfs,/dev/infiniband:/dev/infiniband \
     torchrun --nnodes=$SLURM_NNODES --nproc_per_node=8 \
              --rdzv_id=$SLURM_JOB_ID --rdzv_backend=c10d \
              --rdzv_endpoint=$MASTER_ADDR:$MASTER_PORT \
/pfs/project/train.py --checkpoint-dir /pfs/checkpoints/run-01 --save-every 500| Part of the script | What it does |
|---|---|
--nodes=4 | Asks for four GPU servers. |
--ntasks-per-node=1 | Starts one copy of the launcher on each server. The launcher then starts one process per GPU. |
--gpus-per-node=8 | Reserves all eight GPUs on each server. |
--exclusive | Keeps other jobs off these servers. |
--mem=0 | Gives the job all the memory on each server. |
--time=24:00:00 | Stops the job after 24 hours. Always set a limit, or the job may inherit a partition's unlimited time. |
--output=... | Writes the log to shared storage. %x becomes the job name and %j the job ID. |
MASTER_ADDR, MASTER_PORT | Pick the first server as the meeting point where all 32 processes find each other at start-up. |
NCCL_IB_DISABLE, NCCL_NET, NCCL_SOCKET_IFNAME | Keep GPU-to-GPU traffic on InfiniBand. Without them NCCL can fall back to TCP, which is far slower. |
srun --container-image | Starts the same container on every server, so the software is identical everywhere. |
--container-mounts | Makes shared storage and the InfiniBand devices visible inside the container. |
torchrun | PyTorch's launcher. It starts 8 training processes per server and connects all 32. |
--save-every 500 | An option of the training script in this example: save a checkpoint every 500 steps. |
You submit it with one command, sbatch train.sh. Check on it with squeue -u $USER and follow the log with tail -f.
What makes a run production-ready?
A production-ready run can survive a failed server, a missing file or a slow network without losing much progress. Six habits get you there.
1. Keep everything that matters on shared storage
Each node's local folders, such as /tmp and /dev/shm, are private to that node and get wiped on restart. Anything written inside a container is also thrown away when the job ends, unless that folder is mounted from shared storage. A run can look finished and still have saved nothing.
Put datasets, checkpoints, logs, container images and Python environments on the shared file system. Before a long run, write a test file from one node and read it from all the others.
2. Package your software in a container
Every node must run the same versions of Python, PyTorch, CUDA and NCCL. A container image makes sure of that. Import the image to shared storage once, then point every job at that file. This also stops dozens of nodes from downloading the same image at the same moment.
3. Test the network before the long run
When a multi-node job hangs, it is usually at the very start, while the GPUs are still trying to connect. Run a short NCCL all-reduce benchmark at your full node count before the real run.
Set NCCL_DEBUG=INFO and read the log. NET/IB means traffic is using InfiniBand. NET/Socket means NCCL fell back to ordinary TCP, which is far slower. The usual causes are InfiniBand devices not mounted into the container, wrong network adapter names in NCCL_IB_HCA, or a hard-coded start-up address. Our Megatron-LM benchmark post shows what a correct NCCL log looks like on H200 nodes, including why NCCL_IB_HCA needs a leading equals sign.
4. Save checkpoints often, and make your script resume
A checkpoint is a saved snapshot of the model and optimizer that lets training continue from that point. A well-run cluster keeps going when one server fails, but the job on that server ends. Your progress is only as recent as your last checkpoint.
Save checkpoints to shared storage at a regular interval, for example every 500 steps, and keep the last few. Write your training script so it loads the latest checkpoint when it starts. Then a failed job only needs a restart.
5. Watch GPU health and take bad nodes out early
NVIDIA GPUs report hardware faults as XID errors. One faulty GPU can crash a job that spans 32 of them, sometimes hours in. When a node shows errors, drain it: Slurm lets current jobs finish and sends no new work there. Then reboot or repair it and return it to service.
You can automate part of this with a prolog, a script Slurm runs on each node before a job starts. If the script finds fewer GPUs than expected, it exits with an error and Slurm drains that node.
6. Monitor utilization and set limits
During training, GPU utilization should stay high and roughly even across GPUs. Near-zero utilization usually means the GPUs are waiting on data loading, or the code is running on the CPU. One GPU far below the rest can point to a stuck process.
Set alerts for low utilization and high temperature. Use partitions to keep short interactive jobs away from long training runs, and always set a --time limit.
Pre-flight checklist for a long training run
Run through this list before you start a job that will take hours or days.
- Code, data, container image and checkpoint folder are on shared storage
- A test file written on one node can be read on every node
- A one-node test run shows the right number of GPUs and the right framework versions
- An NCCL all-reduce test at full scale shows
NET/IB, notNET/Socket - All nodes are healthy, with no XID errors and none drained
- The script saves checkpoints regularly and resumes from the latest one
--timeis set and logs go to shared storage- Alerts are on for low GPU utilization and high temperature
Running multi-node training on TIR Training Cluster
TIR Training Cluster, part of E2E Networks' TIR AI platform, gives you a Slurm cluster with the pieces above already in place. It is a standard Slurm installation, so sbatch, srun, squeue and sacct work as described in this post. TIR installs and patches the scheduler for you. Under the hood, it runs on Kubernetes using SchedMD's Slinky project.
| What a production run needs | What TIR Training Cluster provides |
|---|---|
| Fast links between servers | GPU worker nodes connected by an RDMA fabric (InfiniBand) for NCCL traffic |
| Shared storage | Parallel File System and Shared File System, mounted at the same path on the login node and every worker |
| The same software on every node | Container jobs through Enroot and Pyxis: add --container-image to srun to run any Docker or OCI image, chosen per job |
| Catching bad hardware | A Nodes tab with per-GPU utilization, memory, temperature and power, XID error detection, and single-node reboot |
| Monitoring | A job queue, GPU and scheduler charts, and controller and worker logs in the browser, plus alerts |
| Automatic health checks | Prolog and epilog scripts for workers and the controller, set from the console |
| Sharing with a team | Up to 20 custom partitions, per-user SSH logins and private home directories |
| Growing the cluster | Add worker nodes to a running cluster without disturbing running jobs |
| Automation | A REST API for every console action |
The TIR documentation has a full walkthrough, including a 4-node PyTorch example, NCCL settings and a network test. Start with Submit your first job, then move to Multi-node container training.
One thing to keep in mind: on TIR, a node failure does not take down the controller or the other nodes, but the job on the failed node still ends. Checkpointing stays your job, so the habits in this post apply here as on any Slurm cluster.
To get started, see Model Training & Fine-tuning on TIR or talk to our team.