Introduction
Humans are creative beings. A plethora of ideas keep coming to us constantly. Over the past few centuries, artists have implemented their skills by sketching on paper, painting on canvas, carving on walls, and so on. But can we make a machine do all of these? That, too, in a few seconds? Let’s examine this question in this blog post.
Imagine you are a novice and don’t know how to draw. Even if you did know, it would take you hours to complete a sketch or a design. The sea of ideas are flooding your brain, and what you do is take a pen and paper, or if you have a computer on a text editor, jot down your ideas. Then you make it more structured. For example, you might come up with something like this:
‘Create an image of an astronaut, garbed in a pristine white space suit and shimmering visor, standing on an otherworldly landscape characterised by towering exotic plants and a surreal, multicoloured sky. The astronaut is holding out a large, glistening block of ice with frosty vapours emanating from it, offering it as if it were a precious gemstone. Directly in front of him is an alien, a peculiar, yet friendly creature devoid of clothes, displaying hues of pastel green with pearlescent skin that shimmers under the alien sun. The alien's eyes are wide with intrigue and anticipation, tentacle-like appendages reaching out towards the block of ice in an almost reverent manner, capturing an odd and comedic cosmic trade.’
Now give the above description as input to a text-to-image generating AI model and the following image will be created in seconds:

Isn’t it amazing how a machine generated such a high-quality image just via our thoughts inputted as text? This does not even have watermarks.This can be used for high-quality content generation for marketing and ads, and so on. The applications are countless.
We will walk through how such AI models work, what is actually happening under the hood and how they can be implemented.
A Brief History
- On 10 June 2014 the Generative Adversarial Network paper was released which dealt with the machine learning framework for generating images between two adversarial neural networks.
- On 1 July 2015, Google's computer program, characterised by its psychedelic visuals, released DeepDream. It was one of the first use cases that visualised how neural networks can recognize and generate image patterns.
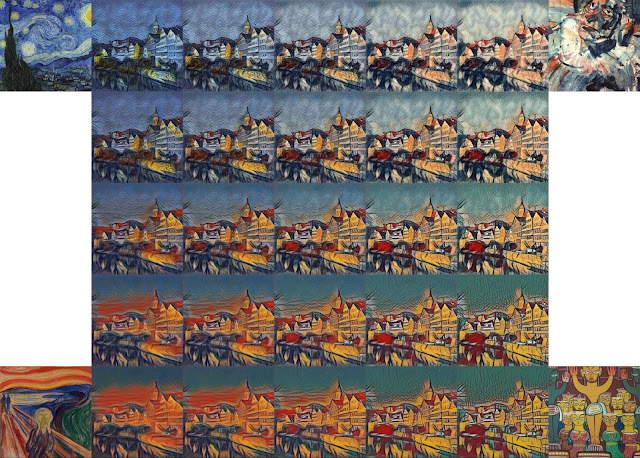
- June 2016 saw StyleTransfer: A deep neural network that can separate content and style from an image and combine different ones.

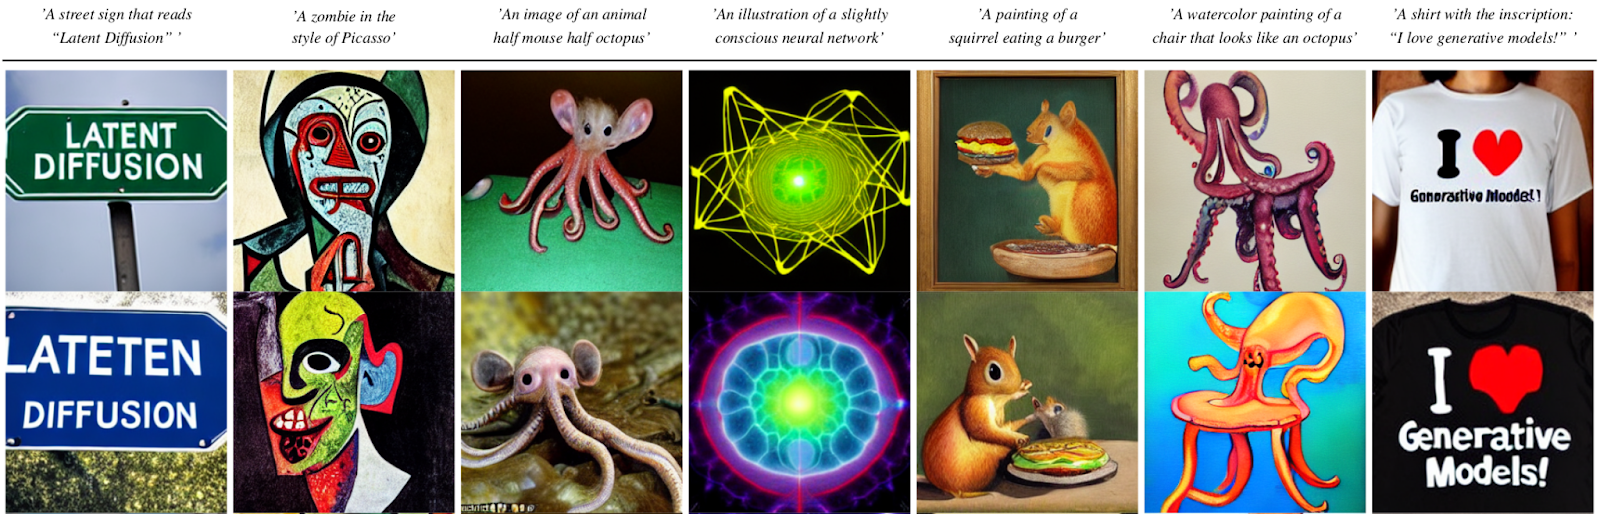
- Fast forward to 2021, we have Latent Diffusion - that is, a text-to-image model by Computer Vision.
- In 2022, there is an influx of models like the DALL-E and DALL-E2 and various other models.
In this article, we will be talking about how Stable Diffusion can be used to create images via text prompts - which was released on 22 August 2022.
Stable Diffusion
Stable Diffusion is a text-to-image latent diffusion model created by the researchers and engineers from CompVis, Stability AI and LAION. It is trained on 512x512 images from a subset of the LAION-5B database. LAION-5B is the largest, freely accessible multi-modal dataset that currently exists.
What Is a Latent Diffusion Model?
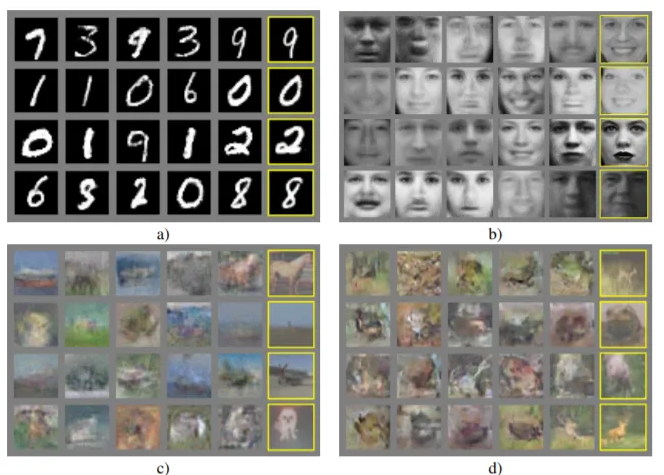
Latent diffusion model is a type of diffusion model where the model learns the distribution of the patterns in an image via adding gaussian noise/filter to the image in a sequential manner.
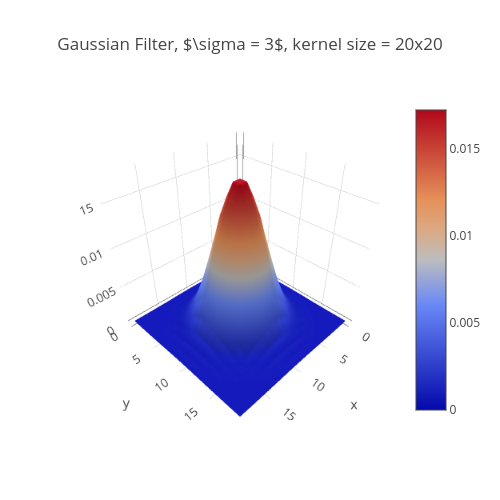
Generated using plotly studio
The above is a graphical representation of a gaussian noise/filter. Whenever it is passed through an image vector, it adds some amount of noise to it. This process is done at each given step till the whole image vector is filled with noise.
Think of it like this: you are adding ink to a glass of water, step by step, and finally when the ink is diffused in water it becomes hard to distinguish the water from the ink. That is, the water becomes completely noisy.
In order to predict noise, reverse diffusion is conducted by subtracting noise at each step.
The process of forward and backward diffusion is very slow and it won’t run on any single GPU. The image space is large. For example, take a 512x512 image. It has its 3 layers of RGB channels. Running diffusion model for one single image would be very time complexive.
Instead of working on a high dimensional image space, latent diffusion compresses the images into a latent space - so that is way more quick. In latent space, the dimensionality is low so we don’t need to deal with the curse of dimensionality and hence don't need to reduce the dimensions using Principal Complex Analysis, etc. The point being, similar data points are closer together in space which makes processing a lot faster.
There are three main components in latent diffusion.
- An autoencoder (VAE).
- A U-Net.
- A text-encoder, e.g. CLIP's Text Encoder.
The Variational Autoencoder
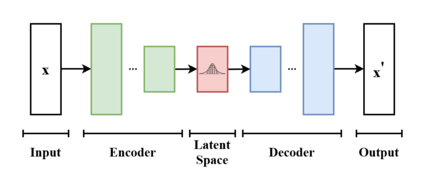
The variational autoencoder uses a probabilistic approach to learn the latent space. This means that the VAE learns distribution over the latent space, rather than a single point. This allows the VAE to generate more realistic and diverse data.
The VAE consists of two neural networks: an encoder and a decoder. The encoder takes the input data and maps it to a distribution over the latent space. The decoder takes the latent space and maps it back to the original input data.The VAE is trained by minimising the difference between the input data and the decoded data.
The U-Net
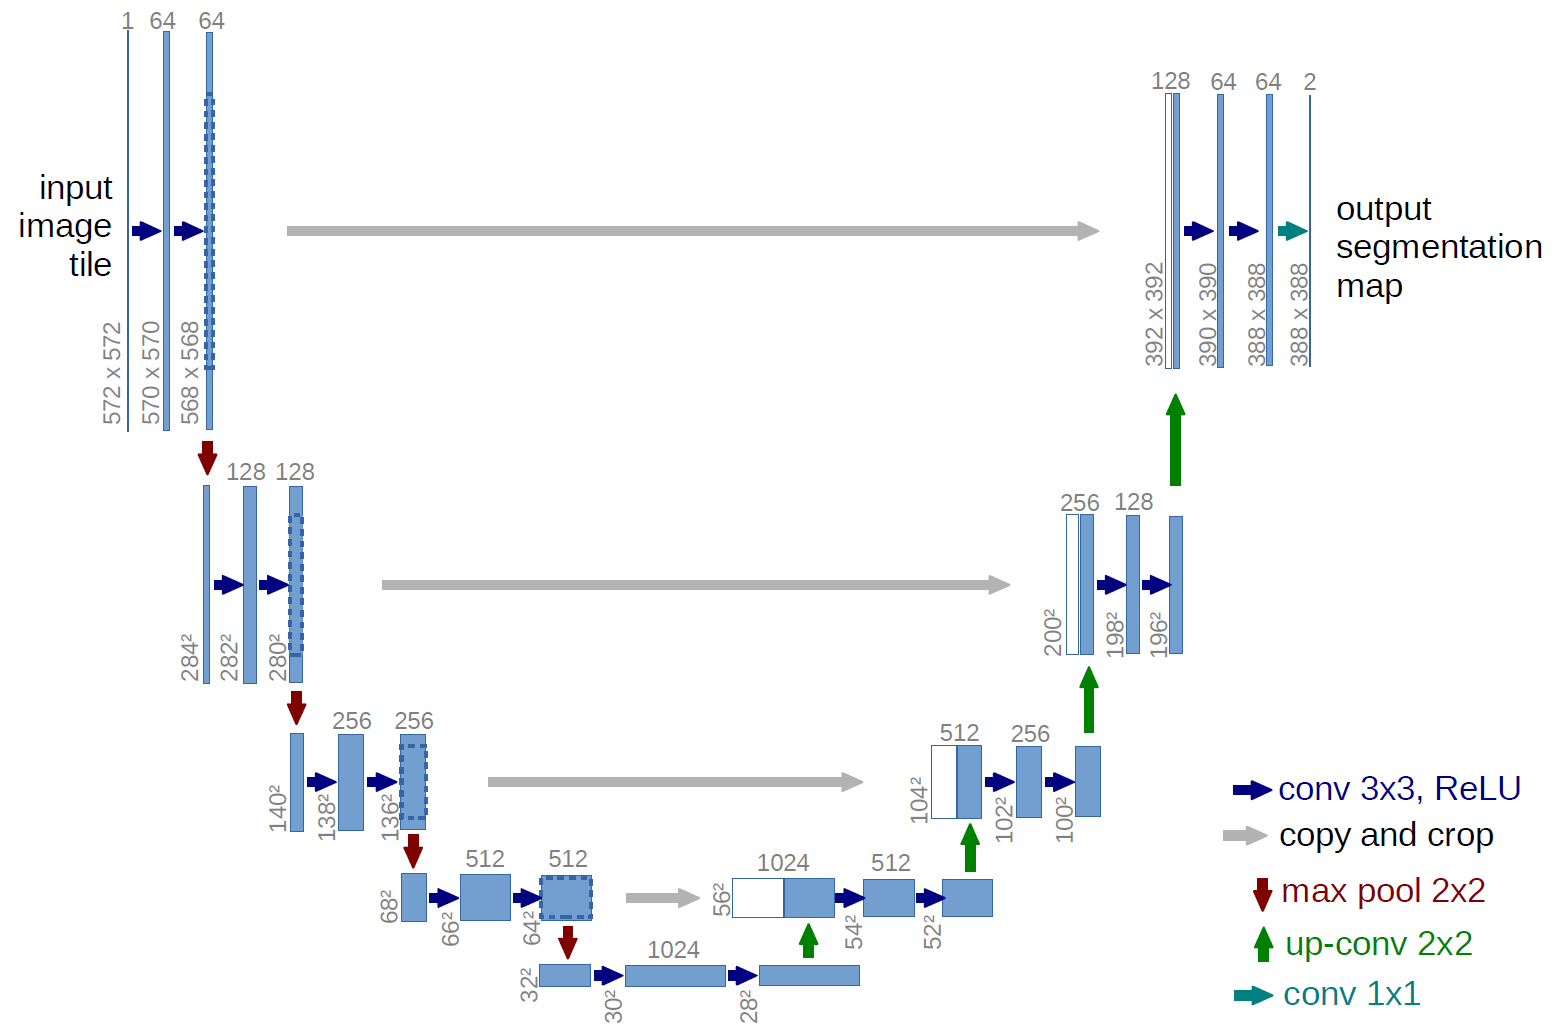
The U-Net is used in latent diffusion models because it is a very effective architecture for generating noise that is both realistic and diverse. The U-Net is able to learn to generate noise that captures the different features of the latent space, such as the overall shape of the image, the texture of the image, and the colors of the image. This allows the model to generate images that are more realistic and diverse than images that are generated with other methods.
Text Encoder

The text-encoder is responsible for transforming the input prompt into an embedding space that can be understood by the U-Net. It is usually a simple transformer-based encoder that maps a sequence of input tokens to a sequence of latent text-embeddings.
Inference
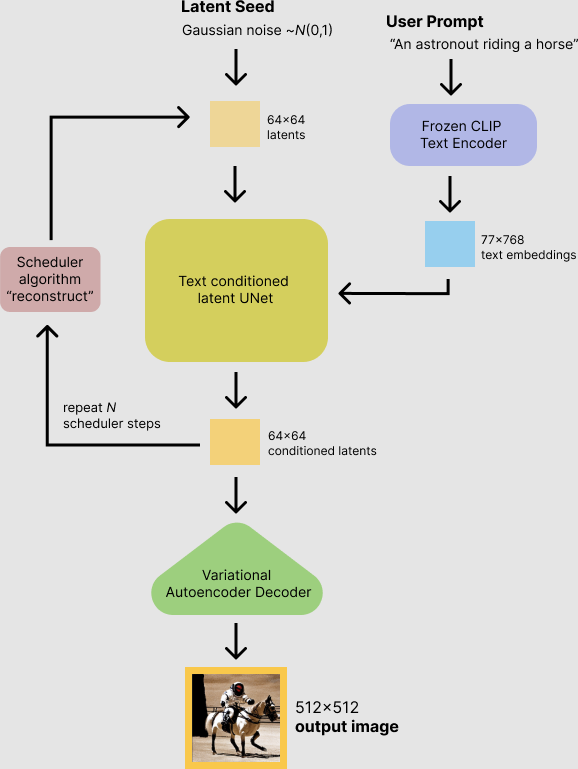
- The Stable Diffusion model takes a latent seed and a text prompt as input.
- The latent seed is used to generate random latent image representations of size 64×64.
- The text prompt is transformed into text embeddings of size 77×768 using CLIP's text encoder.
- The U-Net iteratively denoises the random latent image representations while being conditioned on the text embeddings.
- The output of the U-Net, being the noise residual, is used to compute a denoised latent image representation.
Implementing Stable Diffusion
Now that we have understood the nuances of the Stable Diffusion algorithm, let’s see how it can be implemented via code.
We will conduct this experiment on E2E Cloud, which provides a range of Advanced GPUs and free credits to go along. If you haven’t yet created an account on E2E Cloud, go ahead and do so on MyAccount dashboard.
Once that’s done, log in to E2E Networks with your credentials and then follow the steps outlined below.
GPU Node Creation
To begin with, you would need to create a GPU node. This is where you would be training and testing your model.
Node Creation
Click on create node on your dashboard

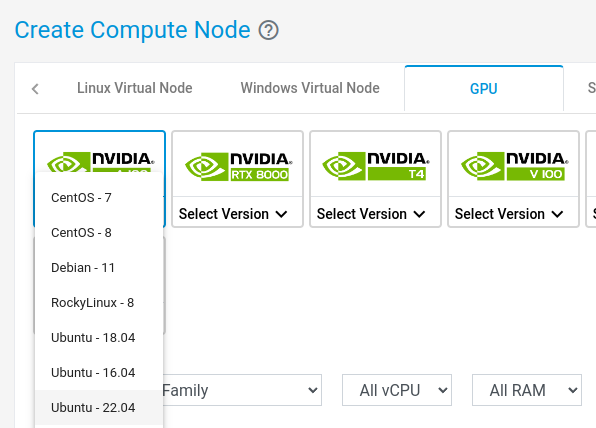
Under GPU, select Ubuntu 22.04 node.
Select the appropriate node
You can choose cheaper nodes, but your mileage may vary. In this case we have chosen an advanced GPU node.
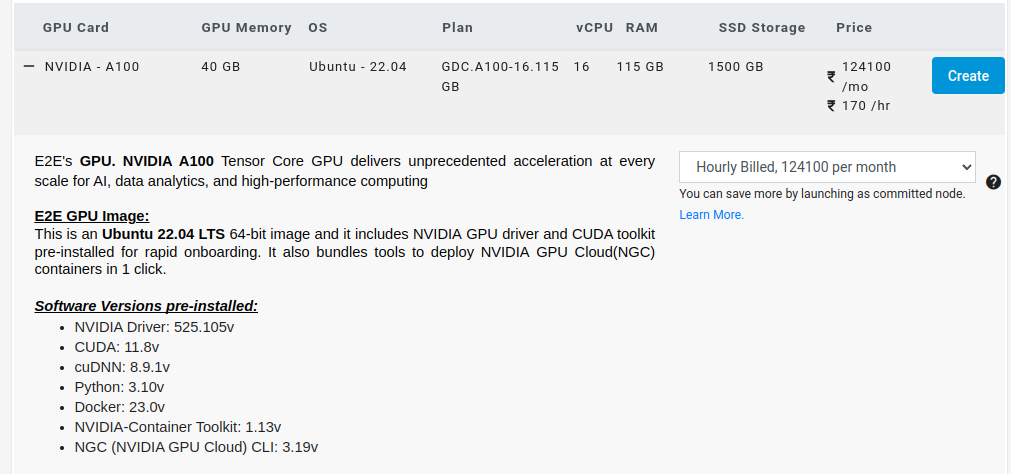
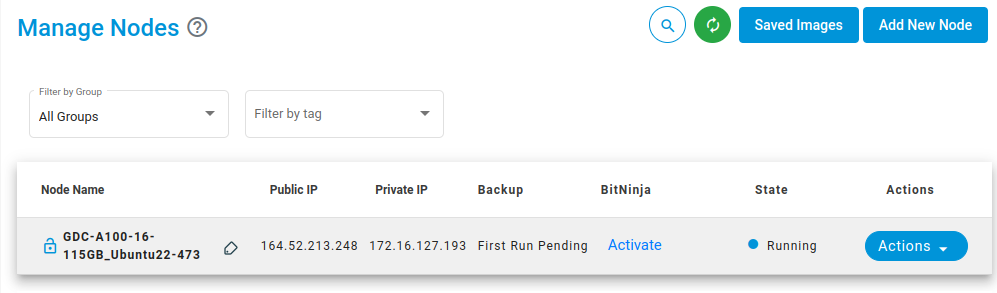
And then click create. The node will be created
Create SSH Keys
Generate your set of SSH keys in your local system using the following command:
$ ssh-keygen
A public and private key will be generated for your local system. Never ever share your private key with anyone. Add the public ssh key on E2E Cloud under Settings > SSH Keys > Add New Key. Like this:

SSH-ing into the Node
After you have added the key, log in to E2E Networks, create a from your local network via SSH:
$ ssh username@ip_address
Enter the password when prompted to.
It's always a good practice to update and upgrade the machine
$ sudo apt update & upgrade
Installation Steps
After this, we install diffusers as well scipy, ftfy and transformers. Accelerate is used to achieve much faster loading.
!pip install diffusers==0.11.1
!pip install transformers scipy ftfy accelerate
Out:
Looking in indexes: https://pypi.org/simple, https://us-python.pkg.dev/colab-wheels/public/simple/
Collecting diffusers==0.10.0
 Downloading diffusers-0.10.0-py3-none-any.whl (502 kB)
 [K |████████████████████████████████| 502 kB 18.5 MB/s
 [?25hRequirement already satisfied: numpy in /usr/local/lib/python3.8/dist-packages (from diffusers==0.10.0) (1.21.6)
Collecting huggingface-hub>=0.10.0
 Downloading huggingface_hub-0.11.1-py3-none-any.whl (182 kB)
 [K |████████████████████████████████| 182 kB 54.0 MB/s
 [?25hRequirement already satisfied: filelock in /usr/local/lib/python3.8/dist-packages (from diffusers==0.10.0) (3.8.0)
Requirement already satisfied: Pillow in /usr/local/lib/python3.8/dist-packages (from diffusers==0.10.0) (7.1.2)
Requirement already satisfied: requests in /usr/local/lib/python3.8/dist-packages (from diffusers==0.10.0) (2.23.0)
Requirement already satisfied: regex!=2019.12.17 in /usr/local/lib/python3.8/dist-packages (from diffusers==0.10.0) (2022.6.2)
Requirement already satisfied: importlib-metadata in /usr/local/lib/python3.8/dist-packages (from diffusers==0.10.0) (4.13.0)
Requirement already satisfied: pyyaml>=5.1 in /usr/local/lib/python3.8/dist-packages (from huggingface-hub>=0.10.0->diffusers==0.10.0) (6.0)
Requirement already satisfied: packaging>=20.9 in /usr/local/lib/python3.8/dist-packages (from huggingface-hub>=0.10.0->diffusers==0.10.0) (21.3)
Requirement already satisfied: tqdm in /usr/local/lib/python3.8/dist-packages (from huggingface-hub>=0.10.0->diffusers==0.10.0) (4.64.1)
Requirement already satisfied: typing-extensions>=3.7.4.3 in /usr/local/lib/python3.8/dist-packages (from huggingface-hub>=0.10.0->diffusers==0.10.0) (4.4.0)
Requirement already satisfied: pyparsing!=3.0.5,>=2.0.2 in
/usr/local/lib/python3.8/dist-packages (from packaging>=20.9->huggingface-hub>=0.10.0->diffusers==0.10.0) (3.0.9) Requirement already satisfied: zipp>=0.5 in /usr/local/lib/python3.8/dist-packages (from importlib-metadata->diffusers==0.10.0) (3.11.0)
Requirement already satisfied: chardet<4,>=3.0.2 in /usr/local/lib/python3.8/dist-packages (from requests->diffusers==0.10.0) (3.0.4)
Requirement already satisfied: certifi>=2017.4.17 in /usr/local/lib/python3.8/dist-packages (from requests->diffusers==0.10.0) (2022.9.24)
Requirement already satisfied: urllib3!=1.25.0,!=1.25.1,<1.26,>=1.21.1 in /usr/local/lib/python3.8/dist-packages (from requests->diffusers==0.10.0) (1.24.3)
Requirement already satisfied: idna<3,>=2.5 in /usr/local/lib/python3.8/dist-packages (from requests->diffusers==0.10.0) (2.10)
Installing collected packages: huggingface-hub, diffusers
Successfully installed diffusers-0.10.0 huggingface-hub-0.11.1
Looking in indexes: https://pypi.org/simple, https://us-python.pkg.dev/colab-wheels/public/simple/
Collecting transformers
Downloading transformers-4.25.1-py3-none-any.whl (5.8 MB)
 [K |████████████████████████████████| 5.8 MB 24.3 MB/s
 [?25hRequirement already satisfied: scipy in /usr/local/lib/python3.8/dist-packages (1.7.3)
Collecting ftfy
 Downloading ftfy-6.1.1-py3-none-any.whl (53 kB)
 [K |████████████████████████████████| 53 kB 800 kB/s
 [?25hCollecting accelerate
 Downloading accelerate-0.15.0-py3-none-any.whl (191 kB)
 [K |████████████████████████████████| 191 kB 61.4 MB/s
 [?25hRequirement already satisfied: huggingface-hub<1.0,>=0.10.0 in
/usr/local/lib/python3.8/dist-packages (from transformers) (0.11.1)
Requirement already satisfied: packaging>=20.0 in /usr/local/lib/python3.8/dist-packages (from transformers) (21.3)
Requirement already satisfied: regex!=2019.12.17 in /usr/local/lib/python3.8/dist-packages (from transformers) (2022.6.2)
Requirement already satisfied: numpy>=1.17 in /usr/local/lib/python3.8/dist-packages (from transformers) (1.21.6)
Requirement already satisfied: filelock in /usr/local/lib/python3.8/dist-packages (from transformers) (3.8.0)
Requirement already satisfied: requests in /usr/local/lib/python3.8/dist-packages (from transformers) (2.23.0)
Collecting tokenizers!=0.11.3,<0.14,>=0.11.1
 Downloading tokenizers-0.13.2-cp38-cp38-manylinux_2_17_x86_64.manylinux2014_x86_64.whl (7.6 MB)
 [K |████████████████████████████████| 7.6 MB 65.0 MB/s
 [?25hRequirement already satisfied: tqdm>=4.27 in /usr/local/lib/python3.8/dist-packages (from transformers) (4.64.1)
Requirement already satisfied: pyyaml>=5.1 in /usr/local/lib/python3.8/dist-packages (from transformers) (6.0)
Requirement already satisfied: typing-extensions>=3.7.4.3 in /usr/local/lib/python3.8/dist-packages (from huggingface-hub<1.0,>=0.10.0->transformers) (4.4.0)
Requirement already satisfied: pyparsing!=3.0.5,>=2.0.2 in /usr/local/lib/python3.8/dist-packages (from packaging>=20.0->transformers) (3.0.9)
Requirement already satisfied: wcwidth>=0.2.5 in /usr/local/lib/python3.8/dist-packages (from ftfy) (0.2.5)
Requirement already satisfied: psutil in /usr/local/lib/python3.8/dist-packages (from accelerate) (5.4.8)
Requirement already satisfied: torch>=1.4.0 in /usr/local/lib/python3.8/dist-packages (from accelerate) (1.13.0+cu116)
Requirement already satisfied: certifi>=2017.4.17 in /usr/local/lib/python3.8/dist-packages (from requests->transformers) (2022.9.24)
Requirement already satisfied: chardet<4,>=3.0.2 in /usr/local/lib/python3.8/dist-packages (from requests->transformers) (3.0.4)
Requirement already satisfied: idna<3,>=2.5 in /usr/local/lib/python3.8/dist-packages (from requests->transformers) (2.10)
Requirement already satisfied: urllib3!=1.25.0,!=1.25.1,<1.26,>=1.21.1 in /usr/local/lib/python3.8/dist-packages (from requests->transformers) (1.24.3)
Installing collected packages: tokenizers, transformers, ftfy, accelerate
Successfully installed accelerate-0.15.0 ftfy-6.1.1 tokenizers-0.13.2 transformers-4.25.1
Looking in indexes: https://pypi.org/simple, https://us-python.pkg.dev/colab-wheels/public/simple/
Requirement already satisfied: ipywidgets<8,>=7 in /usr/local/lib/python3.8/dist-packages (7.7.1)
Requirement already satisfied: ipython>=4.0.0 in /usr/local/lib/python3.8/dist-packages (from ipywidgets<8,>=7) (7.9.0)
Requirement already satisfied: ipykernel>=4.5.1 in
/usr/local/lib/python3.8/dist-packages (from ipywidgets<8,>=7) (5.3.4)
Requirement already satisfied: jupyterlab-widgets>=1.0.0 in /usr/local/lib/python3.8/dist-packages (from ipywidgets<8,>=7) (3.0.3)
Requirement already satisfied: ipython-genutils~=0.2.0 in /usr/local/lib/python3.8/dist-packages (from ipywidgets<8,>=7) (0.2.0)
Requirement already satisfied: widgetsnbextension~=3.6.0 in /usr/local/lib/python3.8/dist-packages (from ipywidgets<8,>=7) (3.6.1)
Requirement already satisfied: traitlets>=4.3.1 in /usr/local/lib/python3.8/dist-packages (from ipywidgets<8,>=7) (5.6.0)
Requirement already satisfied: jupyter-client in /usr/local/lib/python3.8/dist-packages (from ipykernel>=4.5.1->ipywidgets<8,>=7) (6.1.12)
Requirement already satisfied: tornado>=4.2 in /usr/local/lib/python3.8/dist-packages (from ipykernel>=4.5.1->ipywidgets<8,>=7) (6.0.4)
Requirement already satisfied: pickleshare in /usr/local/lib/python3.8/dist-packages (from ipython>=4.0.0->ipywidgets<8,>=7) (0.7.5)
Requirement already satisfied: setuptools>=18.5 in /usr/local/lib/python3.8/dist-packages (from ipython>=4.0.0->ipywidgets<8,>=7) (57.4.0)
Requirement already satisfied: decorator in /usr/local/lib/python3.8/dist-packages (from ipython>=4.0.0->ipywidgets<8,>=7) (4.4.2)
Requirement already satisfied: backcall in /usr/local/lib/python3.8/dist-packages (from ipython>=4.0.0->ipywidgets<8,>=7) (0.2.0)
Requirement already satisfied: pygments in /usr/local/lib/python3.8/dist-packages (from ipython>=4.0.0->ipywidgets<8,>=7) (2.6.1)
Requirement already satisfied: pexpect in /usr/local/lib/python3.8/dist-packages (from ipython>=4.0.0->ipywidgets<8,>=7) (4.8.0)
Collecting jedi>=0.10
 Downloading jedi-0.18.2-py2.py3-none-any.whl (1.6 MB)
 [K |████████████████████████████████| 1.6 MB 31.8 MB/s
 [?25hRequirement already satisfied: prompt-toolkit<2.1.0,>=2.0.0 in /usr/local/lib/python3.8/dist-packages (from ipython>=4.0.0->ipywidgets<8,>=7) (2.0.10)
Requirement already satisfied: parso<0.9.0,>=0.8.0 in /usr/local/lib/python3.8/dist-packages (from jedi>=0.10->ipython>=4.0.0->ipywidgets<8,>=7) (0.8.3)
Requirement already satisfied: wcwidth in /usr/local/lib/python3.8/dist-packages (from prompt-toolkit<2.1.0,>=2.0.0->ipython>=4.0.0->ipywidgets<8,>=7) (0.2.5)
Requirement already satisfied: six>=1.9.0 in /usr/local/lib/python3.8/dist-packages (from prompt-toolkit<2.1.0,>=2.0.0->ipython>=4.0.0->ipywidgets<8,>=7) (1.15.0)
Requirement already satisfied: notebook>=4.4.1 in /usr/local/lib/python3.8/dist-packages (from widgetsnbextension~=3.6.0->ipywidgets<8,>=7) (5.7.16)
Requirement already satisfied: jupyter-core>=4.4.0 in /usr/local/lib/python3.8/dist-packages (from notebook>=4.4.1->widgetsnbextension~=3.6.0->ipywidgets<8,>=7) (5.1.0)
Requirement already satisfied: nbconvert<6.0 in="" usr="" local="" lib="" python3.8="" dist-packages="" (from="" notebook="">=4.4.1->widgetsnbextension~=3.6.0->ipywidgets<8,>=7) (5.6.1)
Requirement already satisfied: jinja2<=3.0.0 in="" usr="" local="" lib="" python3.8="" dist-packages="" (from="" notebook="">=4.4.1->widgetsnbextension~=3.6.0->ipywidgets<8,>=7) (2.11.3)
Requirement already satisfied: nbformat in /usr/local/lib/python3.8/dist-packages (from notebook>=4.4.1->widgetsnbextension~=3.6.0->ipywidgets<8,>=7) (5.7.0)
Requirement already satisfied: Send2Trash in /usr/local/lib/python3.8/dist-packages (from notebook>=4.4.1->widgetsnbextension~=3.6.0->ipywidgets<8,>=7) (1.8.0)
Requirement already satisfied: terminado>=0.8.1 in /usr/local/lib/python3.8/dist-packages (from notebook>=4.4.1->widgetsnbextension~=3.6.0->ipywidgets<8,>=7) (0.13.3)
Requirement already satisfied: pyzmq>=17 in /usr/local/lib/python3.8/dist-packages (from notebook>=4.4.1->widgetsnbextension~=3.6.0->ipywidgets<8,>=7) (23.2.1)
Requirement already satisfied: prometheus-client in /usr/local/lib/python3.8/dist-packages (from notebook>=4.4.1->widgetsnbextension~=3.6.0->ipywidgets<8,>=7) (0.15.0)
Requirement already satisfied: MarkupSafe>=0.23 in /usr/local/lib/python3.8/dist-packages (from jinja2<=3.0.0->notebook>=4.4.1->widgetsnbextension~=3.6.0->ipywidgets<8,>=7) (2.0.1) Requirement already satisfied: python-dateutil>=2.1 in /usr/local/lib/python3.8/dist-packages (from jupyter-client->ipykernel>=4.5.1->ipywidgets<8,>=7) (2.8.2)
Requirement already satisfied: platformdirs>=2.5 in /usr/local/lib/python3.8/dist-packages (from jupyter-core>=4.4.0->notebook>=4.4.1->widgetsnbextension~=3.6.0->ipywidg
ets<8,>=7) (2.5.4) Requirement already satisfied: entrypoints>=0.2.2 in /usr/local/lib/python3.8/dist-packages (from nbconvert<6.0->notebook>=4.4.1->widgetsnbextension~=3.6.0->ipywidgets<8,>=7) (0.4) Requirement already satisfied: testpath in /usr/local/lib/python3.8/dist-packages (from nbconvert<6.0->notebook>=4.4.1->widgetsnbextension~=3.6.0->ipywidgets<8,>=7) (0.6.0) Requirement already satisfied: defusedxml in /usr/local/lib/python3.8/dist-packages (from nbconvert<6.0->notebook>=4.4.1->widgetsnbextension~=3.6.0->ipywidgets<8,>=7) (0.7.1) Requirement already satisfied: bleach in /usr/local/lib/python3.8/dist-packages (from nbconvert<6.0->notebook>=4.4.1->widgetsnbextension~=3.6.0->ipywidgets<8,>=7) (5.0.1) Requirement already satisfied: pandocfilters>=1.4.1 in /usr/local/lib/python3.8/dist-packages (from nbconvert<6.0->notebook>=4.4.1->widgetsnbextension~=3.6.0->ipywidgets<8,>=7) (1.5.0) Requirement already satisfied: mistune<2,>=0.8.1 in /usr/local/lib/python3.8/dist-packages (from nbconvert<6.0->notebook>=4.4.1->widgetsnbextension~=3.6.0->ipywidgets<8,>=7) (0.8.4) Requirement already satisfied: jsonschema>=2.6 in /usr/local/lib/python3.8/dist-packages (from nbformat->notebook>=4.4.1->widgetsnbextension~=3.6.0->ipywidgets<8,>=7) (4.3.3) Requirement already satisfied: fastjsonschema in /usr/local/lib/python3.8/dist-packages (from
nbformat->notebook>=4.4.1->widgetsnbextension~=3.6.0->ipywidgets<8,>=7) (2.16.2) Requirement already satisfied: pyrsistent!=0.17.0,!=0.17.1,!=0.17.2,>=0.14.0 in /usr/local/lib/python3.8/dist-packages (from jsonschema>=2.6->nbformat->notebook>=4.4.1->widgetsnbextension~=3.6.0->ipywidgets<8,>=7) (0.19.2) Requirement already satisfied: importlib-resources>=1.4.0 in /usr/local/lib/python3.8/dist-packages (from jsonschema>=2.6->nbformat->notebook>=4.4.1->widgetsnbextension~=3.6.0->ipywidgets<8,>=7) (5.10.0) Requirement already satisfied: attrs>=17.4.0 in /usr/local/lib/python3.8/dist-packages (from jsonschema>=2.6->nbformat->notebook>=4.4.1->widgetsnbextension~=3.6.0->ipywidgets<8,>=7) (22.1.0) Requirement already satisfied: zipp>=3.1.0 in /usr/local/lib/python3.8/dist-packages (from importlib-resources>=1.4.0->jsonschema>=2.6->nbformat->notebook>=4.4.1->widgetsnbextension~=3.6.0->ipywidgets<8,>=7) (3.11.0) Requirement already satisfied: ptyprocess in /usr/local/lib/python3.8/dist-packages (from terminado>=0.8.1->notebook>=4.4.1->widgetsnbextension~=3.6.0->ipywidgets<8,>=7) (0.7.0) Requirement already satisfied: webencodings in
/usr/local/lib/python3.8/dist-packages (from bleach->nbconvert<6.0->notebook>=4.4.1->widgetsnbextension~=3.6.0->ipywidgets<8,>=7) (0.5.1) Installing collected packages: jedi
Successfully installed jedi-0.18.2
Stable Diffusion Pipeline
StableDiffusionPipeline is an end-to-end inference pipeline that we can use to generate images from text with just a few lines of code.
First, we load the pre-trained weights of all components of the model. In this case, we use Stable Diffusion version 1.4 (CompVis/stable-diffusion-v1-4)
import torch from diffusers
import StableDiffusionPipeline
pipe =StableDiffusionPipeline.from_pretrained("CompVis/stable-diffusion-v1-4", torch_dtype=torch.float16)
Out:
Downloading: 0%| | 0.00/543 [00:00Next, let’s move the pipeline to GPU to have faster inference.
pipe = pipe.to("cuda")
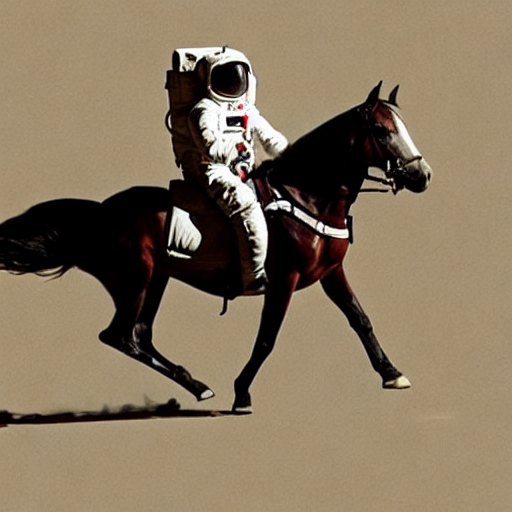
And we are ready to generate images:
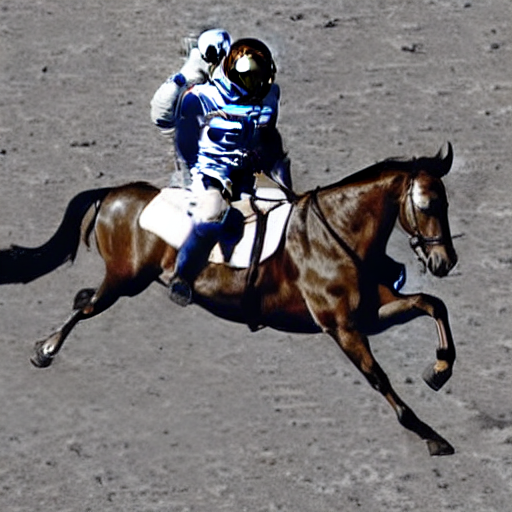
prompt = "a photograph of an astronaut riding a horse"
image = pipe(prompt).images[0] # image here is in PIL format
Next, let’s move the pipeline to GPU to have faster inference.
And we are ready to generate images:
prompt = "a photograph of an astronaut riding a horse"
image = pipe(prompt).images[0] # image here is in PIL format
Out:
0%| | 0/50 [00:00
Running the above cell multiple times will give you a different image every time. If you want a deterministic output, you can pass a random seed to the pipeline. Every time you use the same seed, you’ll have the same image result.
import torch
generator = torch.Generator("cuda").manual_seed(1024)
image = pipe(prompt, generator=generator).images[0]
image
Out:
0%| | 0/50 [00:00
We can change the number of inference steps using the num_inference_steps argument. In general, results are better the more steps we use. Stable Diffusion, being one of the latest models, works great with a relatively small number of steps, so we recommend using the default of 50. If you want faster results, you can use a smaller number.
The other parameter in the pipeline call is guidance_scale. It is a way to increase the adherence to the conditional signal which, in this case, is text as well as overall sample quality. In simple terms, classifier free guidance forces the generation to better match with the prompt. Numbers like 7 or 8.5 give good results; if you use a very large number the images might look good, but will be less diverse.
To generate multiple images for the same prompt, we simply use a list with the same prompt repeated several times. We’ll send the list to the pipeline instead of the string we used before.
Let’s first write a helper function to display a grid of images. Just run the following cell to create the image_grid function, or disclose the code if you are interested in how it’s done.
from PIL import Image
def image_grid(imgs, rows, cols):
 assert len(imgs) == rowscols
 w, h = imgs[0].size
 grid = Image.new('RGB', size=(colsw, rowsh))
 grid_w, grid_h = grid.size
 for i, img in enumerate(imgs):
 grid.paste(img, box=(i%colsw, i//cols*h))
 return grid
Now, we can generate a grid image once having run the pipeline with a list of 4 prompts.
num_images = 4
prompt = ["Create a hyperrealistic, cinematic scene in a 16:9 aspect ratio, captured through the perspective of a 50mm lens and in stunning 4K resolution. Depict King David in a public worship setting, showcasing his adoration and devotion. King David should be shown in a reverent and humble posture, surrounded by a crowd of people, all engaged in worship. The scene should exude a sense of spiritual fervor and collective praise. Utilize lighting techniques to create a warm and inviting atmosphere, with soft light falling on King David and the worshippers. Optimize the image quality to showcase the intricate details of King David's features and the expressions of the worshippers, capturing the authenticity and emotion of the moment. This scene should convey the deep connection between King David and his people, highlighting the power of worship and devotion --ar 16:9"] * num_images
images = pipe(prompt).images
grid = image_grid(images, rows=1, cols=4)
grid
Out:
0%| | 0/50 [00:00

Closing Thoughts
Now that you have got a basic idea of how Stable Diffusion works, and the code implementation, we can experiment it to generate our own art.
Follow the steps above to build, deploy, launch and scale your own Text-to-Image platform using E2E Cloud today. If you need further help, do feel free to reach out to sales@e2enetworks.com.