Every so often, a research paper comes out that seems to be about one thing, but is secretly and much more excitingly about something else entirely. The new DeepSeek-OCR paper is a perfect example. On the surface, it's a powerful new model for Optical Character Recognition (OCR). But hidden inside this paper is a brilliant experiment that tackles one of the biggest challenges for Large Language Models (LLMs): processing long documents. Here's the core problem: Large Language Models (LLMs) face a significant computational challenge when processing long textual content. This is because the processing cost doesn't just grow linearly with the length of the document—it often scales quadratically. In simple terms, this means a 10x longer document isn't just 10x harder to process, but potentially 100x harder. This quadratic scaling makes feeding long documents, like a 50-page report, incredibly slow and expensive.
The DeepSeek team asked a radical question: What if the best way to "feed" a long document to an AI isn't as text at all? What if a 2D image of a page could serve as a highly efficient "compressed" file for the 1D text it contains? This idea is what the paper calls "optical compression".
Even Andrej Karpathy noted, the DeepSeek-OCR paper raises a deeper question: are pixels a better input for LLMs than text? He suggests that our current text tokens might be "inherently wasteful" and just "historical baggage" that could eventually be replaced by visual inputs for greater efficiency.
![]()
But how could you even test such a thing? You would need a model that can take the "compressed file" (the image) and "decompress" it (spit out the original text) with perfect accuracy.
This makes OCR the natural, perfect test bed for the idea. The task is the experiment. Can a model look at a picture of a page and reconstruct all 1,000 words from it? If it can, how "small" can we make the visual data and still have it work?
This is what DeepSeek-OCR is really all about. It's an architecture designed from the ground up to test this hypothesis. It's less of a simple OCR tool and more of a proof-of-concept for a new way of thinking about context. To do it, they had to build a special "smart compressor" to turn the image into a tiny, information-rich package for the language model to read. And in the process of proving this hypothesis, they just so happened to create a state-of-the-art OCR model. As the paper shows, on the OCR benchmark OmniDocBench, DeepSeek-OCR surpasses strong competitors like GOT-OCR 2.0 while using only 100 vision tokens (compared to 256 for GOT-OCR2.0). This OCR benchmark demonstrates DeepSeek-OCR's efficiency, as it also outperforms massive models like MinerU2.0, which requires over 6,000 tokens per page on average to do the same job. In this article, we will dissect the architecture behind this simple but brilliant idea and understand how it works under the hood. In the end, we will also learn how you can run the model on E2E Networks AI Platform. For a comprehensive comparison of open-source OCR models including DeepSeek-OCR, GOT-OCR, PaddleOCR, and others, see our complete guide to OCR models for 2025.
Get ₹2,000 free credits to test your AI workloads
Sign up and complete ID verification to unlock free credits. Deploy on NVIDIA H200, H100, and L40S GPUs—no commitment required.
What is DeepSeek-OCR?
DeepSeek-OCR is an open-source OCR model that uses "optical compression" to process documents 10x more efficiently than competing models. It achieves 97% accuracy while using only 100 vision tokens per page, compared to 256+ tokens for other state-of-the-art models like GOT-OCR 2.0 and 6,000+ tokens for MinerU 2.0. This enables faster inference, lower computational costs, and more efficient document processing pipelines.
The Problem with Previous Approaches
Before we dive into DeepSeek's solution, it's helpful to know what everyone else was doing and why it wasn't good enough for this "optical compression" idea. Most modern vision language models (VLMs) use one of three main strategies to "see" a document, all of which have some problems. Unlike traditional vision language models that process documents with 256-6,000 tokens, DeepSeek-OCR's optical compression approach requires only 100 tokens per page.

1. The Dual-Tower Approach (like Vary)
How it works: Two encoders running in parallel
- One for low-resolution (captures layout)
- One for high-resolution patches (captures detail)
The problem: Combining two separate outputs is complex, requires dual pre-processing, and is difficult to deploy and train efficiently.
2. The Tiling Approach (like InternVL)
How it works: Cuts the image into small tiles (e.g., 384×384 pixels) and processes each separately
The problems:
- Creates a massive number of vision tokens (one set per tile)
- Loses spatial context—the model can read Tile A and Tile B but doesn't know their relative positions
3. The Adaptive Approach (like Qwen2.5-VL)
How it works: Processes the entire high-resolution image in one shot
The problem: Generates a massive number of vision tokens proportional to image size, leading to extreme memory usage and potential GPU out-of-memory errors.
The common theme here? All these methods generate a massive amount of vision tokens. This is the central bottleneck. Because the attention mechanism in a Transformer scales quadratically, doubling the number of tokens doesn't just double the computation - it can square it. This leads to high GPU memory usage and much slower processing times, defeating the purpose of compression. And in OCR applications we require very fast processing times.
This is shown perfectly in the benchmark chart below.
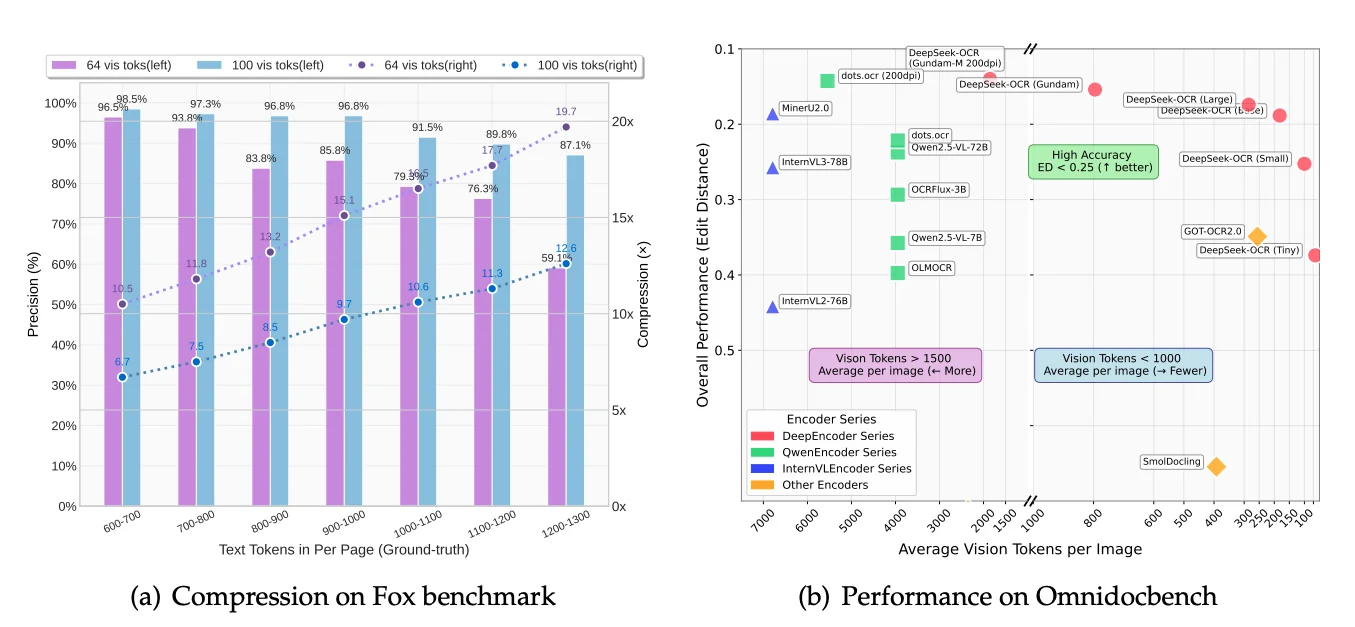
Look at the X-axis, "Average Vision Tokens per Image." You'll see models like MinerU2.0 and InternVL clustered on the far left, using an average of 6,000 to 7,000 vision tokens per page. This is the problem DeepSeek set out to solve. Now, look at the far right of that same chart. You'll see the DeepSeek-OCR models. They are achieving better performance (a lower edit distance) while using dramatically fewer tokens. Some versions use fewer than 800 tokens on average. This chart tells the whole story. The older methods are computationally heavy. The DeepSeek-OCR architecture, which we are about to explore, is designed for efficiency.
Get ₹2,000 free credits to test your AI workloads
Sign up and complete ID verification to unlock free credits. Deploy on NVIDIA H200, H100, and L40S GPUs—no commitment required.
The Architecture: A Deep Dive into "Optical Compression"
At its heart, the DeepSeek-OCR model is an elegant solution. Imagine trying to read an entire, full-sized newspaper page laid out on a table. If you're too far away, you can see the layout (the headlines, the columns, the advertisements) but the text is just a blurry line. If you press your face against the paper, you can read a single word, but you have no idea where you are on the page.

Standard vision models face a similar challenge. They either shrink the high-resolution image, losing all the fine detail (the "blurry newspaper" problem), or they try to process every pixel, creating a massive number of "vision tokens" that is computationally expensive and slow.
DeepSeek-OCR is engineered to solve this. Its inspiration is not just to build a better OCR, but to test a fundamental hypothesis: can a 2D image act as a highly efficient "compressed" format for 1D text?
To achieve this, the architecture is split into two main components: a highly specialized Encoder and an efficient Decoder.
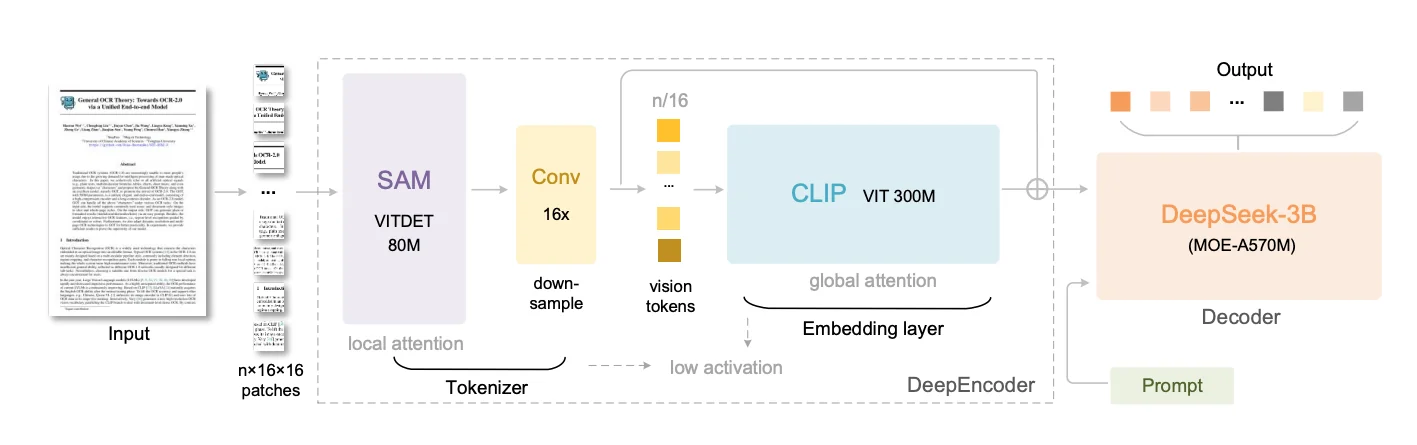
The DeepEncoder: The "Smart Compressor"
The real magic happens in the encoder, which the paper calls DeepEncoder. This isn't one single model but a specialized, three-stage assembly line, with each stage passing its results to the next.
Let's trace the journey of a single image to see how this works.
Stage 1: The Perceiver (SAM Encoder)
- What it is: The image first enters a pretrained SAM (Segment Anything Model) image encoder. SAM was introduced by Meta in April 2023 as a "foundation model for image segmentation." Its purpose was to segment any object in any image with zero-shot generalization, for which it was trained on a massive dataset of over 1 billion segmentation masks.
- Why this is perfect: For this architecture, we aren't using SAM's segmentation output. We are using its powerful ViT (Vision Transformer) encoder. Because SAM was trained to be a master of segmentation, its encoder backbone became incredibly good at understanding visual "perception" - things like boundaries, object relationships, and layout. This is the exact skill set needed to perceive the structure of a document.
- How it works: Like all Vision Transformers, it first "sees" the image by dividing it into a grid of pixel patches. For our image, this creates patch tokens. This is a massive number of tokens. This first-stage SAM encoder is a relatively small 80M parameter model that uses window attention. This means it processes the 4096 tokens in small, local groups or "windows" rather than trying to compare every token to every other token. This design choice dramatically reduces the computational load and keeps activation memory low, making it possible to handle the high-resolution input with lower latencies and memory usage. Its job is to act as the initial "perceiver," analyzing the local shapes and layouts of the document.
Stage 2: The Compressor (Convolutional)
- What it is: The 4096 feature tokens from SAM, now encoded with rich perceptual information, are immediately fed into a 16x convolutional compressor. This "neck" is part of the SAM encoder's architecture, and it's the core of the compression.
- How it works: It's a series of 2D convolutional layers that downsample the feature tokens (not the image). It takes the 4096 tokens and downsample them to 256 tokens doing a 16x compression ().
We now have a tiny, 256-token summary of the original image, but it's a "smart" summary, rich with the perceptual features extracted by SAM. This is the crucial step that makes the next stage possible.
Stage 3: The Knower (CLIP Encoder)
- What it is: This compact set of 256 tokens is now passed to the final stage: a pretrained CLIP (Contrastive Language-Image Pre-Training) image encoder. CLIP was introduced by OpenAI in January 2021. Its goal was to connect images and text in a shared "embedding space." It was trained on 400 million image-text pairs from the internet, learning to associate visual concepts (like a picture of a dog) with language concepts (like the words "a photo of a dog").
- Why this is perfect: While SAM is a master of perception (where are the boundaries?), CLIP is a master of knowledge and meaning (what is this object?). By using CLIP's pretrained image encoder (specifically a 300M parameter ViT-L model), this architecture gains a deep, semantic understanding of the document's content.
- How it works: This is where the type of attention flips. Because we are now dealing with only 256 tokens (thanks to the compressor), this larger, more powerful model can afford to use dense global attention. It compares every single token to every other token, building a holistic, global understanding of the page. The global attention can now analyze the relationships between the compressed tokens.
The entire DeepEncoder flow is a brilliant serial design: Perceive Locally (SAM) Squeeze (Compressor) Understand Globally (CLIP).
Handling Any Document: The "Gundam" Strategy
The process above describes encoding one image. But what about our "blurry newspaper" problem? A single, shrunken-down view might capture the layout but will blur tiny text into unreadability.
This is where the "Gundam" mode comes in—the model's advanced multi-view strategy for handling real-world, high-resolution documents.
Think of it as a two-level patching system:
Level 1: Gundam Tiling (Pre-processing)
Happens before the encoder. Creates two types of views from the original high-res image:
The Global View:
- The entire document shrunk to base resolution (e.g., )
- Purpose: Capture complete page layout
- Think: "Zoomed-out" perspective
The Local Views:
- Original high-res image sliced into large tiles (e.g., )
- These are NOT the 16×16 patches—they're large, high-fidelity close-ups
- Purpose: Read fine-grained text
- Think: "Zoomed-in" detail shots
Level 2: ViT Patching (Inside the Encoder)
The DeepEncoder receives all views (e.g., 1 Global + 4 Local) and processes each independently.
The SAM component divides every input into pixel patches:
| View Type | Resolution | Patches Created | After Compression |
|---|---|---|---|
| Global View | 256 tokens | ||
| Each Local View | 100 tokens |
Each set of patches goes through the full pipeline: SAM → Compressor → CLIP
In essence: Gundam feeds the encoder multiple images (global + local tiles), and the encoder applies its internal 16×16 patching to all of them.
The Final Token Sequence
This multi-view strategy produces multiple sets of final tokens, which are then combined into one master sequence for the decoder. Let's use a concrete example:
- 1 Global View (): Is divided into 4096 patches, which are processed by the full encoder pipeline and compressed by to final tokens.
- 4 Local Views (e.g., 4 tiles at ): Each tile is divided into 1600 patches, processed by the full encoder pipeline, and compressed by to tokens each. This gives us a total of local tokens.
The model flattens all tokens from the local views first, then concatenates all tokens from the global view, and finally appends a single, special [VIEW_SEPARATOR_TOKEN] at the very end.
The final sequence fed to the language model looks like this:
[All_Local_Tokens_Stitched] [All_Global_Tokens_Stitched] [SEPARATOR_TOKEN]
In our example, this would be a single sequence of ( tokens. This is the final package, containing the zoomed-in details to read the text and the zoomed-out context to understand the layout, all in one hyper-efficient package.
The Decoder: The "Efficient Brain"
Once the DeepEncoder has crafted its compact sequence of vision tokens (like the 657 tokens in our example), this sequence is ready for the second main component: the Decoder. This is the language model that reads the visual information and your text prompt, then writes the final output.
What it is:
- The decoder is a DeepSeek-3B-MoE model. The "3B" indicates it has the potential capacity of a 3-billion-parameter model, but the "MoE" (Mixture of Experts) part is the key to its efficiency.
Why it's a good fit for this task:
- OCR is a demanding task. Unlike simple image captioning ("a cat sitting on a mat"), OCR often requires generating thousands of text tokens to reproduce the full content of a document page.
- Running a dense, multi-billion parameter model to generate that much text can be slow and computationally costly.
- The MoE architecture provides a way to get the performance of a larger model while keeping the inference cost (the computation needed to generate text) significantly lower. This makes it ideal for the high-throughput demands of OCR.
How it works:
- Mixture of Experts (MoE) Explained: Think of a standard large language model (LLM) as one giant brain trying to know everything. An MoE model is different. It's like having a team of specialists (the "experts") and a smart dispatcher (the "router" or "gating network").
- The Experts: In the DeepSeek-3B-MoE model used here, there are 64 distinct "expert" networks available within certain layers of the model. Each expert is like a smaller neural network (often just a specific part like the Feed-Forward Network layer in a Transformer block).
- The Router: When the model needs to process a token (whether it's part of your text prompt or one of the visual tokens from the encoder), the router looks at that token and intelligently decides which experts are best suited to handle it.
- Sparse Activation: Instead of activating all 64 experts, the router selects only a small number—in this case, just 6 out of the 64—to process that specific token.
- Shared Experts: Additionally, the DeepSeekMoE architecture includes 2 "shared" experts that are always activated for every token. These shared experts likely handle common, fundamental language processing tasks, ensuring a baseline level of coherence and knowledge integration, while the 6 routed experts provide specialized insights based on the token's context.
- Efficiency: Because only a small fraction of the model (2 shared + 6 routed experts) is activated for each token, the total computation is drastically reduced compared to activating the entire 3-billion-parameter equivalent. This model activates roughly 570 million parameters per token.
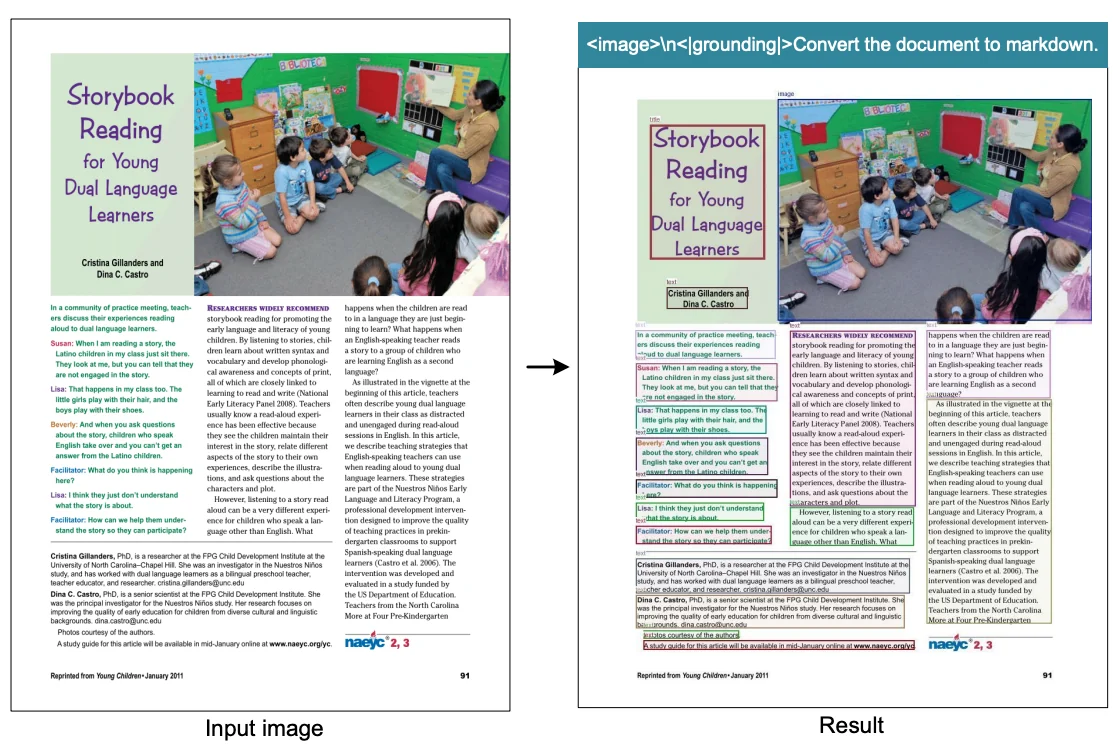
- Input Processing: The decoder receives a single, combined sequence. It starts with your text prompt (e.g.,
<image>\n<|grounding|>Convert the document to markdown.), but the special<image>token has been replaced by the entire sequence of visual tokens generated by the DeepEncoder (e.g., our 657 vision tokens). - Generating Text: The MoE decoder then processes this combined sequence, using its router to selectively engage experts for each token. It generates the final output text (like the Markdown version of the document) one token at a time, predicting the next most likely word based on both the visual information and the text generated so far.
By pairing the highly efficient DeepEncoder with the computationally efficient MoE Decoder, the DeepSeek-OCR architecture achieves a remarkable balance: it can process high-resolution images to capture fine details while generating extensive text output with impressive speed and resource efficiency.
Training Details: Crafting the Compressor
Building a model like DeepSeek-OCR isn't just about clever architecture. It requires a massive, carefully curated dataset and a thoughtful training strategy.
The Dataset Mix
The training data was carefully balanced to create a model that excels at OCR while maintaining broader vision-language capabilities:
- 30 million PDF pages (covering ~100 languages): Provides broad understanding of typical documents across different scripts and layouts
- Specialized "OCR 2.0" data: Millions of synthetic images containing charts, chemical formulas, and geometric figures. This teaches the model to parse structure and meaning, not just recognize individual characters
- 100 million samples from LAION: General vision data to ensure the model doesn't become too narrowly specialized
- Pure text data (10% of mix): Maintains strong language understanding capabilities
Final blend: ~70% OCR data, 20% general vision, 10% text
| Data Type | Volume | Purpose |
|---|---|---|
| PDF pages | 30 million (100 languages) | Broad understanding of typical documents |
| "OCR 2.0" data | Millions of synthetic images | Charts, chemical formulas, geometric figures (teaches structure parsing) |
| General vision | 100M samples (LAION) | Maintains vision-language capabilities |
| Pure text | 10% of mix | Language understanding |
The Training Process: Two Distinct Stages
The training happened in two distinct stages, each with a specific purpose:
Stage 1: Train the Smart Compressor
- Target: DeepEncoder learns to compress images into information-rich tokens
- Method: Next-token prediction framework
- Data: OCR dataset + 100M LAION images
- Goal: Master the art of "visual compression" by taking any document image and creating a compact, meaningful visual summary
Stage 2: Connect the Brain
Once the DeepEncoder became an expert compressor, it was connected to the DeepSeek-3B-MoE decoder (the "efficient brain"). The system was then trained together on the full data mix.
Key architectural decision:
- Frozen components: SAM + Convolutional compressor (act as fixed "vision tokenizer")
- Trainable components: Only CLIP component + entire MoE decoder
- Focus: Teach the decoder to read and interpret the highly compressed visual tokens from the now-fixed initial stages
Training infrastructure: 20 nodes × 8 NVIDIA A100 GPUs with pipeline parallelism
The Results: How Good is the Compression?
After training this carefully designed model on a massive dataset, the crucial question remains: did the "optical compression" idea actually work?
The answer: remarkably well.

The model was tested on the Fox OCR benchmark using real English documents. The table above shows performance across two modes:
- Tiny mode: 64 vision tokens
- Small mode: 100 vision tokens
The Sweet Spot: Near-Lossless at 10x
Here's where things get interesting. For documents up to about 1,000 text tokens:
| Mode | Vision Tokens | Compression Ratio | Precision | What This Means |
|---|---|---|---|---|
| Small | 100 | 7x to 10x | ~97% | Nearly lossless! The visual representation holds almost all information |
| Tiny | 64 | up to 11x | >93% | Still excellent with even fewer tokens |
Think about it: You can compress a 1,000-token document down to just 100 vision tokens and reconstruct it with 97% accuracy. That's a 10x reduction with virtually no information loss.
Where the Limits Show Up
As documents grow longer (1100+ text tokens) and compression ratios push towards 20x:
- Precision starts dropping more noticeably
- The ultra-compact 64-token mode struggles
- Information loss becomes like trying to read text from a progressively blurrier image
The takeaway: There's a clear sweet spot around 10x compression where quality remains excellent. Push beyond that, and you're trading accuracy for size.
Real-World Performance
The numbers tell one story, but seeing is believing. The model handles complex document layouts, shapes, and structures with impressive accuracy:

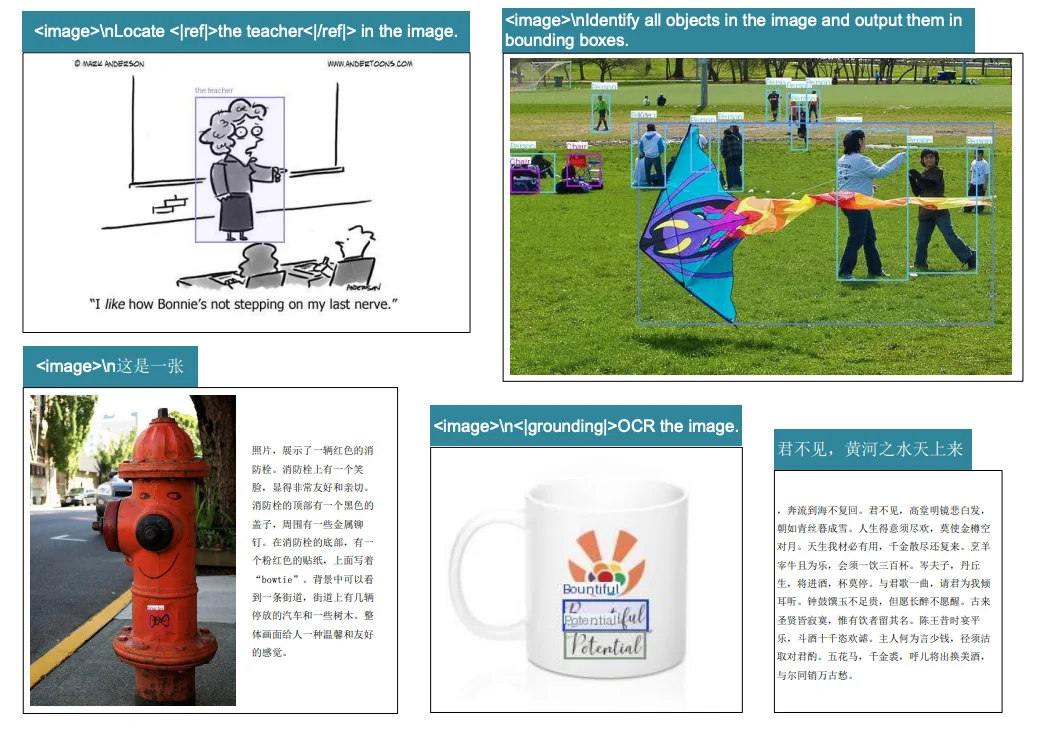
What stands out: this isn't just an OCR model. It handles document understanding tasks across the board, from tables to handwriting to complex formatting.
Running DeepSeek-OCR on E2E Cloud
Since the DeepSeek-OCR model is open-source (using a permissive MIT license), it's ideal for high-volume document processing applications. We can easily run it on the E2E Networks AI platform for efficient document processing workflows. While the creators provide examples using Hugging Face Transformers, they recommend using vLLM for production use cases, especially for faster inference speeds. We'll follow that recommendation and showcase how to set up and run the model using vLLM for offline batch document processing.
1. Setting Up Your GPU Instance
First, you'll need a GPU instance on the E2E Networks platform.
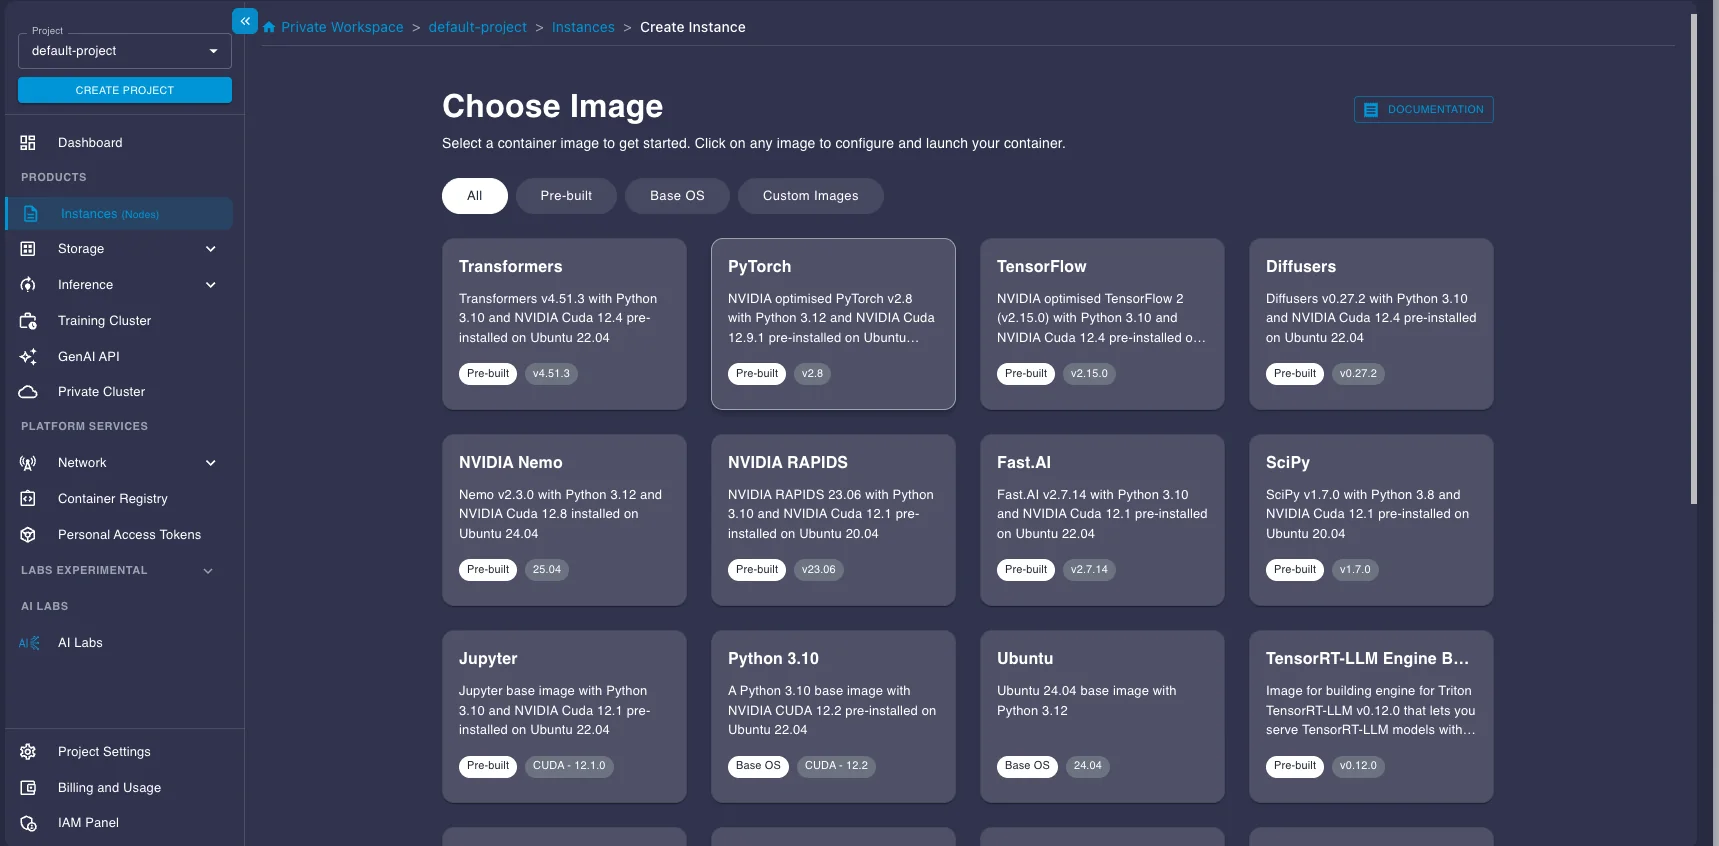
- Log in to your E2E Networks account and navigate to the Instances (Nodes) section under Products in the left sidebar.
- Click the CREATE INSTANCE button.

- You'll be asked to Choose Image. Select the PyTorch image under the Pre-built tab. This image comes pre-installed with NVIDIA drivers, CUDA, PyTorch, and other essentials, saving you setup time.
- Next, choose a Plan. Select a GPU instance suitable for running the model. Here we select a A100 instance.
- Choose your Instance Pricing. For cost savings, especially for batch jobs that don't need to run 24/7, select the Spot plan. Just be aware that spot instances can be interrupted.
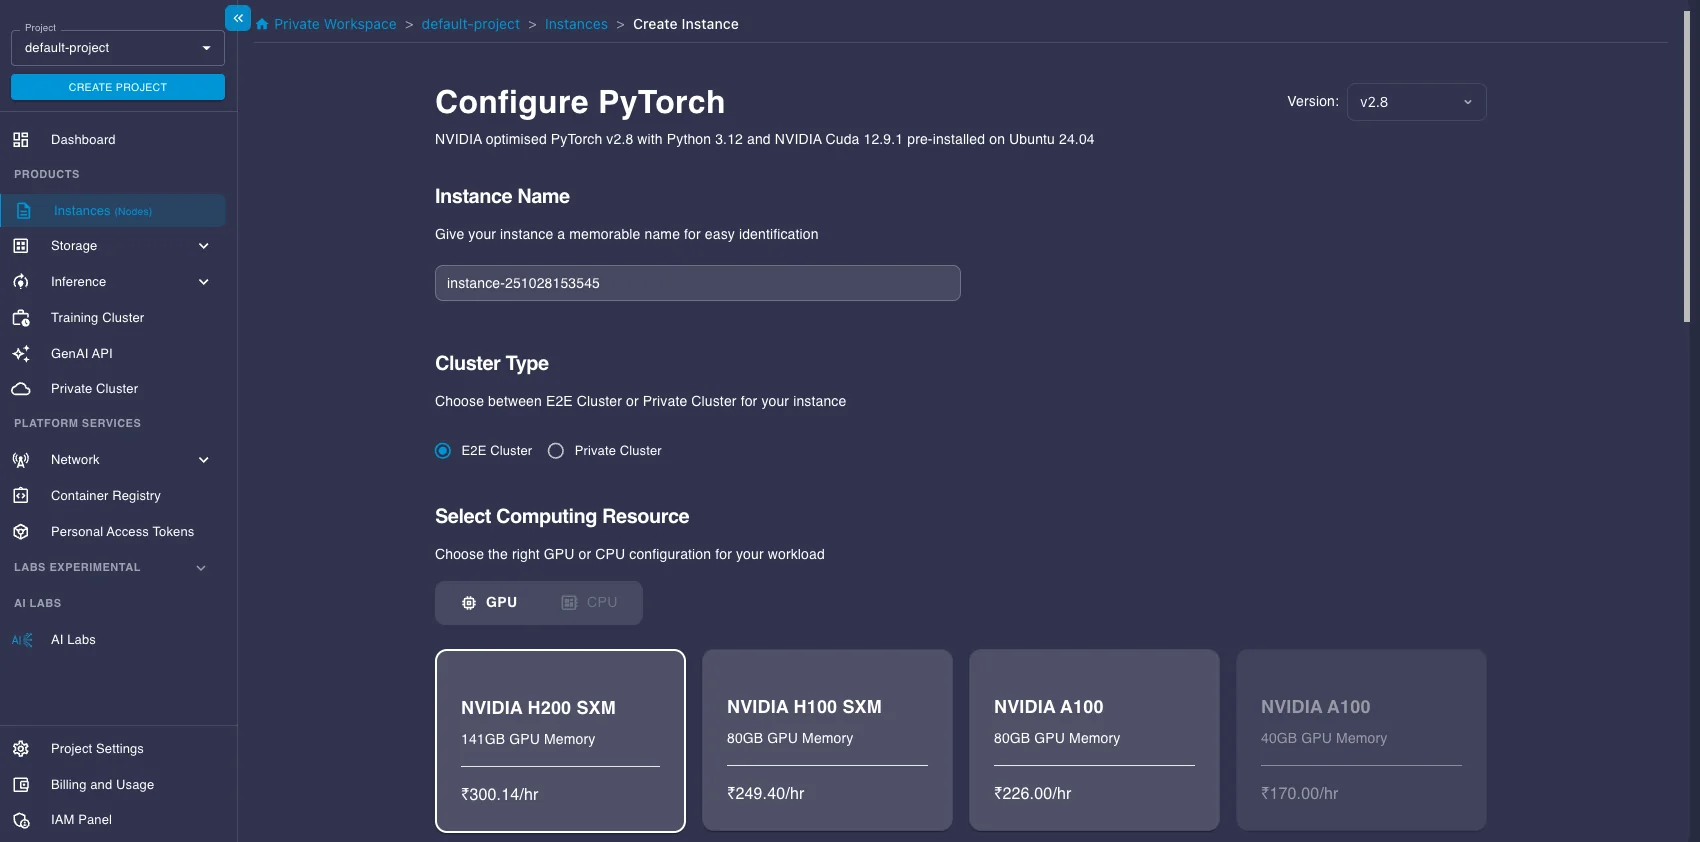
- Configure Storage (the default 30GB is likely enough to start, but add more if you have large datasets), add your SSH key for secure access, and configure any necessary Security Group settings.
- Click Launch Instance.
Connecting to Your Instance
Once your instance status shows as "Running," you can connect to it.
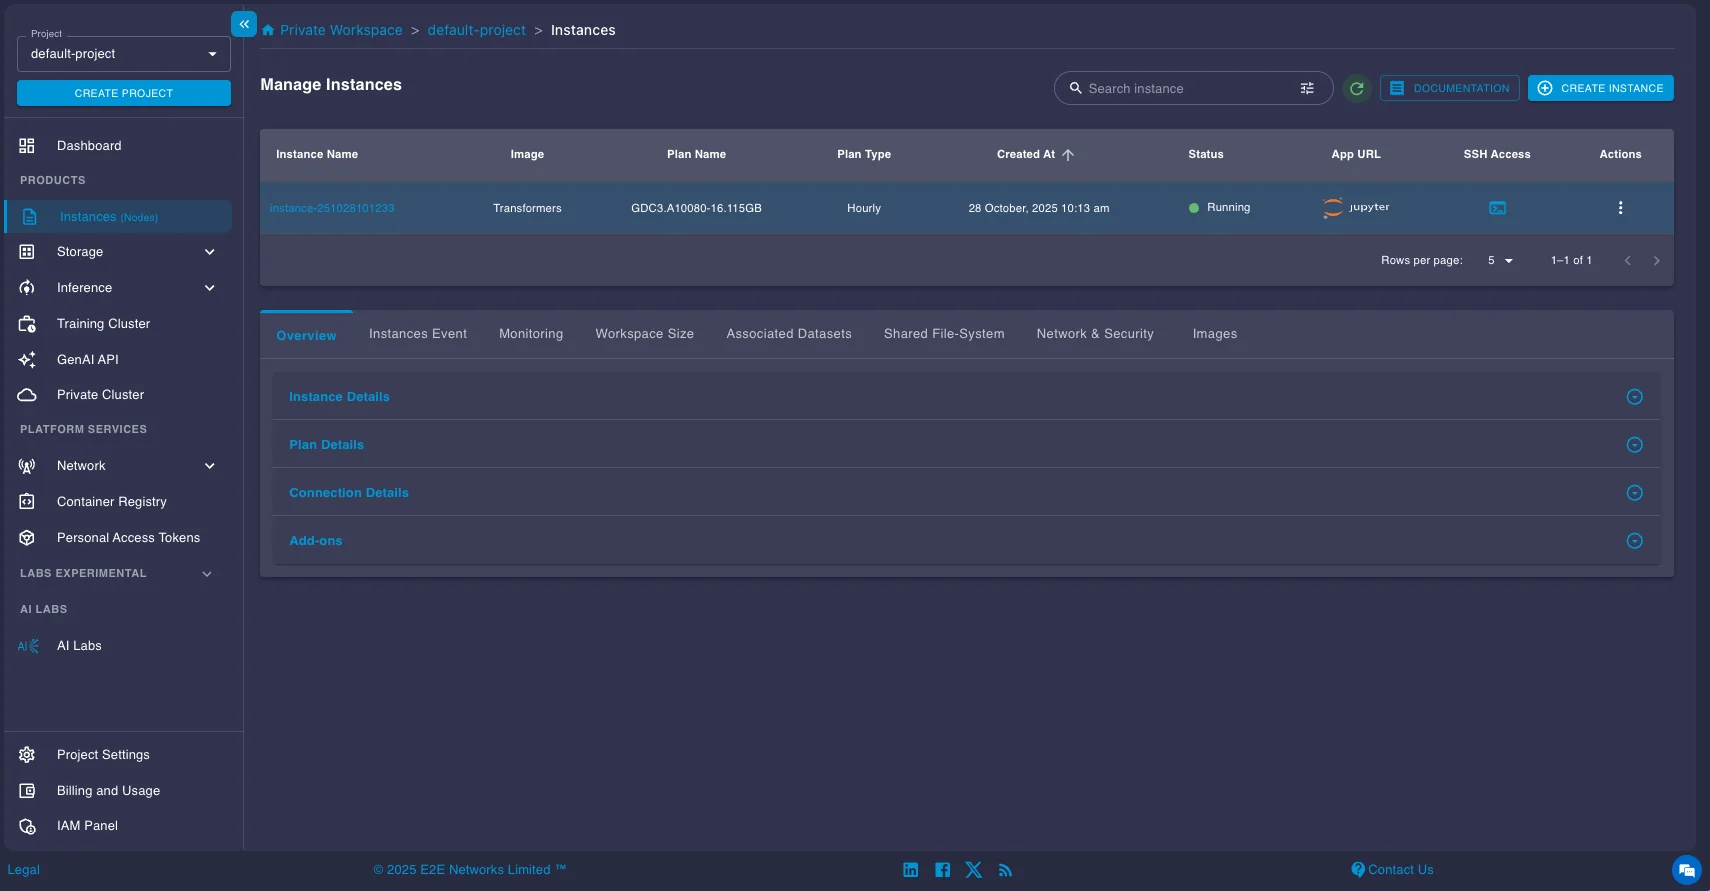
You have two main options:
- SSH: Use the provided SSH command in your local terminal or configure your favorite IDE (like VS Code with the Remote - SSH extension) to connect directly to the instance's IP address. This is usually the preferred method for development.
- Jupyter Lab: Click the Jupyter link provided in the instance details page to open a Jupyter Lab interface directly in your web browser.
Installing vLLM and running the model
DeepSeek-OCR requires the nightly build of vLLM as it is introduced recently. Open a terminal on your instance (either via SSH or within Jupyter Lab) and install it using pip:
pip install -U vllm --pre --extra-index-url https://wheels.vllm.ai/nightlyOnce you are done with the installation, you can now run the model. Here's a concise code snippet provided in the official vLLM documentation for running DeepSeek-OCR for batch processing:
from vllm import LLM, SamplingParams
from vllm.model_executor.models.deepseek_ocr import NGramPerReqLogitsProcessor
from PIL import Image

# Create model instance
llm = LLM(
    model="deepseek-ai/DeepSeek-OCR",
    enable_prefix_caching=False,
    mm_processor_cache_gb=0,
    logits_processors=[NGramPerReqLogitsProcessor]
)

# Prepare batched input with your image file
image_1 = Image.open("path/to/your/image_1.png").convert("RGB")
image_2 = Image.open("path/to/your/image_2.png").convert("RGB")
prompt = "<image>\nFree OCR."

model_input = [
    {
        "prompt": prompt,
        "multi_modal_data": {"image": image_1}
    },
    {
        "prompt": prompt,
        "multi_modal_data": {"image": image_2}
    }
]

sampling_param = SamplingParams(
            temperature=0.0,
            max_tokens=8192,
            # ngram logit processor args
            extra_args=dict(
                ngram_size=30,
                window_size=90,
                whitelist_token_ids={128821, 128822},  # whitelist: <td>, </td>
            ),
            skip_special_tokens=False,
        )
# Generate output
model_outputs = llm.generate(model_input, sampling_param)

# Print output
for output in model_outputs:
    print(output.outputs[0].text)
Understanding the Prompts and Output Format
DeepSeek-OCR works best with simple, direct prompts.
Prompt Options:
Here are the main prompt options and when to use them:
-
Use
<image>\nFree OCR.when you want plain text extraction. The output will be just the raw text from the image, without any layout information. -
Use
<image>\n<|grounding|>Convert the document to markdown.when you want to preserve the original document structure. The output will be in Markdown format, and will also include bounding boxes for detected elements.
Markdown Output Format (with Grounding)
When using the Markdown prompt, output includes special tags:
Recognized text segment... <|ref|>text<|/ref|><|det|>[[x1, y1, x2, y2]]<|/det|>
Another segment... <|ref|>title<|/ref|><|det|>[[x1, y1, x2, y2]]<|/det|>
Tag breakdown:
<|ref|>type<|/ref|>: Element type (text, title, table, figure, etc.)<|det|>[[x1, y1, x2, y2]]<|/det|>: Bounding box coordinates- Normalized to 1000×1000 grid (regardless of original image size)
(x1, y1)= top-left corner(x2, y2)= bottom-right corner
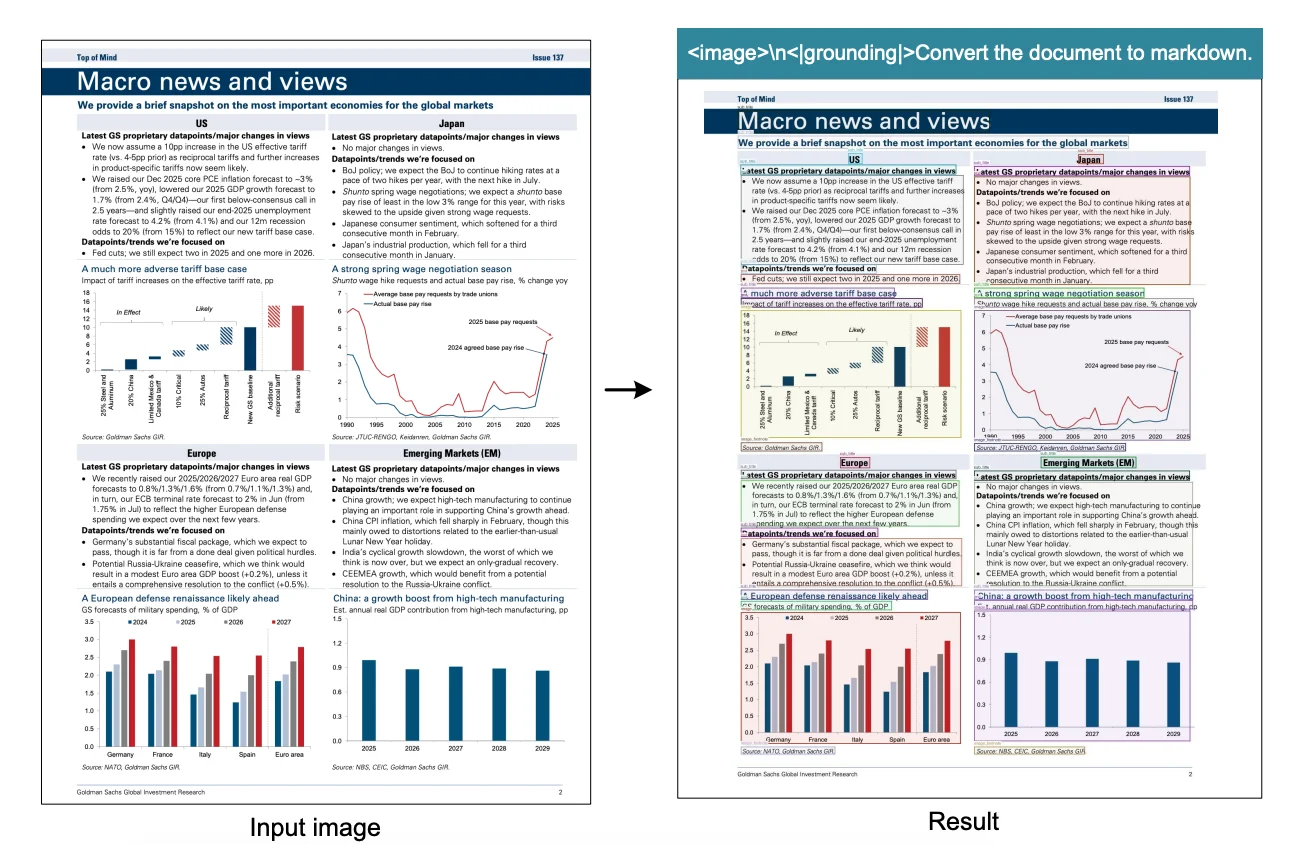
This bounding box information is incredibly useful as you can see in the above figure. You can parse these coordinates from the Markdown output and use a library like Pillow (PIL) in Python to draw rectangles directly onto the original image, visually highlighting the text segments, titles, tables, etc., that the model identified, as shown in the example image above.
Key Configuration Tips for Optimal Performance
| Configuration | Setting | Why It Matters |
|---|---|---|
| Custom Logits Processor | NGramPerReqLogitsProcessor | OCR output is long and repetitive (tables, lists). This prevents the model from getting stuck repeating token sequences, ensuring stable layout generation. |
| Disable Caching | enable_prefix_caching=False | Each page is unique—prefix and multi-modal caching add overhead without benefits for batch OCR jobs. |
| Use Plain Prompts | Keep prompts simple | Model performs best with direct instructions. See DeepSeek-OCR repo for more prompt examples. |
| Adjust Batch Parameters | Tune max_num_seqs or max_num_batched_tokens | GPU-dependent tuning can significantly improve throughput. |
Once you have the sample code above running, you can now modify it or run the model for any of your tasks.
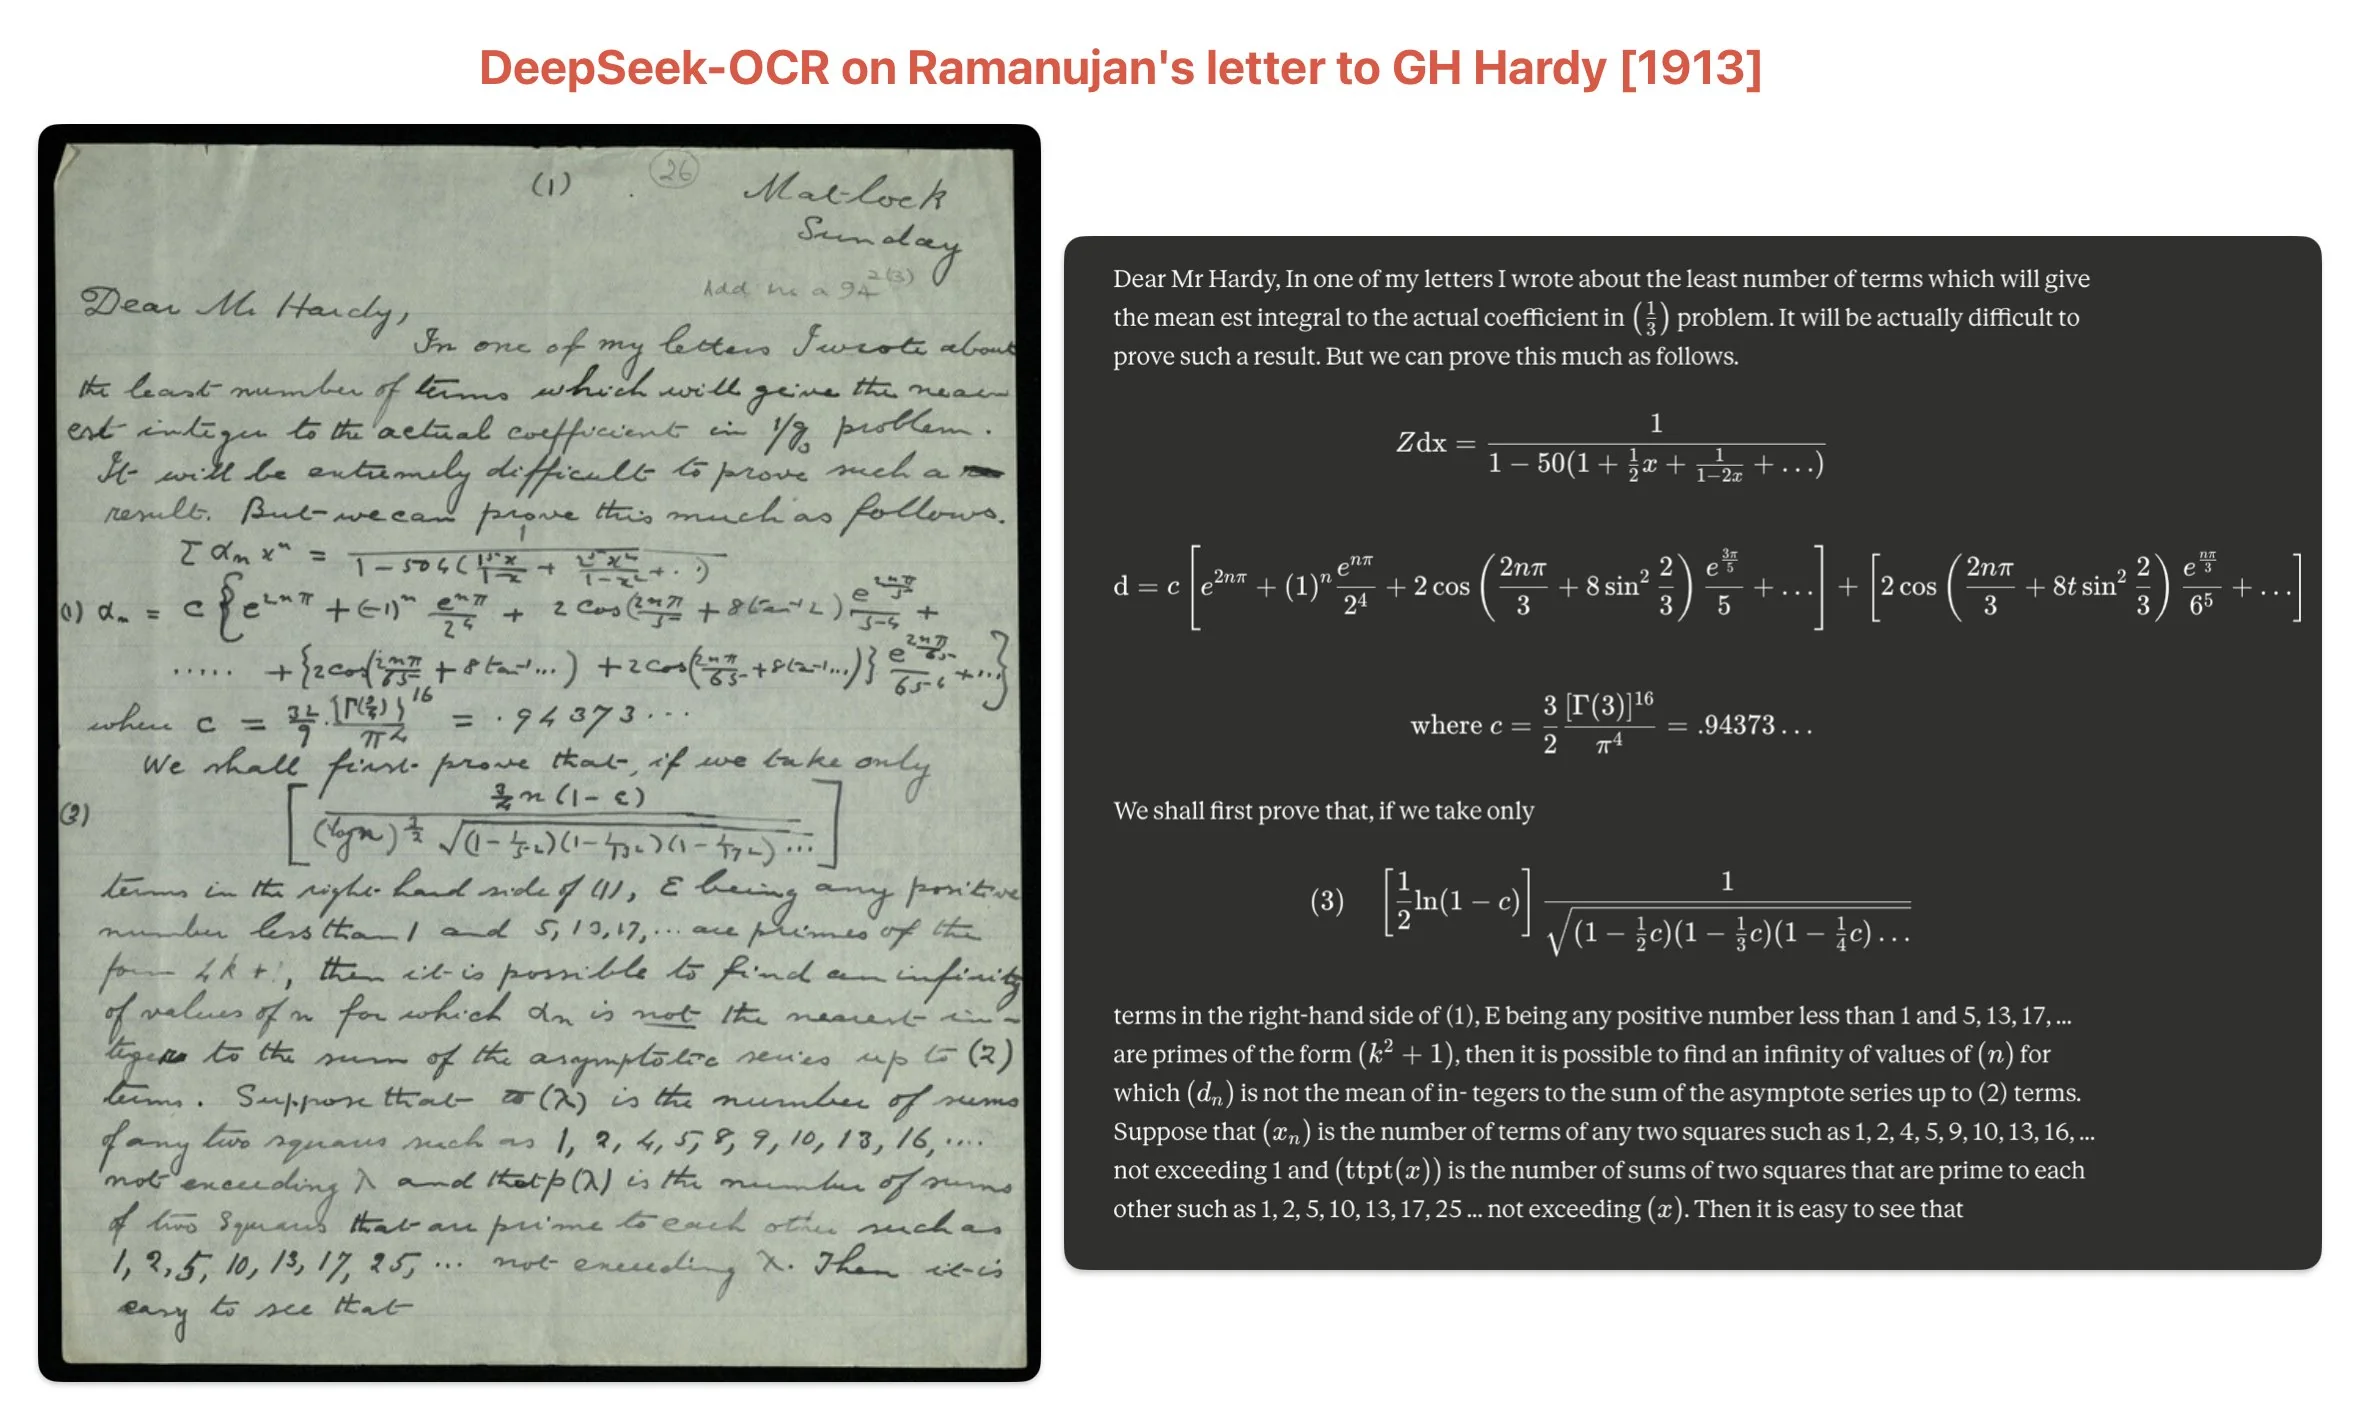
For example here's the result on a fairly difficult to read handwritten letter by Ramanujan to GH Hardy. It's doing an incredible job of parsing all the equations and letters.
The paper provides more such results and you are free to test out the model on your use-case specific documents.
Testing throughput on different GPUs
We ran batch inference effectively using the default "Gundam" mode settings (which the processor typically uses for large images passed via multi_modal_data={"image": image}) on the OmniDocBench dataset to get a sense of its speed on various E2E Networks GPU instances. Here are the approximate pages-per-second (PPS) we observed:
| GPU | Pages/sec (PPS) | Pages/day (Approx.) | Speedup vs A100 |
|---|---|---|---|
| NVIDIA A100 | 3.13 | ~270k | 1.00x |
| NVIDIA H100 | 4.65 | ~401k | 1.49x |
| NVIDIA H200 | 5.26 | ~455k | 1.68x |
As the table shows, the newer H100 and H200 GPUs offer significant speedups compared to the A100, achieving approximately 1.5x and 1.7x the throughput, respectively. This translates to processing an incredible number of pages per day (over 400k-450k), potentially exceeding the speed of many proprietary OCR solutions for large-scale batch tasks. These numbers give you an idea of the throughput you can expect for large-scale document processing tasks on the platform. Remember that actual performance can vary based on document complexity, image resolution, batch size, and other factors.
Conclusion
This exploration of DeepSeek-OCR reveals it's far more than just a new state-of-the-art document OCR model. The project is truly a proof-of-concept for a fascinating and powerful idea: using 2D images as a highly efficient compression format for 1D text. The central finding that the model can "decompress" a page of text with ~97% precision from visual data that is 10 times smaller is a significant breakthrough.
This "optical compression" concept offers a promising new direction for tackling one of the biggest challenges in AI: managing long-term context. The paper itself proposes intriguing applications, such as compressing a chatbot's dialogue history. Imagine a system where recent conversations are clear and high-fidelity, but older messages are progressively "forgotten" by being rendered into smaller, lower-resolution images. This would save massive amounts of computational resources, mimicking a human-like memory system.
Compared to cloud-based document AI services like Google Document AI or Azure Form Recognizer, DeepSeek-OCR runs entirely on your infrastructure, eliminating per-page API costs and ensuring complete data privacy. For organizations processing millions of pages monthly, this can reduce document AI costs from 1,000 in GPU infrastructure costs. The model is open-source and ready for production document processing tasks. As we demonstrated, it can be deployed for practical, high-throughput document processing pipelines that handle hundreds of thousands of pages daily.
Frequently Asked Questions
What is optical compression in OCR?
Optical compression is DeepSeek-OCR's approach to processing documents as compressed visual data rather than text tokens. It treats document images as "compressed files" that contain more information per token than traditional text representation, achieving 10x efficiency gains while maintaining 97% accuracy.
How accurate is DeepSeek-OCR?
DeepSeek-OCR achieves 97% accuracy on the OmniDocBench benchmark when processing documents up to 1,000 text tokens. It surpasses GOT-OCR 2.0 and matches or exceeds models that use 60x more tokens per page, demonstrating that optical compression maintains near-lossless quality at 10x compression ratios.
Can I run DeepSeek-OCR locally?
Yes, DeepSeek-OCR is open source with an MIT license and can be deployed on GPUs like NVIDIA A100, H100, or H200. The deployment guide above shows how to run it on E2E Networks cloud infrastructure using vLLM for production workloads.
Why use DeepSeek-OCR over other OCR models?
DeepSeek-OCR offers the best balance of accuracy (97%), efficiency (100 tokens/page vs 6,000+ for competitors), and computational cost. It's ideal for processing large document volumes where API costs become prohibitive, and it runs entirely on your infrastructure for data privacy and compliance.


