Introduction
Llama2-7b is a powerful open model by Meta that has proven itself on a number of benchmarks. The model is a pre-trained version, meaning it has been trained on a massive dataset of text and code to understand and generate different forms of text content. While the pre-trained version excels in various tasks, Meta also offers a fine-tuned version, called Llama-2-7b-chat, specifically optimized for engaging in dialogue and conversations. Both models are available through the Hugging Face Transformers library.
Llama2-7b is a great base foundational model for building LLMs for a range of use-cases. When fine-tuned, it can be used in a number of domains effectively:
- Healthcare: For tasks like analyzing medical reports, summarizing clinical trials, and generating patient education materials.
- Finance: To analyze financial documents, generate financial reports, and answer investor questions.
- Legal: To assist with legal research, analyze legal documents, and draft legal contracts.
- Customer service: To develop chatbots that understand customer queries and provide efficient and accurate responses in a specific domain.
- Scientific research: To analyze scientific literature, summarize research findings, and generate scientific reports.
- Language-specific models: To build models trained for specific languages, such as Indic languages like Hindi or Kannada or Tamil. In fact, it has been used as the base for the OpenHathi series of models.
Fine-tuning Llama2-7b is a technique that all developers should attempt at least once, in order to understand the nuances of fine-tuning LLMs.
In this article, we will showcase the steps to fine-tune Llama2 on E2E Cloud, with two different approaches. In the first approach, which is simpler, we will use TIR, the AI platform which takes care of most of the complexities for the developer. In the second approach, we will use a GPU node and fine-tune using code.
Before diving in, let’s understand how fine-tuning works in general.
Fine-Tuning (or Training) LLMs - High Level Breakdown
Fine-tuning LLMs like Llama2-7b involves several steps. Understanding these steps is essential for you to understand the code that we will showcase later.
Preparation
-
Download the pre-trained Llama2-7b model and tokenizer: These are typically available from the model’s repository on Hugging Face.
-
Prepare your domain-specific dataset: You can download a dataset, or prepare one yourself. You have to ensure the data is well-formatted and labeled appropriately for the desired task; otherwise your outcome would be suboptimal.
-
Choose your hardware: Fine-tuning Llama2-7b requires significant computational resources, so advanced GPUs with sufficient memory are recommended. We recommend A100s or H100s.
Preprocessing
-
Clean and pre-process your data: Often, you might want to reduce the dataset size, or remove irrelevant information. You would also need to ensure consistent formatting, in accordance with the model’s instruction template guidelines.
-
Tokenize your data: Convert the text data into numerical representations using the downloaded tokenizer.
Model Configuration
-
Load and configure the model: Use libraries like Transformers to load the pre-trained Llama2-7b model.
-
Define the fine-tuning task: Specify whether you want the model for tasks like text classification, question answering, or text generation. This will determine the model architecture adjustments needed.
-
Choose an adapter approach: Techniques like LoRA (Linear Regression Adapter) or QLoRA (Quantized LoRA) can be used to add domain-specific parameters to the pre-trained model efficiently.
Training
-
Choose a training script: Utilize libraries like Transformers or custom scripts to define the training loop and hyperparameters.
-
Set hyperparameters: Define critical parameters like learning rate, batch size, and training epochs, considering your dataset size and desired performance.
-
Start training: Train the model on your prepared dataset using your chosen optimizer and learning rate scheduler.
-
Monitor training: Track metrics like accuracy or loss to monitor the model's progress and adjust hyperparameters if needed.
Evaluation and Deployment
-
Evaluate the fine-tuned model: Use a held-out test set to assess its performance on unseen data.
-
Save the fine-tuned model: Save the trained model for future use in your application.
-
Integrate the model: Integrate the fine-tuned model into your application or system to leverage its capabilities for specific tasks.
So, in essence, every fine-tuning task can be broken down to these five high-level activities.
Let’s now see how to achieve these steps on E2E Cloud.
Approach 1 (Simpler): Steps to Fine-Tune Llama2 on TIR
TIR is a newly launched AI platform by E2E Cloud that simplifies the process of building, deploying and using AI models. As of today, TIR contains a number of key features that developers regularly need:
Pre-built containers: Use from a range of pre-built containers that contain the latest drivers and libraries pre-installed. Or build a custom container of your own.
Datasets: Download and create datasets that you can reuse for AI training or fine-tuning, either on EOS Object Bucket or on Disk.
Model repository: Create your own model repository, a feature that’s highly effective for enterprises looking to release models internally for their teams.
Inference endpoints: Create model endpoints, with models from the model repository you have created or from Hugging Face.
Pipelines: This is to build AI workflow pipelines, similar to the kind that Argo offers. This is especially powerful for low-code ML building.
Foundation studio: To either train or fine-tune foundational AI models, or harness foundational model APIs. This is the section we will leverage for Llama2 fine-tuning.
Integrations: For integrations with internal or external services. Eg, your integration with Hugging Face through access token would go here.
Now, let’s get started.
Once you have logged into Myaccount, click on ‘TIR - AI Platform’ on the top navigation bar. Next, click on the Foundation Studio on the left sidebar and then click on ‘Create Fine-tuning Job’ button on the top right.
Here you will find a simple wizard that will take care of the complexities of fine-tuning Llama2-7b.
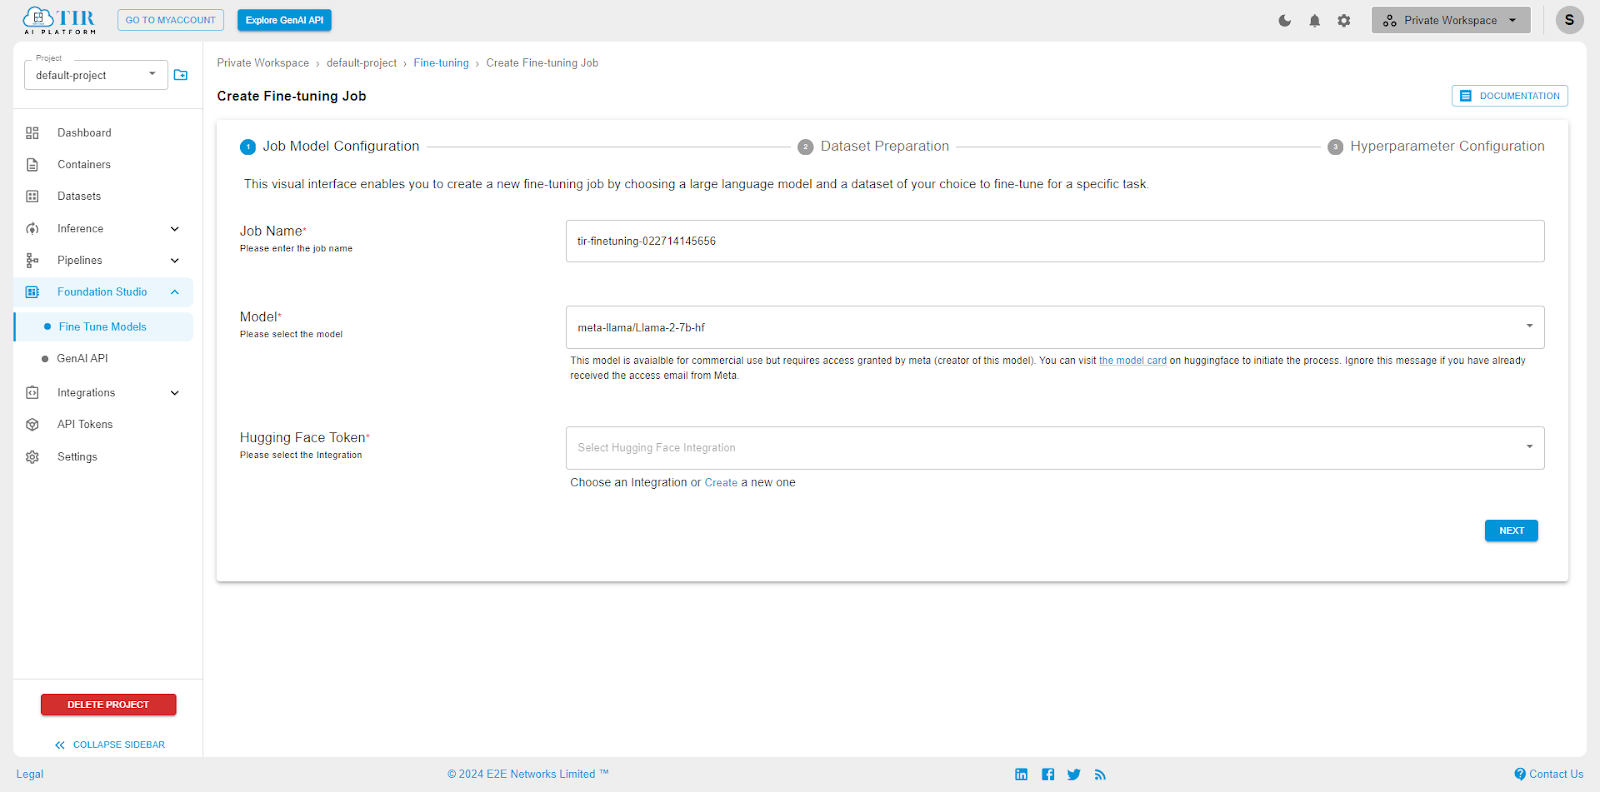
In the options, select the following:
Job Name: any name you want to assign your fine-tuning job.
Model: Select meta-llama/Llama-2-7b-hf (this is the base Llama2-7b model, and not the fine-tuned chat model released by Meta)
HuggingFace Token: Here, you would have to create a quick HuggingFace integration by entering your token from HuggingFace.
Once done, move to the next step. Here you will get to select a dataset or upload a custom one. Here are the options and the explanations for them:
Select task: You have to select one from ‘Instruction Fine-tuning’, ‘Text Classification’, ‘Summary Generator’, ‘Mask Modelling’, ‘Question Answering’ or other. In this task, we will choose instruction fine-tuning, but depending on your goal, you can select any of the other options. In the background the platform would design the instruction prompt according to the task selected, so the AI responds in the way you want.
Dataset type: Here, you have the option of choosing whether you will use an existing dataset from Hugging Face or create a custom one. Let’s choose the Hugging Face dataset ‘mlabonne/guanaco-llama2-1k’.
Target dataset field: You can let this be ‘text’. However, for custom datasets, you can set this field to the one which will be used for training.
Validation split ratio: This allows you to select a part of the dataset for validation, keeping the rest for the training of the model.

Now click next, and let’s see the Hyperparameter configuration.

In this, the following parameters are relevant:
Training Type: In most cases, this would be PEFT (or Parameter Efficient Fine-Tuning), where you would use LoRA for the fine-tuning process.
Context Length: The context length is the maximum number of tokens the model can remember when generating text. A longer context window allows the model to understand long-range dependencies in text better. Unless you use ROPE technique, the context length value here will be less than what the model was natively created with (in case of Llama2, that’s 4096 tokens). We will keep the 512 value as it is here.
Learning Rate: A learning rate of 1e-4 has become the standard when fine-tuning LLMs with LoRA. To deep-dive into this, and how it affects the other parameters, you should reference the original LoRA paper. Stop Training When: There are two options here: when epoch count is reached, or when step count is reached. If you choose step count here, you will need to set Max Steps in the next parameter. We will keep it to when epoch count is reached, and set the epoch count to a value between 2 to 10.
Epochs: An epoch signifies one complete pass of your fine-tuning dataset through the Llama2 model. In simpler terms: your fine-tuning dataset has a certain number of examples (let's say, 10,000 samples of text from your specific domain). One epoch means the Llama2 model has been exposed to all 10,000 samples and had a chance to learn from them. You can stick to 3, or increase the number, if the model doesn’t converge with just 3 epochs. The number of epochs is crucial for balancing the model's performance. Too few epochs, and the model might not have enough time to learn the nuances of your domain (underfitting). Too many epochs, and the model might start memorizing the specific examples in your dataset rather than learning generalizable patterns. This harms its ability to perform well on new, unseen data (overfitting). The ideal number of epochs depends on several factors, including dataset size, model complexity, and your specific task. It's usually determined through experimentation and by monitoring model performance on a validation set.
Max Steps: Each epoch is further divided into smaller portions called steps. This hyperparameter defines the total number of steps the training process will run on. You either control Epochs or Max Steps, not both.
PEFT LoRA R: LoRA introduces smaller, trainable matrices (adapters) into the model's layers, reducing the number of parameters that need to be updated during fine-tuning. This parameter (lora_r) controls the rank of these matrices added by LoRA. The rank of a matrix broadly refers to its dimensionality and how much information it can represent. The smaller the number, the faster the computation and lower the complexity of information captured. The higher the number, the higher the computation cost, and with higher complexity of information. Larger and more complex datasets often benefit from a higher lora_r (e.g., 32, 64) to capture more intricate information. Limited compute power may necessitate a lower lora_r (e.g., 16, 32) for faster and more efficient training. We recommend starting with 16 or 32, and then going up from there.
PEFT LoRA Alpha: The lora_alpha hyperparameter acts as a scaling factor that controls the magnitude of the updates to the LoRA adapters during fine-tuning. It directly influences how much the model learns from the new domain-specific data when using LoRA. With lower values, the model adapts to the new domain more gradually. With higher values, you risk overfitting. If your dataset is significantly different from the pre-trained LLM's data, a higher lora_alpha may be necessary to facilitate faster adaptation. If your dataset is small or overfitting is a concern, a lower lora_alpha might be safer.
As you will soon see, the decision on hyperparameter values in LLM training comes with experience of training models and then analyzing their performance.
Now, back to our training process. Once you have filled up the values, you will be asked to select the appropriate GPU. Select A100 or H100, and then click ‘Preview’. This will give you a view into the hyperparameters for fine-tuning that you have set, before you kickstart your fine-tune job.
Click on ‘Launch’ and your fine-tuning will begin.

After some wait, you will see your model show up in the ‘model repository’ tab on the left side.
As a next step, you can create an inference endpoint and test or use your model.
This concludes the steps to fine-tune using TIR. Next, let’s look at doing the same using a programmatic approach.
Approach 2 (Tougher): Steps to Fine-Tune Llama2 on GPU Node
In the previous section, we saw how to fine-tune Llama2-7b using TIR AI Platform. In this section, we will go through the process of launching a GPU node and fine-tuning the same model.
This approach is far more complex, but gives you an insight into what is going on underneath programmatically.
To start with, go back to the ‘Myaccount’ section of E2E Cloud, and then click on ‘Compute’ on the left sidebar.

Then, go ahead and launch an A100 node. Remember to add your SSH Key, so you can SSH into root later.
Once the machine has launched, you can use VS Code Remote Explorer extension to SSH into the node, and then create a workspace and launch a notebook. This gives you visibility into the machine, as well as the flexibility of using the Jupyter Notebook environment.
Now, let’s start with the code. We are going to assume that you know how to create a virtual environment (or select a kernel in Jupyter Notebook).
First, let’s install the pre-requisites.
!pip install accelerate peft bitsandbytes transformers trl
Next, let’s set the models we will use:
# Model from Hugging Face hub
base_model = "NousResearch/Llama-2-7b-hf"

# New instruction dataset

guanaco_dataset = "mlabonne/guanaco-llama2-1k"

# Fine-tuned model

new_model = "llama-2-7b-guanaco"
Now let’s import the libraries.
import os
import torch
from datasets import load_dataset
from transformers import (
    AutoModelForCausalLM,
    AutoTokenizer,
    BitsAndBytesConfig,
    TrainingArguments,
    pipeline,
    logging,
)
from peft import LoraConfig
from trl import SFTTrainer
We will use 4-bit quantization to perform our training. However, you can try out 8-bit quantization as well later.
compute_dtype = getattr(torch, "float16")
quantization_config = BitsAndBytesConfig(
    load_in_4bit=True,
    bnb_4bit_quant_type="nf4",
    bnb_4bit_compute_dtype=compute_dtype,
    bnb_4bit_use_double_quant=False,
)
Let’s now load the dataset and the model:
dataset = load_dataset(guanaco_dataset, split="train")
model = AutoModelForCausalLM.from_pretrained(
    base_model,
    quantization_config=quantization_config,
    device_map={"": 0}
)
model.config.use_cache = False
model.config.pretraining_tp = 1
Llama2 is a ‘causal’ model, and we are using the 4-bit quantization config. Let’s next load up the tokenizer:
tokenizer = AutoTokenizer.from_pretrained(base_model, trust_remote_code=True)
tokenizer.pad_token = tokenizer.eos_token
tokenizer.padding_side = "right"
We will now set up the PEFT parameters, which we explained before in the previous section. You will see them here as well:
peft_params = LoraConfig(
    lora_alpha=16,
    lora_dropout=0.1,
    r=64,
    bias="none",
    task_type="CAUSAL_LM",
)
As you can see above, lora_alpha and ‘r’ are the same as PEFT LoRA R and PEFT LoRA Alpha parameters in the TIR fine-tuning process.
We will also set up other training parameters now:
training_params = TrainingArguments(
    output_dir="./results",
    num_train_epochs=3,
    per_device_train_batch_size=4,
    gradient_accumulation_steps=1,
    optim="paged_adamw_32bit",
    save_steps=25,
    logging_steps=25,
    learning_rate=1e-4,
    weight_decay=0.001,
    fp16=False,
    bf16=False,
    max_grad_norm=0.3,
    max_steps=-1,
    warmup_ratio=0.03,
    group_by_length=True,
    lr_scheduler_type="constant",
    report_to="tensorboard"
)
We will again train on 3 epochs, like we did before, and use the learning rate we used before as well. Feel free to play with this if your trained model doesn’t perform well. We will keep max_steps as -1, since we are using epochs to control our training process.
Some of the parameters you haven’t seen in the previous section (present in the ‘advanced’ mode) can be tuned here additionally:
er_device_train_batch_size: batch size per GPU for training.
gradient_accumulation_steps: refers to the number of steps required to accumulate the gradients during the update process.
warmup_ratio: ratio of steps for a linear warmup
We will use Supervised Fine-Tuning in our case (SFT), and provide the above Training Arguments to the trainer.
trainer = SFTTrainer(
    model=model,
    train_dataset=dataset,
    peft_config=peft_params,
    dataset_text_field="text",
    max_seq_length=None,
    tokenizer=tokenizer,
    args=training_params,
    packing=False,
)

trainer.train()
This above kickstarts the training process. Once the training job completes, you can save the model weights and the tokenizer.
trainer.model.save_pretrained(new_model)
trainer.tokenizer.save_pretrained(new_model)
Finally, once the training process is completed, you can test out the model using the code below.
prompt = "Where is Italy?"
pipe = pipeline(task="text-generation", model=model, tokenizer=tokenizer, max_length=200)
result = pipe(f"[INST] {prompt} [/INST]")
print(result[0]['generated_text'])
This will generate great output, and you can now use the model for building a RAG pipeline or just as it is.
Additionally, in future, if you are planning to fine-tune regularly, you can also use frameworks like Axolotl or Argo, which help you orchestrate the entire pipeline yourself. We will not get into that in this article, but will dive into it in a future one.
Final Note
As you saw in this article, there are two ways you can train or fine-tune models on E2E Cloud. The first one allows you to achieve the task with zero code, and is highly effective if you are looking to get to your trained model endpoint fast. The second section shows how to do the same using GPU nodes, where you actually control the entire process programmatically yourself.
If you are looking to fine-tune Llama2 on E2E Cloud, and need our help with the right approach, do feel free to reach out to sales@e2enetworks.com and we will be happy to discuss.