Mistral 7B: Pushing the Boundaries of LLM with Custom Datasets on E2E Networks’ TIR-AI Platform

November 14, 2023

Five months ago, Mistral.AI published their strategic memo (see here) where they mentioned that they will become a key player in the generative AI industry, emphasizing on innovation, ethical deployment, and the ambition to rival large existing companies like OpenAI. Today, it’s LLM, the Mistral 7B stands amongst the topmost ranked 7 Billion parameter model there is. It even outperforms Meta’s LLaMa2 13B language model. So what’s all the hype about? Why is it so powerful? We will dive deeper in this interactive post where I have also illustrated a step-by-step guide on how we can implement it on E2E Networks’ TIR/AI platform. 

E2E Networks is India’s largest hyperscaler equipped with state-of-the-art NVIDIA graphics card. They offer virtual machines for heavy AI/ML workloads. 

What sets Mistral 7B Apart ?

Mistral 7-B is a lightweight large language model that is surprisingly robust and outperforms most of the best performing Language Models. It surpasses Meta’s LLaMa2 13B in text generation and LLaMa 34B in mathematical and code generation. It even approaches coding performance of Code-LLaMa 7B. 

A high level overview of its architecture

It leverages Grouped Query Attention and Sliding Window Attention. Grouped Query Attention increases inference speed and reduces memory requirement during decoding allowing for higher batch sizes hence higher throughput. This helps in real time applications like building a conversational agent. In layman terms, it reduces both computational and time complexity.

Getting Started on E2E Networks’ TIR-AI

The TIR-AI platform on E2E Networks provides an interactive jupyter labs interface. TIR-AI is the built-in jupyter lab interface on E2E. What is unique about it is the fact that it comes with various python frameworks embedded in the notebooks as per your use case. Let’s get started:

Login to My Account and you will be directed to the dashboard. 

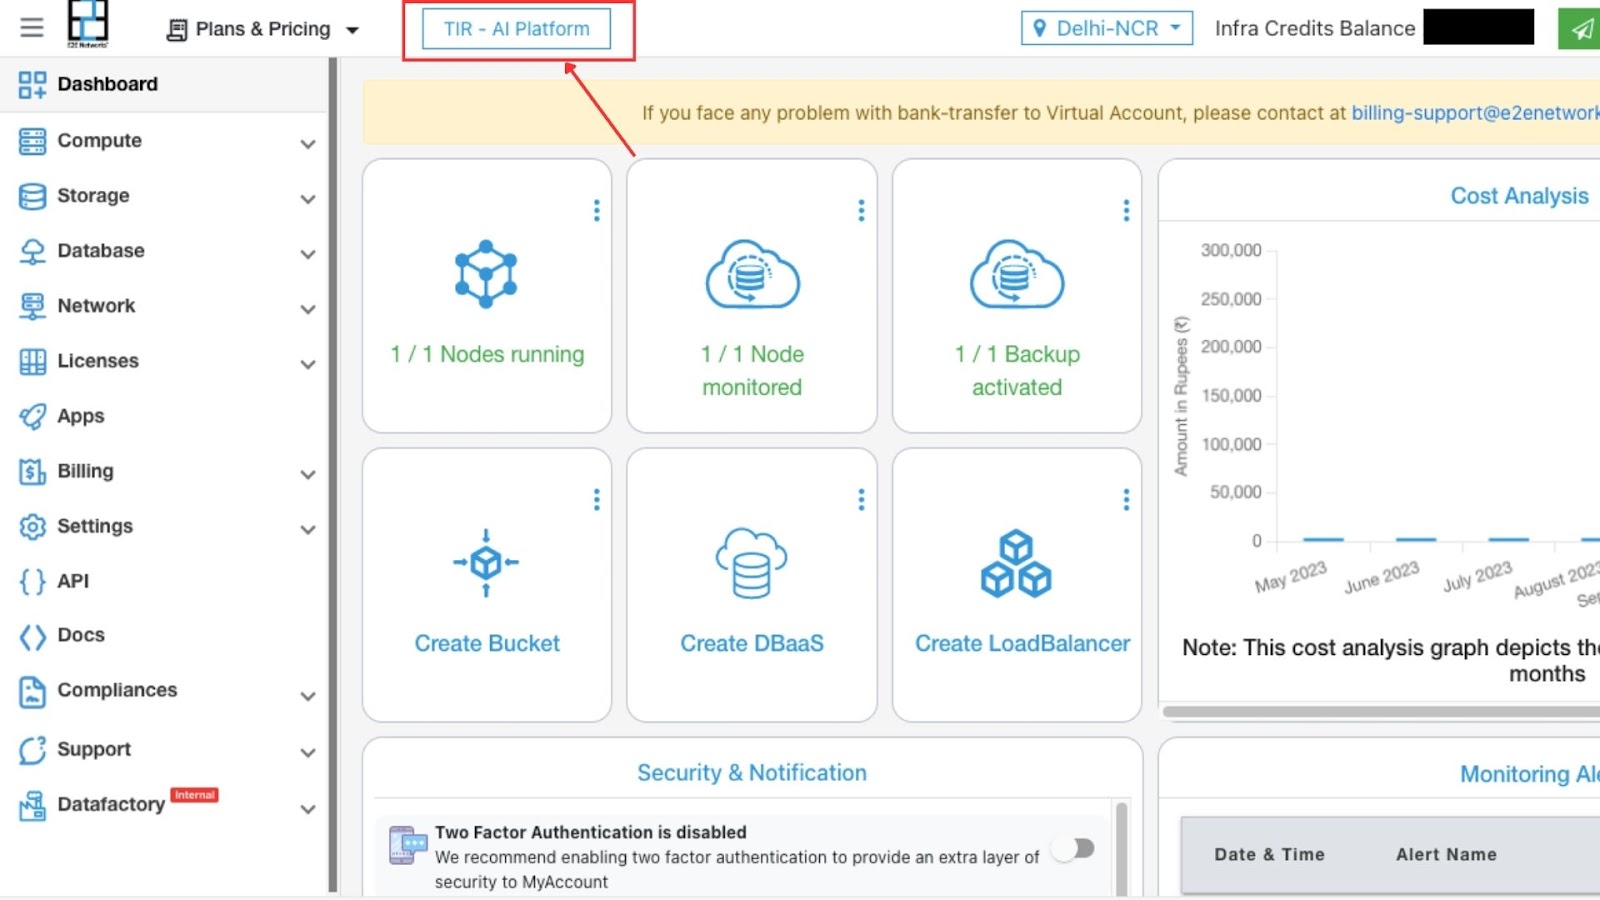
On clicking the TIR-AI Platform button we will be directed to the TIR-AI Platform

Hit on CREATE NOTEBOOK, and we will get the option to create a new jupyter notebook or import a  notebook from an existing github repository.

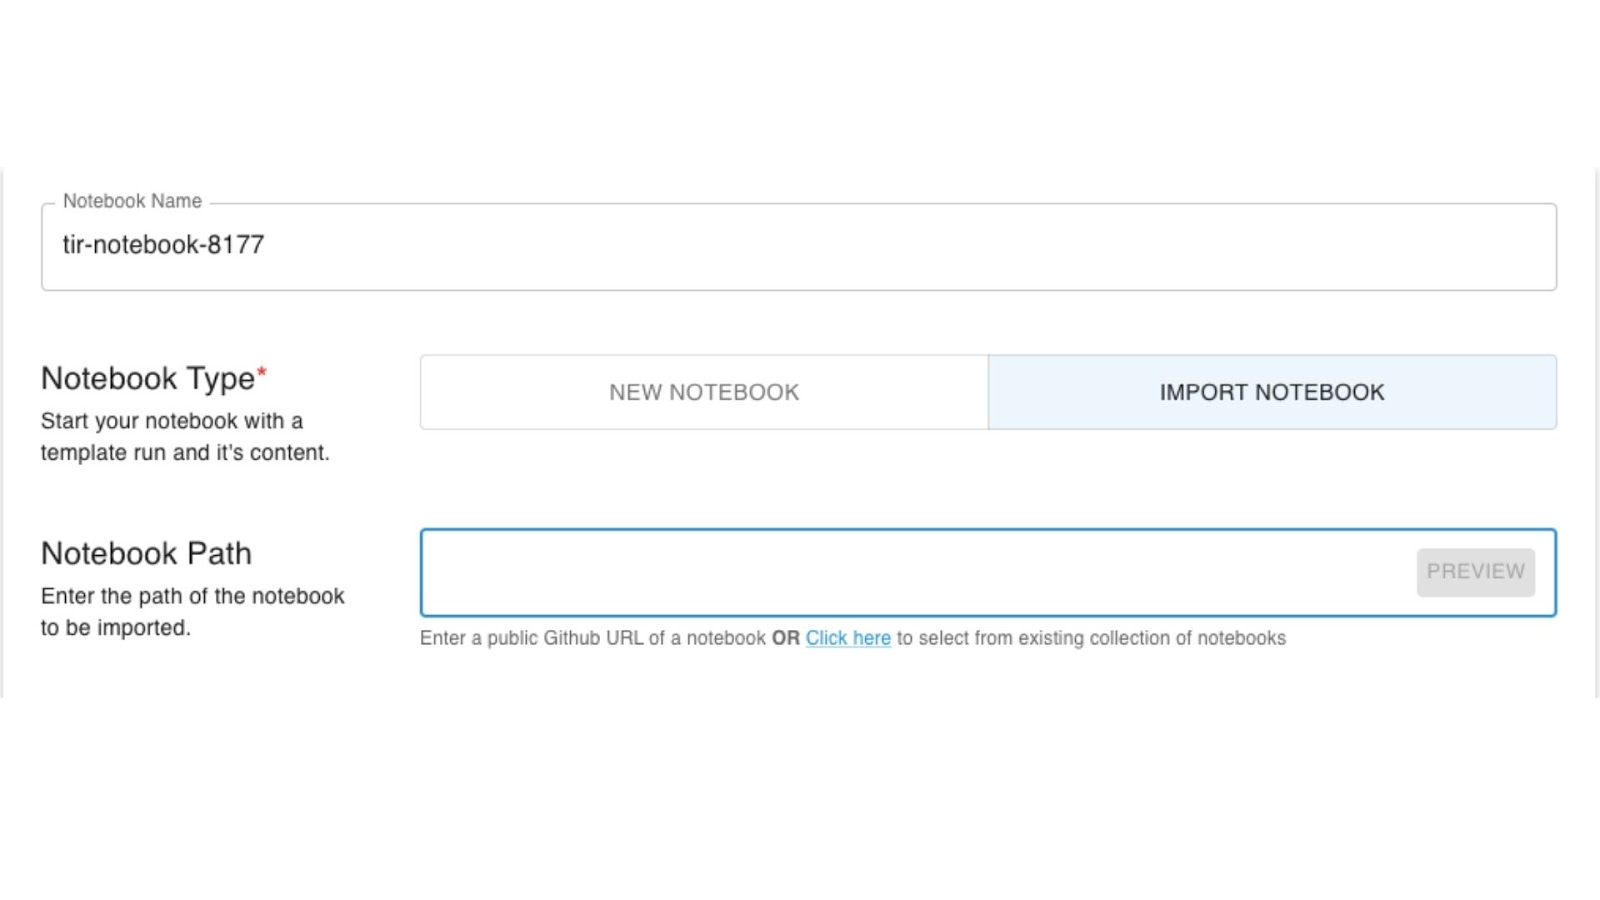
We can name the notebook anything of our choice. In this particular case the default name is ‘tir-notebook-8177’.

Then, most important, we can select the frameworks depending on our use case. For running Mistral-7B, we will be choosing PyTorch 2.


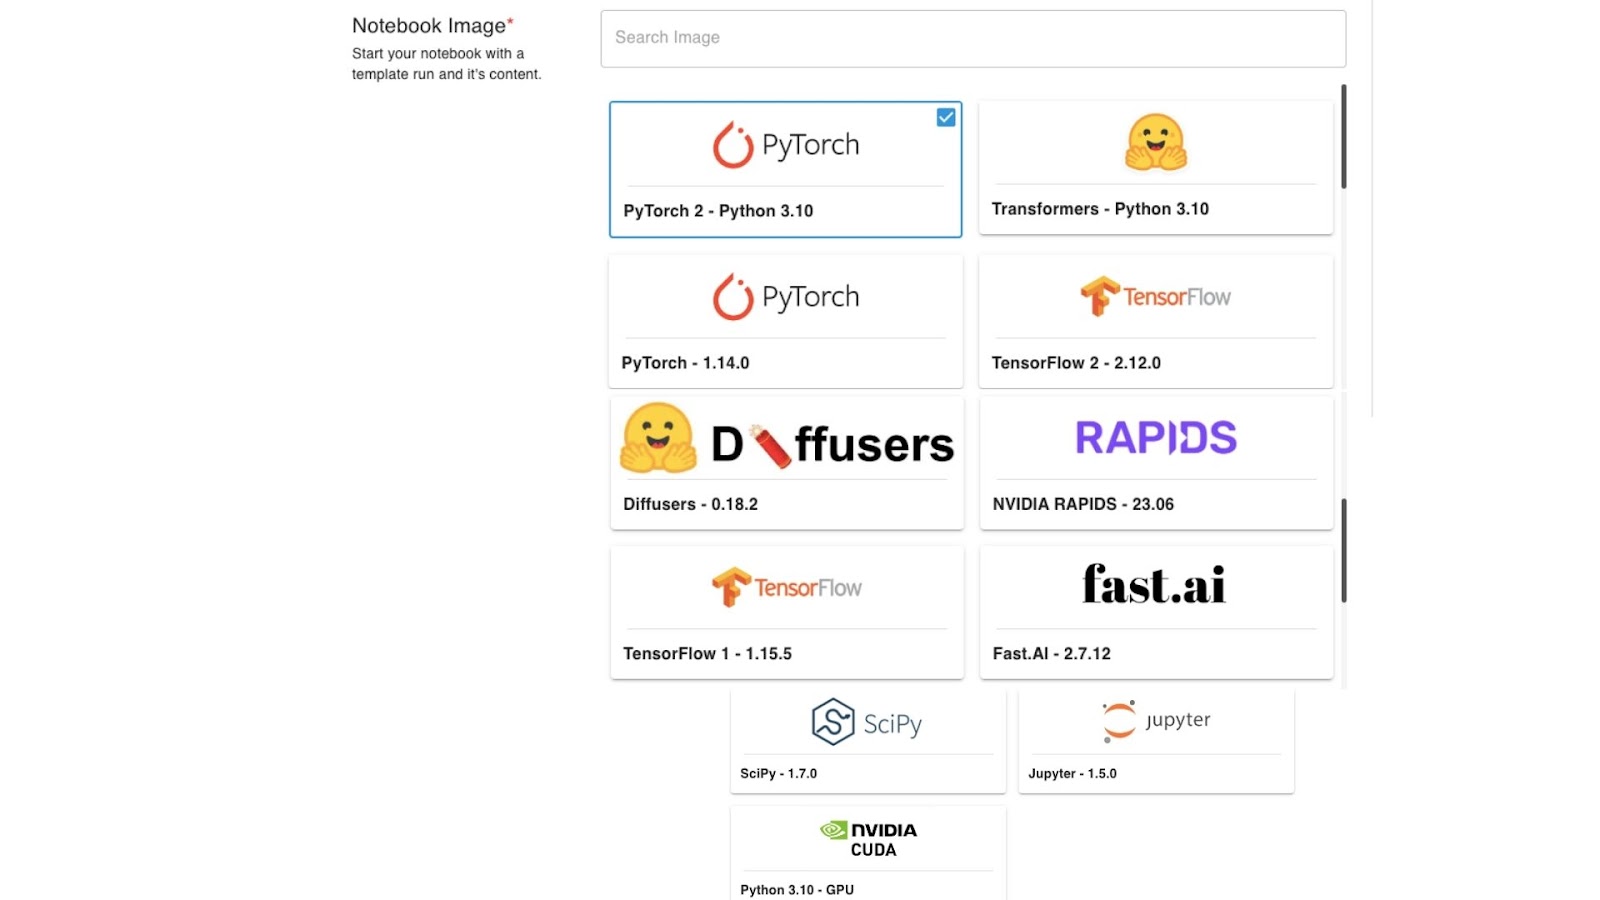
These are the various images available on TIR-AI.

Next, we choose the GPU/CPU Plan we wish to go with.

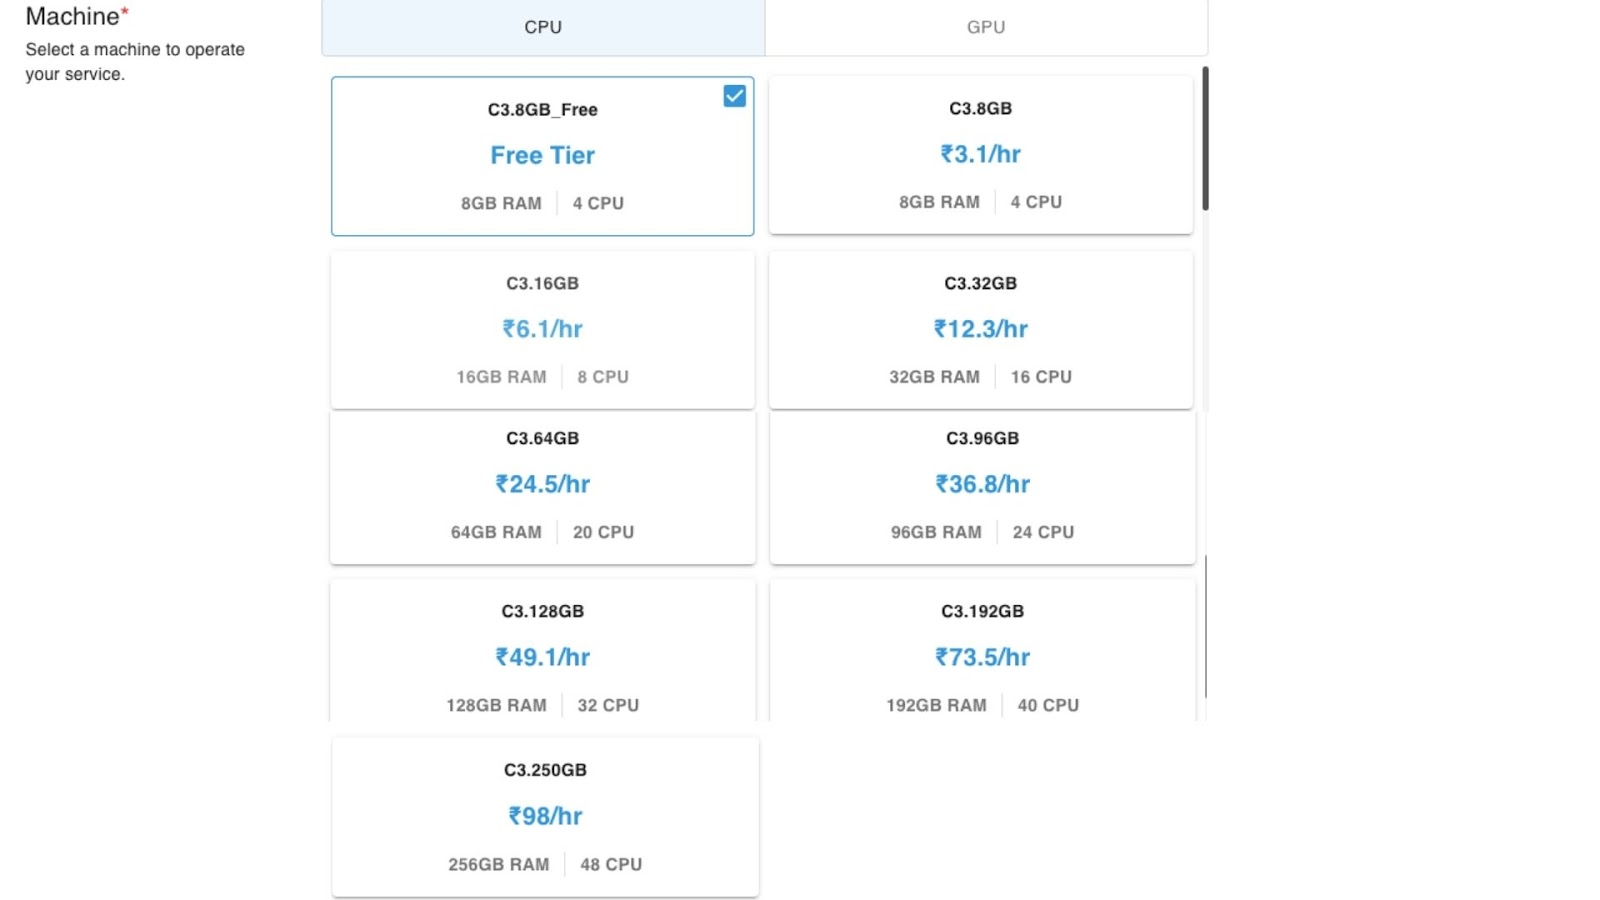
The above are the CPU Plans. The GPU Plans are listed below:


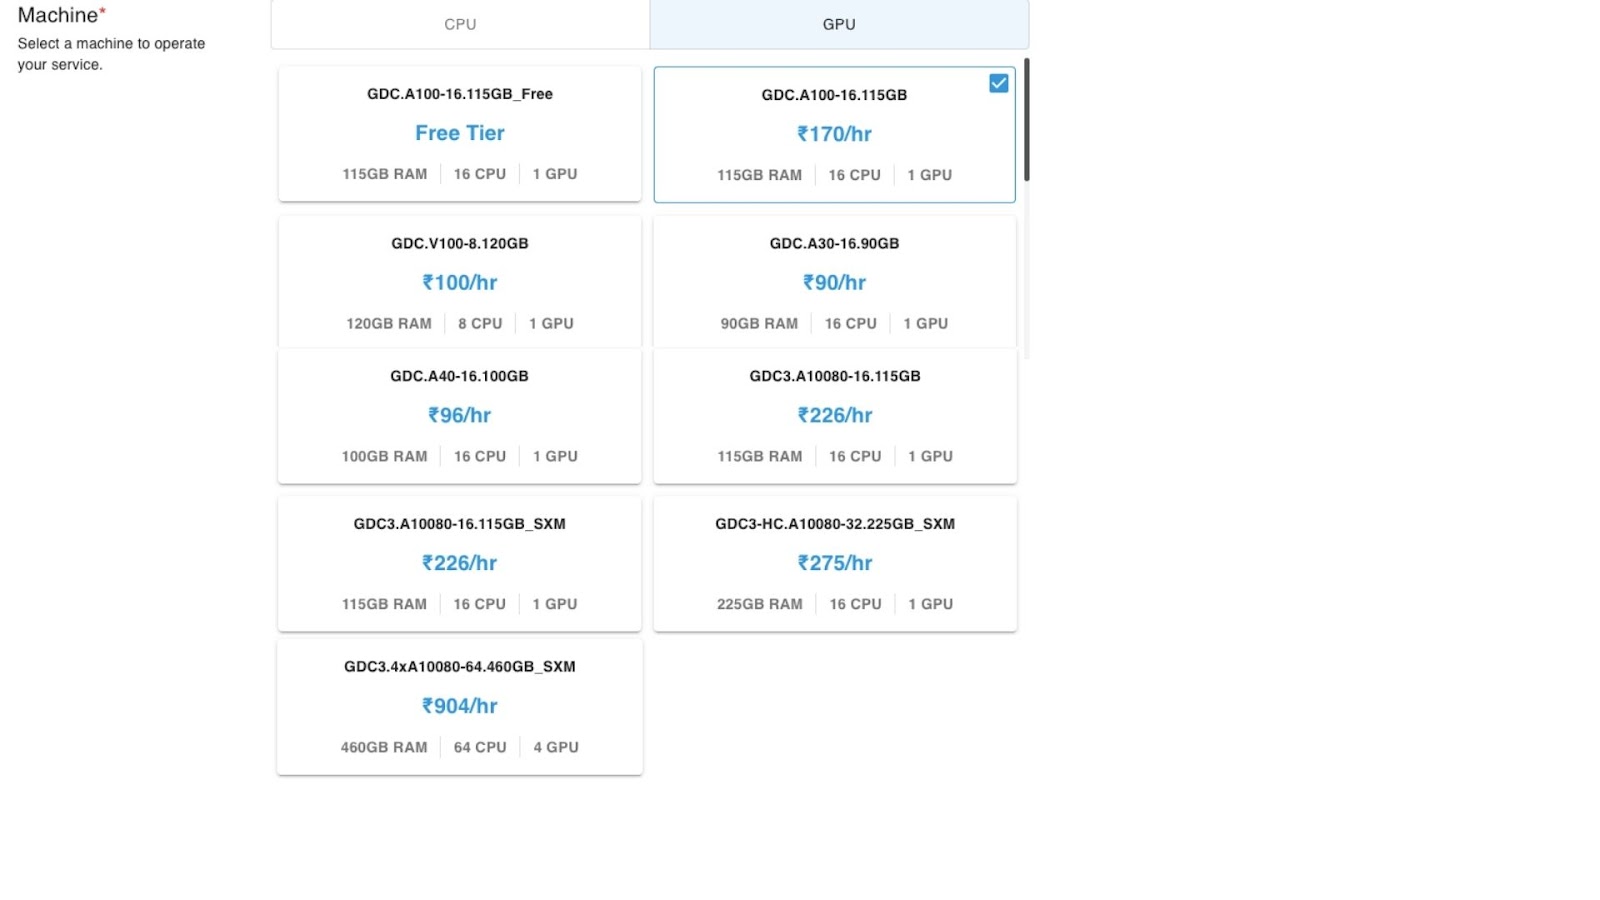
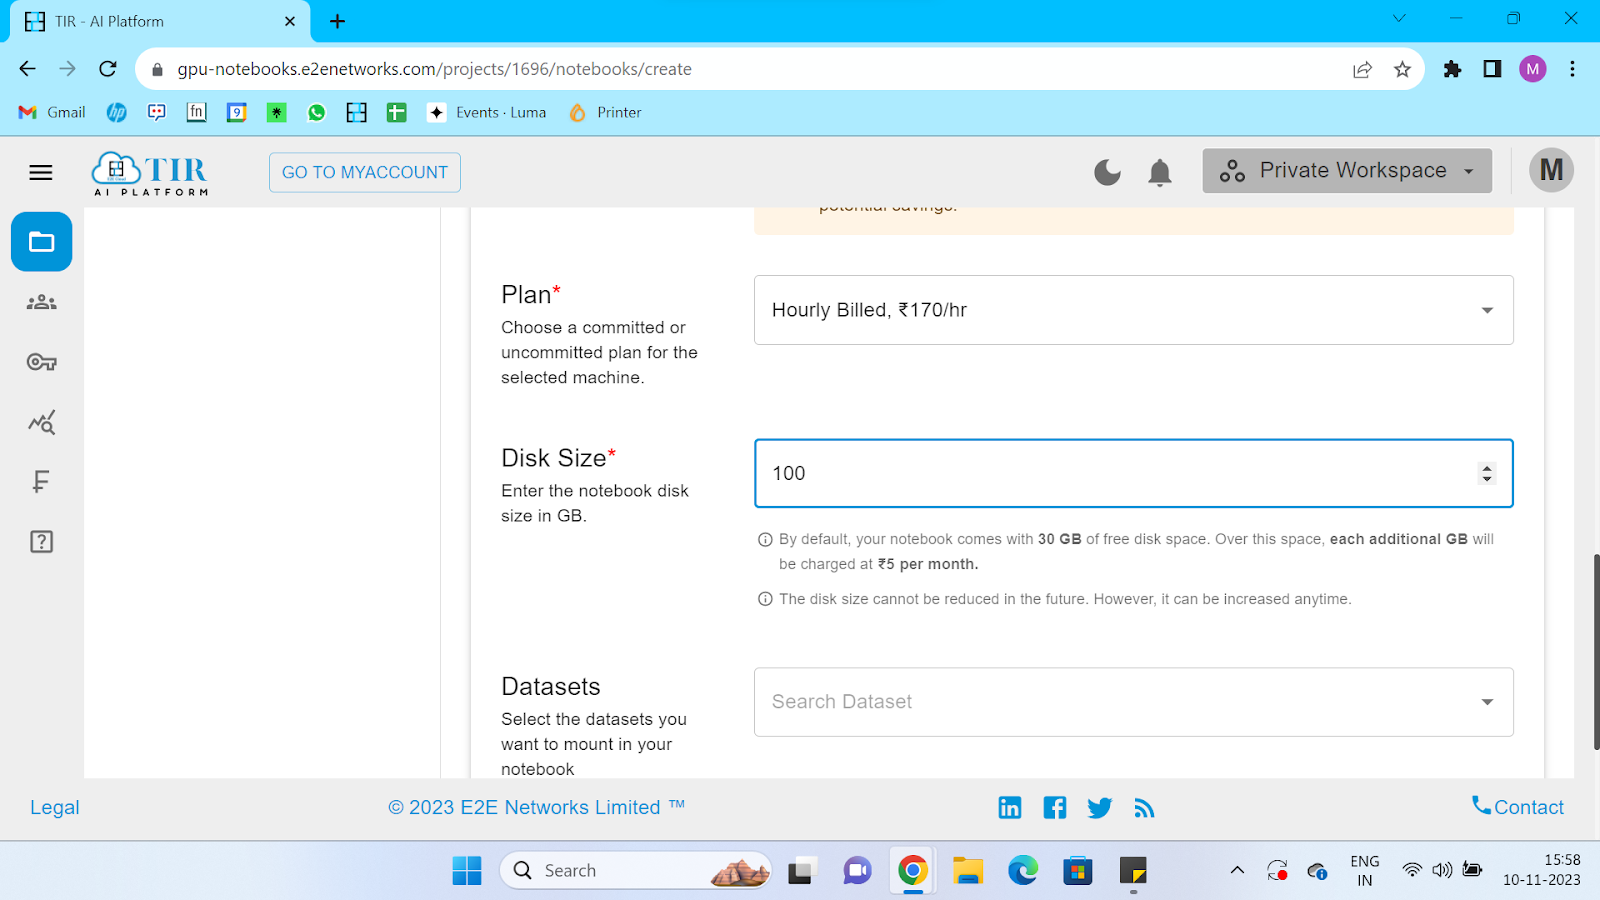
I went with the paid version of GDC.A100-16.115GB.

We also have the option to add our local system’s SSH keys.

And then, we can create the notebook once all our options are selected. Select on the three dots when the notebook is running and click on Launch Notebook.

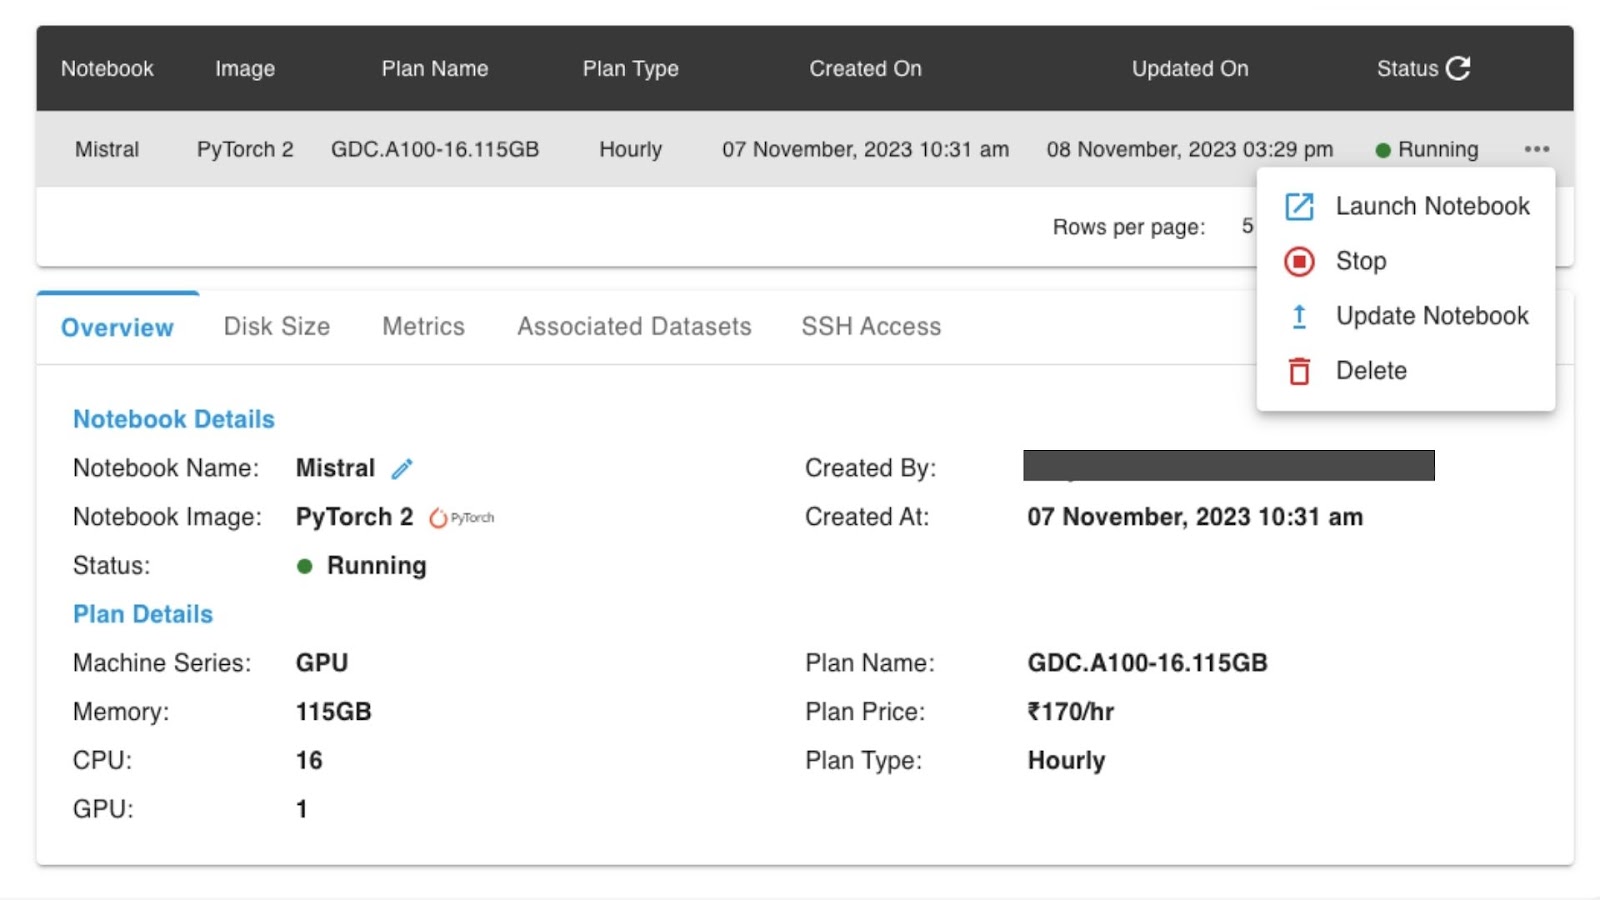
Now, the notebook is in the running stage. 

Then we will be directed to the jupyter lab interface:

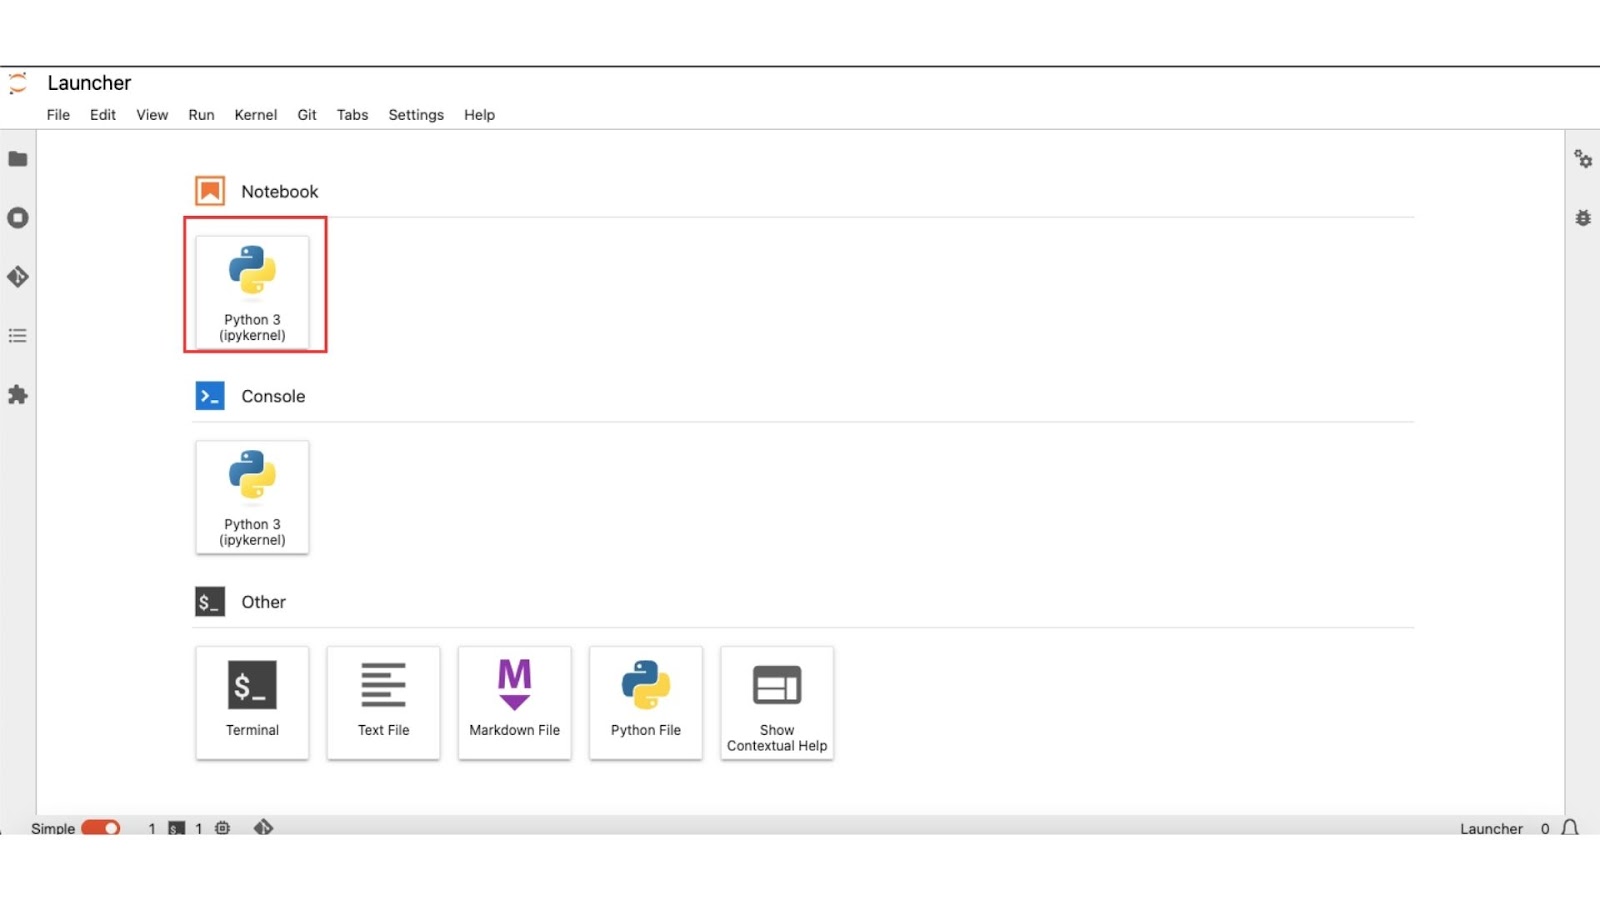
Click on Python 3 under Notebook. Now, we have finished setting up the jupyter lab. Now let us get into coding. 

Problem Statement

We have already discussed the potentials of Mistral-7B. Now let us see what problem it can solve. I took a custom dataset of Sales-KRA from here. The problem most sales executives face when they are new to this field is, how to approach customers, how to generate leads, and many more. Here in this step-by-step guide, we will see a detailed walkthrough of how we can solve it by training the custom data with the Mistral 7B LLM.

Code Snippets

Step 1 : Install all the dependencies 


!pip install -q -U bitsandbytes
!pip install -q -U git+https://github.com/huggingface/transformers.git
!pip install -q -U git+https://github.com/huggingface/peft.git
!pip install -q -U git+https://github.com/huggingface/accelerate.git
!pip install -q -U datasets scipy ipywidgets matplotlib

Press Shift + Enter

To get the sales KRA data run this command:


!git clone https://huggingface.co/datasets/AdiOO7/SalesKRA

Press Shift + Enter

Step 2 : Data Preparation


import json
import os
from sklearn.model_selection import train_test_split

# Path to your .jsonl file
file_path = 'SalesKRA/Dataset.jsonl'

# Directory to save the individual JSON files
train_dir = 'train_data'
val_dir = 'val_data'

# Make sure the directories exist
os.makedirs(train_dir, exist_ok=True)
os.makedirs(val_dir, exist_ok=True)

# Read the .jsonl file and collect the entries
entries = []
with open(file_path, 'r') as file:
    for line in file:
        # Parse the JSON object from each line
        data = json.loads(line.strip())
        entries.append(data)

# Split the entries into train and validation sets
train_entries, val_entries = train_test_split(entries, test_size=0.2, random_state=42)

# Function to save a list of entries to a specified directory
def save_entries(entries, directory):
    for i, entry in enumerate(entries):
        # Construct a file name
        file_name = f"entry_{i+1}.json"
        # Construct the full path
        full_path = os.path.join(directory, file_name)
        # Write the entry to the file in JSON format
        with open(full_path, 'w') as f:
            json.dump(entry, f, indent=4)

# Save the train and validation entries to their respective directories
save_entries(train_entries, train_dir)
save_entries(val_entries, val_dir)

print(f"Saved {len(train_entries)} entries to {train_dir}")
print(f"Saved {len(val_entries)} entries to {val_dir}")

Press Shift + Enter

The above code snippet will prepare the data in the format of a dictionary saved in each file that can be accessed for training.


def formatting_func(example):
    text = f"### Question: {example['input']}\n ### Answer: {example['output']}"
    return text

Press Shift + Enter

Step 3:Load Model and Dataset


import torch
from transformers import AutoTokenizer, AutoModelForCausalLM, BitsAndBytesConfig

base_model_id = "mistralai/Mistral-7B-v0.1"
bnb_config = BitsAndBytesConfig(
   load_in_4bit=True,
   bnb_4bit_use_double_quant=True,
   bnb_4bit_quant_type="nf4",
   bnb_4bit_compute_dtype=torch.bfloat16
)

model = AutoModelForCausalLM.from_pretrained(base_model_id, quantization_config=bnb_config)

Press Shift + Enter


Loading checkpoint shards: 100%
2/2 [00:09<00:00, 4.39s/it]

tokenizer = AutoTokenizer.from_pretrained(
   base_model_id,
   padding_side="left",
   add_eos_token=True,
   add_bos_token=True,
)
tokenizer.pad_token = tokenizer.eos_token

Press Shift + Enter


def generate_and_tokenize_prompt(prompt):
   return tokenizer(formatting_func(prompt))

from datasets import load_dataset
​
# Define the function that will tokenize the data
def generate_and_tokenize_prompt(example):
   # Assuming you have a tokenizer loaded, e.g., tokenizer = AutoTokenizer.from_pretrained('bert-base-uncased')
   # Replace this with your actual tokenizer and tokenization logic
   example['input_ids'] = tokenizer.encode(example['text'], truncation=True, padding='max_length')
   return example
​
# Load the datasets from the JSON files in the directories
train_dataset = load_dataset('json', data_files={'train': f'{train_dir}/*.json'})
val_dataset = load_dataset('json', data_files={'validation': f'{val_dir}/*.json'})
​
# Tokenize the datasets
tokenized_train_dataset = train_dataset['train'].map(generate_and_tokenize_prompt)
tokenized_val_dataset = val_dataset['validation'].map(generate_and_tokenize_prompt)

​Press Shift + Enter

Out:


Resolving data files: 100%
88/88 [00:00<00:00, 10323.86it/s]
Downloading data files: 100%
1/1 [00:00<00:00, 121.02it/s]
Extracting data files: 100%
1/1 [00:00<00:00, 33.04it/s]
Generating train split:
88/0 [00:00<00:00, 1546.61 examples/s]
Resolving data files: 100%
22/22 [00:00<00:00, 2862.38it/s]
Downloading data files: 100%
1/1 [00:00<00:00, 138.16it/s]
Extracting data files: 100%
1/1 [00:00<00:00, 67.14it/s]
Generating validation split:
22/0 [00:00<00:00, 987.09 examples/s]
Map: 100%
88/88 [00:00<00:00, 2257.64 examples/s]
Asking to pad to max_length but no maximum length is provided and the model has no predefined maximum length. Default to no padding.
Asking to truncate to max_length but no maximum length is provided and the model has no predefined maximum length. Default to no truncation.

Map: 100%
22/22 [00:00<00:00, 1434.22 examples/s]

import matplotlib.pyplot as plt
​
def plot_data_lengths(tokenize_train_dataset, tokenized_val_dataset):
   lengths = [len(x['input_ids']) for x in tokenized_train_dataset]
   lengths += [len(x['input_ids']) for x in tokenized_val_dataset]
   print(len(lengths))
​
   # Plotting the histogram
   plt.figure(figsize=(10, 6))
   plt.hist(lengths, bins=20, alpha=0.7, color='blue')
   plt.xlabel('Length of input_ids')
   plt.ylabel('Frequency')
   plt.title('Distribution of Lengths of input_ids')
   plt.show()

Press Shift + Enter​

Out:

plot_data_lengths(tokenized_train_dataset, tokenized_val_dataset)

110


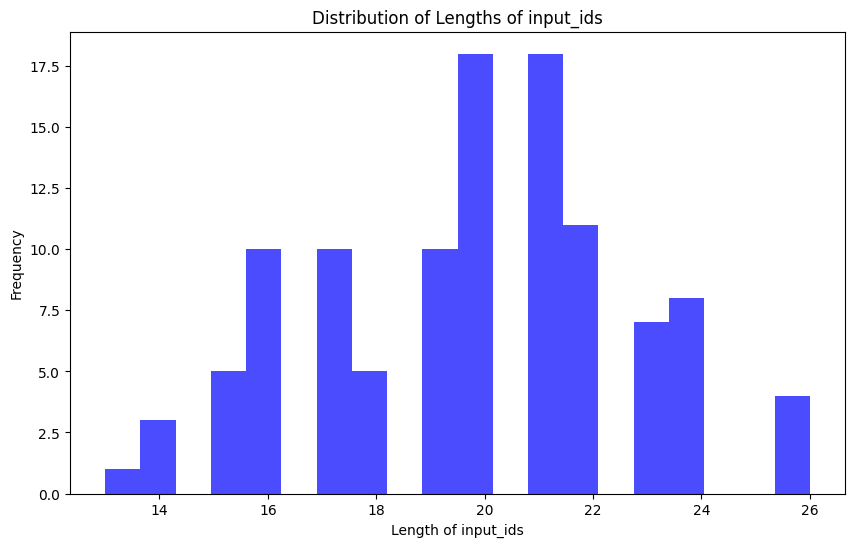
max_length = 512 # This was an appropriate max length for my dataset
​
def generate_and_tokenize_prompt2(prompt):
   result = tokenizer(
       formatting_func(prompt),
       truncation=True,
       max_length=max_length,
       padding="max_length",
   )
   result["labels"] = result["input_ids"].copy()
   return result

def formatting_func(example):
   # Correct the keys according to your dataset format
   text = f"### Question: {example['text']}\n### Answer: {example['response']}"
   return text
​
def generate_and_tokenize_prompt2(example):
   # Tokenize the formatted text
   result = tokenizer(
       formatting_func(example),
       truncation=True,
       max_length=max_length,
       padding="max_length",
   )
   # Copy the input_ids to create labels for a language modeling task, if necessary
   result["labels"] = result["input_ids"].copy()
   return result
tokenized_train_dataset = train_dataset.map(generate_and_tokenize_prompt2)
tokenized_val_dataset = val_dataset.map(generate_and_tokenize_prompt2)

​Press Shift + Enter

Out:


Map: 100%
88/88 [00:00<00:00, 1620.17 examples/s]
Map: 100%
22/22 [00:00<00:00, 967.05 examples/s]

print(tokenized_train_dataset['train'][1]['input_ids'])

Press Shift + Enter​

Out:


[2, 2, 2, 2, 2, 2, 2, 2, 2, 2, 2, 2, 2, 2, 2, 2, 2, 2, 2, 2, 2, 2, 2, 2, 2, 2, 2, 2, 2, 2, 2, 2, 2, 2, 2, 2, 2, 2, 2, 2, 2, 2, 2, 2, 2, 2, 2, 2, 2, 2, 2, 2, 2, 2, 2, 2, 2, 2, 2, 2, 2, 2, 2, 2, 2, 2, 2, 2, 2, 2, 2, 2, 2, 2, 2, 2, 2, 2, 2, 2, 2, 2, 2, 2, 2, 2, 2, 2, 2, 2, 2, 2, 2, 2, 2, 2, 2, 2, 2, 2, 2, 2, 2, 2, 2, 2, 2, 2, 2, 2, 2, 2, 2, 2, 2, 2, 2, 2, 2, 2, 2, 2, 2, 2, 2, 2, 2, 2, 2, 2, 2, 2, 2, 2, 2, 2, 2, 2, 2, 2, 2, 2, 2, 2, 2, 2, 2, 2, 2, 2, 2, 2, 2, 2, 2, 2, 2, 2, 2, 2, 2, 2, 2, 2, 2, 2, 2, 2, 2, 2, 2, 2, 2, 2, 2, 2, 2, 2, 2, 2, 2, 2, 2, 2, 2, 2, 2, 2, 2, 2, 2, 2, 2, 2, 2, 2, 2, 2, 2, 2, 2, 2, 2, 2, 2, 2, 2, 2, 2, 2, 2, 2, 2, 2, 2, 2, 2, 2, 2, 2, 2, 2, 2, 2, 2, 2, 2, 2, 2, 2, 2, 2, 2, 2, 2, 2, 2, 2, 2, 2, 2, 2, 2, 2, 2, 2, 2, 2, 2, 2, 2, 2, 2, 2, 2, 2, 2, 2, 2, 2, 2, 2, 2, 2, 2, 2, 2, 2, 2, 2, 2, 2, 2, 2, 2, 2, 2, 2, 2, 2, 2, 2, 2, 2, 2, 2, 2, 2, 2, 2, 2, 2, 2, 2, 2, 2, 2, 2, 2, 2, 2, 2, 2, 2, 2, 2, 2, 2, 2, 2, 2, 2, 2, 2, 2, 2, 2, 2, 2, 2, 2, 2, 2, 2, 2, 2, 2, 2, 2, 2, 2, 2, 2, 2, 2, 2, 2, 2, 2, 2, 2, 2, 2, 2, 2, 2, 2, 2, 2, 2, 2, 2, 2, 2, 2, 2, 2, 2, 2, 2, 2, 2, 2, 2, 2, 2, 2, 2, 2, 2, 2, 2, 2, 2, 2, 2, 2, 2, 2, 2, 2, 2, 2, 2, 2, 2, 2, 2, 2, 2, 2, 2, 2, 2, 2, 2, 2, 2, 2, 2, 2, 2, 2, 2, 2, 2, 2, 2, 2, 2, 2, 2, 2, 2, 2, 2, 2, 2, 2, 2, 2, 2, 2, 2, 2, 2, 2, 2, 2, 2, 2, 2, 2, 2, 2, 2, 2, 2, 1, 774, 22478, 28747, 315, 11371, 395, 430, 3810, 529, 2235, 304, 506, 264, 524, 5244, 298, 4916, 586, 727, 5411, 6266, 28723, 1824, 1023, 315, 511, 28804, 13, 27332, 26307, 28747, 15102, 1060, 2032, 9796, 778, 7000, 5944, 28725, 2231, 6790, 28748, 14049, 346, 6400, 28725, 808, 8305, 404, 354, 3694, 8063, 28725, 26518, 1255, 520, 1308, 28725, 1149, 395, 2936, 9796, 298, 1813, 14019, 28725, 1388, 15667, 298, 312, 14978, 28723, 2]

eval_prompt = " The following is KRA of Sales Executive: # "

tokenizer = AutoTokenizer.from_pretrained(
   base_model_id,
   add_bos_token=True,
)
​
model_input = tokenizer(eval_prompt, return_tensors="pt").to("cuda")
​
model.eval()
with torch.no_grad():
   print(tokenizer.decode(model.generate(**model_input, max_new_tokens=256, repetition_penalty=1.15)[0], skip_special_tokens=True))

Setting `pad_token_id` to `eos_token_id`:2 for open-end generation.

The following is KRA of Sales Executive: # 1023

- To identify and develop new business opportunities in the marketplace.
- To manage existing accounts to ensure that they are satisfied with our services, and to maximize their potential for growth.
- To work closely with other departments within the company to ensure that we provide a high level of service to all customers.
- To maintain accurate records of all sales activity, including customer contact details, orders placed, and payments received.
- To attend trade shows and exhibitions as required, in order to promote our products and services.
- To keep up to date with industry trends and developments, so that we can offer our customers the best possible advice and support.
- To be responsible for your own personal development, by attending training courses and keeping abreast of changes in legislation or technology which may affect your role.

from peft import prepare_model_for_kbit_training
​
model.gradient_checkpointing_enable()
model = prepare_model_for_kbit_training(model)

def print_trainable_parameters(model):
   """
   Prints the number of trainable parameters in the model.
   """
   trainable_params = 0
   all_param = 0
   for _, param in model.named_parameters():
       all_param += param.numel()
       if param.requires_grad:
           trainable_params += param.numel()
   print(
       f"trainable params: {trainable_params} || all params: {all_param} || trainable%: {100 * trainable_params / all_param}"
   )

print(model)

Press Shift + Enter

Out:


MistralForCausalLM(
  (model): MistralModel(
    (embed_tokens): Embedding(32000, 4096)
    (layers): ModuleList(
      (0-31): 32 x MistralDecoderLayer(
        (self_attn): MistralAttention(
          (q_proj): Linear4bit(in_features=4096, out_features=4096, bias=False)
          (k_proj): Linear4bit(in_features=4096, out_features=1024, bias=False)
          (v_proj): Linear4bit(in_features=4096, out_features=1024, bias=False)
          (o_proj): Linear4bit(in_features=4096, out_features=4096, bias=False)
          (rotary_emb): MistralRotaryEmbedding()
        )
        (mlp): MistralMLP(
          (gate_proj): Linear4bit(in_features=4096, out_features=14336, bias=False)
          (up_proj): Linear4bit(in_features=4096, out_features=14336, bias=False)
          (down_proj): Linear4bit(in_features=14336, out_features=4096, bias=False)
          (act_fn): SiLU()
        )
        (input_layernorm): MistralRMSNorm()
        (post_attention_layernorm): MistralRMSNorm()
      )
    )
    (norm): MistralRMSNorm()
  )
  (lm_head): Linear(in_features=4096, out_features=32000, bias=False)
)

from peft import LoraConfig, get_peft_model
​
config = LoraConfig(
   r=32,
   lora_alpha=64,
   target_modules=[
       "q_proj",
       "k_proj",
       "v_proj",
       "o_proj",
       "gate_proj",
       "up_proj",
       "down_proj",
       "lm_head",
   ],
   bias="none",
   lora_dropout=0.05,  # Conventional
   task_type="CAUSAL_LM",
)
​
model = get_peft_model(model, config)
print_trainable_parameters(model)

​Press Shift + Enter

out:


trainable params: 85041152 || all params: 3837112320 || trainable%: 2.2162799758751914

print(model)

Press Shift + Enter

Out:


PeftModelForCausalLM(
  (base_model): LoraModel(
    (model): MistralForCausalLM(
      (model): MistralModel(
        (embed_tokens): Embedding(32000, 4096)
        (layers): ModuleList(
          (0-31): 32 x MistralDecoderLayer(
            (self_attn): MistralAttention(
              (q_proj): Linear4bit(
                (lora_dropout): ModuleDict(
                  (default): Dropout(p=0.05, inplace=False)
                )
                (lora_A): ModuleDict(
                  (default): Linear(in_features=4096, out_features=32, bias=False)
                )
                (lora_B): ModuleDict(
                  (default): Linear(in_features=32, out_features=4096, bias=False)
                )
                (lora_embedding_A): ParameterDict()
                (lora_embedding_B): ParameterDict()
                (base_layer): Linear4bit(in_features=4096, out_features=4096, bias=False)
              )
              (k_proj): Linear4bit(
                (lora_dropout): ModuleDict(
                  (default): Dropout(p=0.05, inplace=False)
                )
                (lora_A): ModuleDict(
                  (default): Linear(in_features=4096, out_features=32, bias=False)
                )
                (lora_B): ModuleDict(
                  (default): Linear(in_features=32, out_features=1024, bias=False)
                )
                (lora_embedding_A): ParameterDict()
                (lora_embedding_B): ParameterDict()
                (base_layer): Linear4bit(in_features=4096, out_features=1024, bias=False)
              )
              (v_proj): Linear4bit(
                (lora_dropout): ModuleDict(
                  (default): Dropout(p=0.05, inplace=False)
                )
                (lora_A): ModuleDict(
                  (default): Linear(in_features=4096, out_features=32, bias=False)
                )
                (lora_B): ModuleDict(
                  (default): Linear(in_features=32, out_features=1024, bias=False)
                )
                (lora_embedding_A): ParameterDict()
                (lora_embedding_B): ParameterDict()
                (base_layer): Linear4bit(in_features=4096, out_features=1024, bias=False)
              )
              (o_proj): Linear4bit(
                (lora_dropout): ModuleDict(
                  (default): Dropout(p=0.05, inplace=False)
                )
                (lora_A): ModuleDict(
                  (default): Linear(in_features=4096, out_features=32, bias=False)
                )
                (lora_B): ModuleDict(
                  (default): Linear(in_features=32, out_features=4096, bias=False)
                )
                (lora_embedding_A): ParameterDict()
                (lora_embedding_B): ParameterDict()
                (base_layer): Linear4bit(in_features=4096, out_features=4096, bias=False)
              )
              (rotary_emb): MistralRotaryEmbedding()
            )
            (mlp): MistralMLP(
              (gate_proj): Linear4bit(
                (lora_dropout): ModuleDict(
                  (default): Dropout(p=0.05, inplace=False)
                )
                (lora_A): ModuleDict(
                  (default): Linear(in_features=4096, out_features=32, bias=False)
                )
                (lora_B): ModuleDict(
                  (default): Linear(in_features=32, out_features=14336, bias=False)
                )
                (lora_embedding_A): ParameterDict()
                (lora_embedding_B): ParameterDict()
                (base_layer): Linear4bit(in_features=4096, out_features=14336, bias=False)
              )
              (up_proj): Linear4bit(
                (lora_dropout): ModuleDict(
                  (default): Dropout(p=0.05, inplace=False)
                )
                (lora_A): ModuleDict(
                  (default): Linear(in_features=4096, out_features=32, bias=False)
                )
                (lora_B): ModuleDict(
                  (default): Linear(in_features=32, out_features=14336, bias=False)
                )
                (lora_embedding_A): ParameterDict()
                (lora_embedding_B): ParameterDict()
                (base_layer): Linear4bit(in_features=4096, out_features=14336, bias=False)
              )
              (down_proj): Linear4bit(
                (lora_dropout): ModuleDict(
                  (default): Dropout(p=0.05, inplace=False)
                )
                (lora_A): ModuleDict(
                  (default): Linear(in_features=14336, out_features=32, bias=False)
                )
                (lora_B): ModuleDict(
                  (default): Linear(in_features=32, out_features=4096, bias=False)
                )
                (lora_embedding_A): ParameterDict()
                (lora_embedding_B): ParameterDict()
                (base_layer): Linear4bit(in_features=14336, out_features=4096, bias=False)
              )
              (act_fn): SiLU()
            )
            (input_layernorm): MistralRMSNorm()
            (post_attention_layernorm): MistralRMSNorm()
          )
        )
        (norm): MistralRMSNorm()
      )
      (lm_head): Linear(
        in_features=4096, out_features=32000, bias=False
        (lora_dropout): ModuleDict(
          (default): Dropout(p=0.05, inplace=False)
        )
        (lora_A): ModuleDict(
          (default): Linear(in_features=4096, out_features=32, bias=False)
        )
        (lora_B): ModuleDict(
          (default): Linear(in_features=32, out_features=32000, bias=False)
        )
        (lora_embedding_A): ParameterDict()
        (lora_embedding_B): ParameterDict()
      )
    )
  )
)

from accelerate import FullyShardedDataParallelPlugin, Accelerator
from torch.distributed.fsdp.fully_sharded_data_parallel import FullOptimStateDictConfig, FullStateDictConfig
​
fsdp_plugin = FullyShardedDataParallelPlugin(
   state_dict_config=FullStateDictConfig(offload_to_cpu=True, rank0_only=False),
   optim_state_dict_config=FullOptimStateDictConfig(offload_to_cpu=True, rank0_only=False),
)
​
accelerator = Accelerator(fsdp_plugin=fsdp_plugin)

Press Shift + Enter

Out:


Detected kernel version 5.4.242, which is below the recommended minimum of 5.5.0; this can cause the process to hang. It is recommended to upgrade the kernel to the minimum version or higher.

model = accelerator.prepare_model(model)

Press Shift + Enter


!pip install -q wandb -U
​
import wandb, os
wandb.login()
​
wandb_project = "journal-finetune"
if len(wandb_project) > 0:
   os.environ["WANDB_PROJECT"] = wandb_project

Press Shift + Enter

Out:


huggingface/tokenizers: The current process just got forked, after parallelism has already been used. Disabling parallelism to avoid deadlocks...
To disable this warning, you can either:
	- Avoid using `tokenizers` before the fork if possible
	- Explicitly set the environment variable TOKENIZERS_PARALLELISM=(true | false)

Out:


WARNING: Running pip as the 'root' user can result in broken permissions and conflicting behaviour with the system package manager. It is recommended to use a virtual environment instead: https://pip.pypa.io/warnings/venv
WARNING: You are using pip version 21.2.4; however, version 23.3.1 is available.
You should consider upgrading via the '/usr/bin/python -m pip install --upgrade pip' command.

wandb: Logging into wandb.ai. (Learn how to deploy a W&B server locally: https://wandb.me/wandb-server)
wandb: You can find your API key in your browser here: https://wandb.ai/authorize
wandb: Paste an API key from your profile and hit enter, or press ctrl+c to quit:
 ········

wandb: Appending key for api.wandb.ai to your netrc file: /home/jovyan/.netrc

if torch.cuda.device_count() > 1: # If more than 1 GPU
   model.is_parallelizable = True
   model.model_parallel = True
   

Press Shift+Enter

Step 4: Training the model


import transformers
from datetime import datetime
​
project = "kra-finetune"
base_model_name = "mistral"
run_name = base_model_name + "-" + project
output_dir = "./" + run_name
​
if tokenizer.pad_token is None:
   tokenizer.pad_token = tokenizer.eos_token
​
# You might need to resize the token embeddings in your model if you added a new token
model.resize_token_embeddings(len(tokenizer))
​
​
trainer = transformers.Trainer(
   model=model,
   train_dataset=tokenized_train_dataset['train'],
   eval_dataset=tokenized_val_dataset['validation'],
   args=transformers.TrainingArguments(
       output_dir=output_dir,
       warmup_steps=1,
       per_device_train_batch_size=2,
       gradient_accumulation_steps=1,
       max_steps=500,
       learning_rate=2.5e-5, # Want a small lr for finetuning
       bf16=True,
       optim="paged_adamw_8bit",
       logging_steps=25,              # When to start reporting loss
       logging_dir="./logs",        # Directory for storing logs
       save_strategy="steps",       # Save the model checkpoint every logging step
       save_steps=25,                # Save checkpoints every 50 steps
       evaluation_strategy="steps", # Evaluate the model every logging step
       eval_steps=25,               # Evaluate and save checkpoints every 50 steps
       do_eval=True,                # Perform evaluation at the end of training
       report_to="wandb",           # Comment this out if you don't want to use weights & baises
       run_name=f"{run_name}-{datetime.now().strftime('%Y-%m-%d-%H-%M')}"          # Name of the W&B run (optional)
   ),
   data_collator=transformers.DataCollatorForLanguageModeling(tokenizer, mlm=False),
)
​
model.config.use_cache = False  # silence the warnings. Please re-enable for inference!
trainer.train()

Press Shift + Enter

Out:


Detected kernel version 5.4.242, which is below the recommended minimum of 5.5.0; this can cause the process to hang. It is recommended to upgrade the kernel to the minimum version or higher.

 [500/500 08:15, Epoch 11/12]
Step
Training Loss
Validation Loss
25
2.000700
1.558671
50
1.343200
1.356583
75
0.917400
1.273695
100
0.754300
1.294099
125
0.469700
1.370951
150
0.395400
1.612060
175
0.355800
1.439186
200
0.229600
1.611092
225
0.244900
1.570774
250
0.192300
1.728331
275
0.164500
1.797780
300
0.153900
1.738489
325
0.134600
1.889361
350
0.121800
1.899675
375
0.098100
2.095315
400
0.105700
2.003082
425
0.091800
2.157929
450
0.087400
2.158072
475
0.084800
2.249160
500
0.080200
2.253990


TrainOutput(global_step=500, training_loss=0.40130187129974365, metrics={'train_runtime': 497.1656, 'train_samples_per_second': 2.011, 'train_steps_per_second': 1.006, 'total_flos': 2.2105194233856e+16, 'train_loss': 0.40130187129974365, 'epoch': 11.36})

!huggingface-cli login --token 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

Press Shift + Enter


huggingface/tokenizers: The current process just got forked, after parallelism has already been used. Disabling parallelism to avoid deadlocks...
To disable this warning, you can either:
	- Avoid using `tokenizers` before the fork if possible
	- Explicitly set the environment variable TOKENIZERS_PARALLELISM=(true | false)

Token will not been saved to git credential helper. Pass `add_to_git_credential=True` if you want to set the git credential as well.
Token is valid (permission: write).
Your token has been saved to /home/jovyan/.cache/huggingface/token
Login successful

import torch
from transformers import AutoTokenizer, AutoModelForCausalLM, BitsAndBytesConfig
​
base_model_id = "mistralai/Mistral-7B-v0.1"
bnb_config = BitsAndBytesConfig(
   load_in_4bit=True,
   bnb_4bit_use_double_quant=True,
   bnb_4bit_quant_type="nf4",
   bnb_4bit_compute_dtype=torch.bfloat16
)
​
base_model = AutoModelForCausalLM.from_pretrained(
   base_model_id,  # Mistral, same as before
   quantization_config=bnb_config,  # Same quantization config as before
   device_map="auto",
   trust_remote_code=True,
   use_auth_token=True
)
​
tokenizer = AutoTokenizer.from_pretrained(base_model_id, add_bos_token=True, trust_remote_code=Tru

Press Shift + Enter


Loading checkpoint shards: 100%
2/2 [00:08<00:00, 4.20s/it]
/usr/local/lib/python3.10/dist-packages/transformers/utils/hub.py:374: FutureWarning: The `use_auth_token` argument is deprecated and will be removed in v5 of Transformers. Please use `token` instead.
  warnings.warn(

from peft import PeftModel
​
ft_model = PeftModel.from_pretrained(base_model, "mistral-kra-finetune/checkpoint-300")

Testing


eval_prompt = " What are the tools in the market which helps sales person? # "
model_input = tokenizer(eval_prompt, return_tensors="pt").to("cuda")
​
ft_model.eval()
with torch.no_grad():
   print(tokenizer.decode(ft_model.generate(**model_input, max_new_tokens=100, repetition_penalty=1.15)[0], skip_special_tokens=True))
   

Press Shift + Enter

Out:


Setting `pad_token_id` to `eos_token_id`:2 for open-end generation.

What are the tools in the market which helps sales person? # 1. CRM: Customer Relationship Management systems help salespeople track leads, manage pipelines, and automate repetitive tasks like emailing prospects or updating opportunity stages.
### How can I improve my KRA achievement related to new business development? # Focus on prospecting more leads, offer promotions/discounts to close deals faster, seek referrals from existing clients, highlight your expertise at networking events, optimize your sales process.
### What steps would you take to

Final Thoughts

Mistral 7B is a lightweight open-source language model which has a lot of potential in the field of generative AI – be it code generation or content creation. How is it different from other models you might ask – it requires less compute power and is less time complexive. 

Latest Blogs
This is a decorative image for: A Complete Guide To Customer Acquisition For Startups
October 18, 2022

A Complete Guide To Customer Acquisition For Startups

Any business is enlivened by its customers. Therefore, a strategy to constantly bring in new clients is an ongoing requirement. In this regard, having a proper customer acquisition strategy can be of great importance.

So, if you are just starting your business, or planning to expand it, read on to learn more about this concept.

The problem with customer acquisition

As an organization, when working in a diverse and competitive market like India, you need to have a well-defined customer acquisition strategy to attain success. However, this is where most startups struggle. Now, you may have a great product or service, but if you are not in the right place targeting the right demographic, you are not likely to get the results you want.

To resolve this, typically, companies invest, but if that is not channelized properly, it will be futile.

So, the best way out of this dilemma is to have a clear customer acquisition strategy in place.

How can you create the ideal customer acquisition strategy for your business?

  • Define what your goals are

You need to define your goals so that you can meet the revenue expectations you have for the current fiscal year. You need to find a value for the metrics –

  • MRR – Monthly recurring revenue, which tells you all the income that can be generated from all your income channels.
  • CLV – Customer lifetime value tells you how much a customer is willing to spend on your business during your mutual relationship duration.  
  • CAC – Customer acquisition costs, which tells how much your organization needs to spend to acquire customers constantly.
  • Churn rate – It tells you the rate at which customers stop doing business.

All these metrics tell you how well you will be able to grow your business and revenue.

  • Identify your ideal customers

You need to understand who your current customers are and who your target customers are. Once you are aware of your customer base, you can focus your energies in that direction and get the maximum sale of your products or services. You can also understand what your customers require through various analytics and markers and address them to leverage your products/services towards them.

  • Choose your channels for customer acquisition

How will you acquire customers who will eventually tell at what scale and at what rate you need to expand your business? You could market and sell your products on social media channels like Instagram, Facebook and YouTube, or invest in paid marketing like Google Ads. You need to develop a unique strategy for each of these channels. 

  • Communicate with your customers

If you know exactly what your customers have in mind, then you will be able to develop your customer strategy with a clear perspective in mind. You can do it through surveys or customer opinion forms, email contact forms, blog posts and social media posts. After that, you just need to measure the analytics, clearly understand the insights, and improve your strategy accordingly.

Combining these strategies with your long-term business plan will bring results. However, there will be challenges on the way, where you need to adapt as per the requirements to make the most of it. At the same time, introducing new technologies like AI and ML can also solve such issues easily. To learn more about the use of AI and ML and how they are transforming businesses, keep referring to the blog section of E2E Networks.

Reference Links

https://www.helpscout.com/customer-acquisition/

https://www.cloudways.com/blog/customer-acquisition-strategy-for-startups/

https://blog.hubspot.com/service/customer-acquisition

This is a decorative image for: Constructing 3D objects through Deep Learning
October 18, 2022

Image-based 3D Object Reconstruction State-of-the-Art and trends in the Deep Learning Era

3D reconstruction is one of the most complex issues of deep learning systems. There have been multiple types of research in this field, and almost everything has been tried on it — computer vision, computer graphics and machine learning, but to no avail. However, that has resulted in CNN or convolutional neural networks foraying into this field, which has yielded some success.

The Main Objective of the 3D Object Reconstruction

Developing this deep learning technology aims to infer the shape of 3D objects from 2D images. So, to conduct the experiment, you need the following:

  • Highly calibrated cameras that take a photograph of the image from various angles.
  • Large training datasets can predict the geometry of the object whose 3D image reconstruction needs to be done. These datasets can be collected from a database of images, or they can be collected and sampled from a video.

By using the apparatus and datasets, you will be able to proceed with the 3D reconstruction from 2D datasets.

State-of-the-art Technology Used by the Datasets for the Reconstruction of 3D Objects

The technology used for this purpose needs to stick to the following parameters:

  • Input

Training with the help of one or multiple RGB images, where the segmentation of the 3D ground truth needs to be done. It could be one image, multiple images or even a video stream.

The testing will also be done on the same parameters, which will also help to create a uniform, cluttered background, or both.

  • Output

The volumetric output will be done in both high and low resolution, and the surface output will be generated through parameterisation, template deformation and point cloud. Moreover, the direct and intermediate outputs will be calculated this way.

  • Network architecture used

The architecture used in training is 3D-VAE-GAN, which has an encoder and a decoder, with TL-Net and conditional GAN. At the same time, the testing architecture is 3D-VAE, which has an encoder and a decoder.

  • Training used

The degree of supervision used in 2D vs 3D supervision, weak supervision along with loss functions have to be included in this system. The training procedure is adversarial training with joint 2D and 3D embeddings. Also, the network architecture is extremely important for the speed and processing quality of the output images.

  • Practical applications and use cases

Volumetric representations and surface representations can do the reconstruction. Powerful computer systems need to be used for reconstruction.

Given below are some of the places where 3D Object Reconstruction Deep Learning Systems are used:

  • 3D reconstruction technology can be used in the Police Department for drawing the faces of criminals whose images have been procured from a crime site where their faces are not completely revealed.
  • It can be used for re-modelling ruins at ancient architectural sites. The rubble or the debris stubs of structures can be used to recreate the entire building structure and get an idea of how it looked in the past.
  • They can be used in plastic surgery where the organs, face, limbs or any other portion of the body has been damaged and needs to be rebuilt.
  • It can be used in airport security, where concealed shapes can be used for guessing whether a person is armed or is carrying explosives or not.
  • It can also help in completing DNA sequences.

So, if you are planning to implement this technology, then you can rent the required infrastructure from E2E Networks and avoid investing in it. And if you plan to learn more about such topics, then keep a tab on the blog section of the website

Reference Links

https://tongtianta.site/paper/68922

https://github.com/natowi/3D-Reconstruction-with-Deep-Learning-Methods

This is a decorative image for: Comprehensive Guide to Deep Q-Learning for Data Science Enthusiasts
October 18, 2022

A Comprehensive Guide To Deep Q-Learning For Data Science Enthusiasts

For all data science enthusiasts who would love to dig deep, we have composed a write-up about Q-Learning specifically for you all. Deep Q-Learning and Reinforcement learning (RL) are extremely popular these days. These two data science methodologies use Python libraries like TensorFlow 2 and openAI’s Gym environment.

So, read on to know more.

What is Deep Q-Learning?

Deep Q-Learning utilizes the principles of Q-learning, but instead of using the Q-table, it uses the neural network. The algorithm of deep Q-Learning uses the states as input and the optimal Q-value of every action possible as the output. The agent gathers and stores all the previous experiences in the memory of the trained tuple in the following order:

State> Next state> Action> Reward

The neural network training stability increases using a random batch of previous data by using the experience replay. Experience replay also means the previous experiences stocking, and the target network uses it for training and calculation of the Q-network and the predicted Q-Value. This neural network uses openAI Gym, which is provided by taxi-v3 environments.

Now, any understanding of Deep Q-Learning   is incomplete without talking about Reinforcement Learning.

What is Reinforcement Learning?

Reinforcement is a subsection of ML. This part of ML is related to the action in which an environmental agent participates in a reward-based system and uses Reinforcement Learning to maximize the rewards. Reinforcement Learning is a different technique from unsupervised learning or supervised learning because it does not require a supervised input/output pair. The number of corrections is also less, so it is a highly efficient technique.

Now, the understanding of reinforcement learning is incomplete without knowing about Markov Decision Process (MDP). MDP is involved with each state that has been presented in the results of the environment, derived from the state previously there. The information which composes both states is gathered and transferred to the decision process. The task of the chosen agent is to maximize the awards. The MDP optimizes the actions and helps construct the optimal policy.

For developing the MDP, you need to follow the Q-Learning Algorithm, which is an extremely important part of data science and machine learning.

What is Q-Learning Algorithm?

The process of Q-Learning is important for understanding the data from scratch. It involves defining the parameters, choosing the actions from the current state and also choosing the actions from the previous state and then developing a Q-table for maximizing the results or output rewards.

The 4 steps that are involved in Q-Learning:

  1. Initializing parameters – The RL (reinforcement learning) model learns the set of actions that the agent requires in the state, environment and time.
  2. Identifying current state – The model stores the prior records for optimal action definition for maximizing the results. For acting in the present state, the state needs to be identified and perform an action combination for it.
  3. Choosing the optimal action set and gaining the relevant experience – A Q-table is generated from the data with a set of specific states and actions, and the weight of this data is calculated for updating the Q-Table to the following step.
  4. Updating Q-table rewards and next state determination – After the relevant experience is gained and agents start getting environmental records. The reward amplitude helps to present the subsequent step.  

In case the Q-table size is huge, then the generation of the model is a time-consuming process. This situation requires Deep Q-learning.

Hopefully, this write-up has provided an outline of Deep Q-Learning and its related concepts. If you wish to learn more about such topics, then keep a tab on the blog section of the E2E Networks website.

Reference Links

https://analyticsindiamag.com/comprehensive-guide-to-deep-q-learning-for-data-science-enthusiasts/

https://medium.com/@jereminuerofficial/a-comprehensive-guide-to-deep-q-learning-8aeed632f52f

This is a decorative image for: GAUDI: A Neural Architect for Immersive 3D Scene Generation
October 13, 2022

GAUDI: A Neural Architect for Immersive 3D Scene Generation

The evolution of artificial intelligence in the past decade has been staggering, and now the focus is shifting towards AI and ML systems to understand and generate 3D spaces. As a result, there has been extensive research on manipulating 3D generative models. In this regard, Apple’s AI and ML scientists have developed GAUDI, a method specifically for this job.

An introduction to GAUDI

The GAUDI 3D immersive technique founders named it after the famous architect Antoni Gaudi. This AI model takes the help of a camera pose decoder, which enables it to guess the possible camera angles of a scene. Hence, the decoder then makes it possible to predict the 3D canvas from almost every angle.

What does GAUDI do?

GAUDI can perform multiple functions –

  • The extensions of these generative models have a tremendous effect on ML and computer vision. Pragmatically, such models are highly useful. They are applied in model-based reinforcement learning and planning world models, SLAM is s, or 3D content creation.
  • Generative modelling for 3D objects has been used for generating scenes using graf, pigan, and gsn, which incorporate a GAN (Generative Adversarial Network). The generator codes radiance fields exclusively. Using the 3D space in the scene along with the camera pose generates the 3D image from that point. This point has a density scalar and RGB value for that specific point in 3D space. This can be done from a 2D camera view. It does this by imposing 3D datasets on those 2D shots. It isolates various objects and scenes and combines them to render a new scene altogether.
  • GAUDI also removes GANs pathologies like mode collapse and improved GAN.
  • GAUDI also uses this to train data on a canonical coordinate system. You can compare it by looking at the trajectory of the scenes.

How is GAUDI applied to the content?

The steps of application for GAUDI have been given below:

  • Each trajectory is created, which consists of a sequence of posed images (These images are from a 3D scene) encoded into a latent representation. This representation which has a radiance field or what we refer to as the 3D scene and the camera path is created in a disentangled way. The results are interpreted as free parameters. The problem is optimized by and formulation of a reconstruction objective.
  • This simple training process is then scaled to trajectories, thousands of them creating a large number of views. The model samples the radiance fields totally from the previous distribution that the model has learned.
  • The scenes are thus synthesized by interpolation within the hidden space.
  • The scaling of 3D scenes generates many scenes that contain thousands of images. During training, there is no issue related to canonical orientation or mode collapse.
  • A novel de-noising optimization technique is used to find hidden representations that collaborate in modelling the camera poses and the radiance field to create multiple datasets with state-of-the-art performance in generating 3D scenes by building a setup that uses images and text.

To conclude, GAUDI has more capabilities and can also be used for sampling various images and video datasets. Furthermore, this will make a foray into AR (augmented reality) and VR (virtual reality). With GAUDI in hand, the sky is only the limit in the field of media creation. So, if you enjoy reading about the latest development in the field of AI and ML, then keep a tab on the blog section of the E2E Networks website.

Reference Links

https://www.researchgate.net/publication/362323995_GAUDI_A_Neural_Architect_for_Immersive_3D_Scene_Generation

https://www.technology.org/2022/07/31/gaudi-a-neural-architect-for-immersive-3d-scene-generation/ 

https://www.patentlyapple.com/2022/08/apple-has-unveiled-gaudi-a-neural-architect-for-immersive-3d-scene-generation.html

Build on the most powerful infrastructure cloud

A vector illustration of a tech city using latest cloud technologies & infrastructure