How to Build an LLM Chatbot on Your Data 

August 14, 2023

I’m sure each of us would have interacted with a chatbot. It might have been to get the status of your order on an e-commerce platform or while chatting with a health helpline number to get a diet plan, and so on. Using Chatbots or Conversational AI technologies can help businesses save a lot of human hours that go into customer service and answering queries. With the advent of Large language Models (LLMs) that are able to comprehend human language with context, the possibilities in the domain of conversational AI bots are at an all time high.

Fine-tuning an LLM on Custom Data

As LLMs are trained on huge amounts of data, they are better at interpreting human language and the intention behind what an user wants. We can leverage this to our advantage by fine-tuning these LLMs on our custom data. During fine-tuning, a LLM will learn the custom training data you provide, incremental to the knowledge it has gained during pre-training. Fine-tuning can help in making chatbots for specific domains like healthcare support, technical documentation support bot, to name a few. The use-cases are varied.

In this article, I’ll explain how to train an LLM with pre-trained weights on a custom dataset along with a code walkthrough.

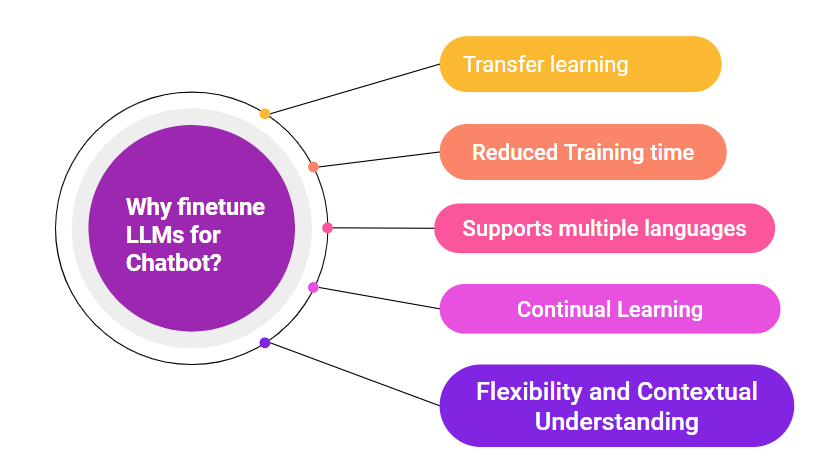
Fig. 1: 5 reasons why you should fine-tune LLMs to make a Chatbot.

Introduction to Llama Large Language Model

I’ll be using Meta’s Large Language Model, Llama. Meta has released a family of large language models that are trained on huge text corpuses and can be used for various NLP tasks like conversational AI, text summarization, sentiment classification, and more. I’ll be choosing the ‘Llama-2-7b-hf’ model available on the Hugging Face platform, which is trained on 7 billion parameters. This is also optimised for dialogue use cases, which suits our needs. There are also Llama models that are pre-trained on 30-70 billion parameters – you can check the list here if you want to see all the options.

Tips Before Starting the Project

We’ll be doing the project using Python on E2E Networks. You need to be familiar with some of the basics of NLP like tokenization. I suggest reading up on the working of transformer models for a better understanding. We’ll be using the pre-trained model weights and datasets from the Hugging Face hub. More relevant concepts include Neural Network Training Pipeline and Hyper Parameter Fine-Tuning.

Step 1: Setting up the E2E Node

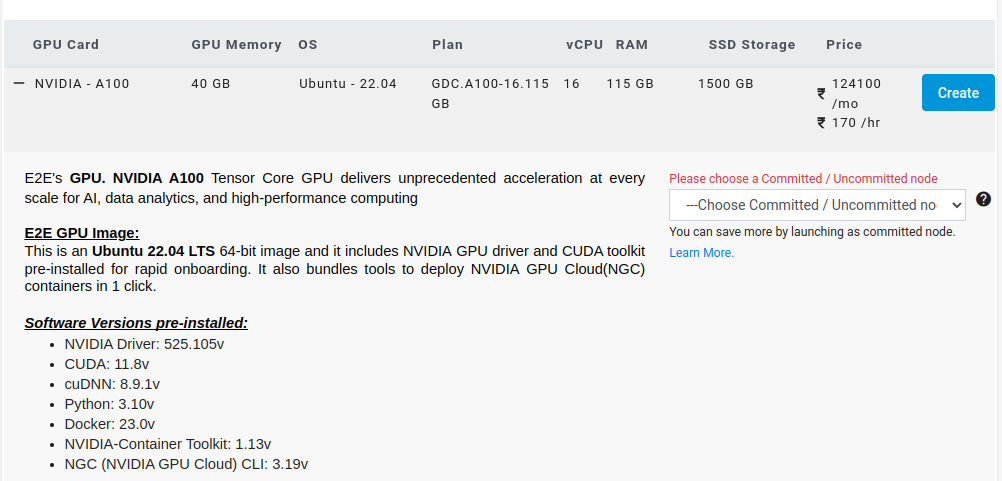
Create an Ubuntu 22.04 GPU node on E2E.

Select a 40GB Machine and hit Create.

Check on Enable Backup and hit Create. 

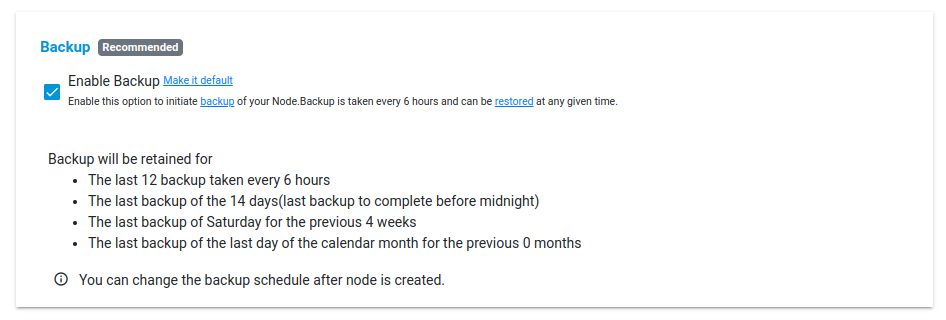
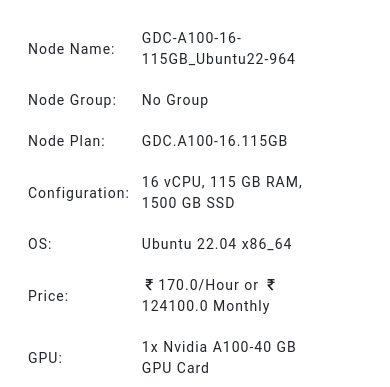
The node will now be created with the following specifications:

Log in to the E2E server using ssh via terminal:


ssh username@IP_address

After you are logged in, cd into /mnt:


cd /mnt

Step 2: Install and Import the Libraries 

The first step in any Machine Learning project is to install and import the libraries you would require. Let us take a quick look at the different packages we would be working with. First, ‘datasets’ package, which we’ll use to load and work with the datasets available on Hugging Face hub. To perform fine-tuning, we’ll be using a simple and efficient approach with the LoRa tuner. It’s a method that uses an optimised and minimum number of parameters to fine-tune, and can help you save up on the computational resources. To use this, we import the LoraConfig class from the ‘peft’ package. We use Pytorch for the training framework. Run the below code from your terminal.


!pip install datasets
!pip install transformers
!pip install peft
!pip install torch
!pip install bits

When you execute the pip command, you should be able to see the packages being collected and installed as shown below.


root@e2e-81-156:/mnt# pip install transformers
Collecting transformers
  Downloading transformers-4.31.0-py3-none-any.whl (7.4 MB)
     ━━━━━━━━━━━━━━━━━━━━━━━━━━━━━━━━━━━━━━━━ 7.4/7.4 MB 30.6 MB/s eta 0:00:00
Collecting tokenizers!=0.11.3,<0.14,>=0.11.1
  Downloading tokenizers-0.13.3-cp310-cp310-manylinux_2_17_x86_64.manylinux2014_x86_64.whl (7.8 MB)
     ━━━━━━━━━━━━━━━━━━━━━━━━━━━━━━━━━━━━━━━━ 7.8/7.8 MB 88.4 MB/s eta 0:00:00
Requirement already satisfied: pyyaml>=5.1 in /usr/lib/python3/dist-packages (from transformers) (5.4.1)
Collecting huggingface-hub<1.0,>=0.14.1
  Downloading huggingface_hub-0.16.4-py3-none-any.whl (268 kB)
     ━━━━━━━━━━━━━━━━━━━━━━━━━━━━━━━━━━━━━━━━ 268.8/268.8 KB 31.1 MB/s eta 0:00:00
Collecting numpy>=1.17
  Downloading numpy-1.25.2-cp310-cp310-manylinux_2_17_x86_64.manylinux2014_x86_64.whl (18.2 MB)
     ━━━━━━━━━━━━━━━━━━━━━━━━━━━━━━━━━━━━━━━━ 18.2/18.2 MB 55.3 MB/s eta 0:00:00
Collecting safetensors>=0.3.1
  Downloading safetensors-0.3.1-cp310-cp310-manylinux_2_17_x86_64.manylinux2014_x86_64.whl (1.3 MB)
     ━━━━━━━━━━━━━━━━━━━━━━━━━━━━━━━━━━━━━━━━ 1.3/1.3 MB 29.9 MB/s eta 0:00:00
Collecting packaging>=20.0
  Downloading packaging-23.1-py3-none-any.whl (48 kB)
     ━━━━━━━━━━━━━━━━━━━━━━━━━━━━━━━━━━━━━━━━ 48.9/48.9 KB 16.4 MB/s eta 0:00:00
Collecting regex!=2019.12.17
  Downloading regex-2023.6.3-cp310-cp310-manylinux_2_17_x86_64.manylinux2014_x86_64.whl (770 kB)
     ━━━━━━━━━━━━━━━━━━━━━━━━━━━━━━━━━━━━━━━━ 770.4/770.4 KB 53.1 MB/s eta 0:00:00
Requirement already satisfied: requests in /usr/lib/python3/dist-packages (from transformers) (2.25.1)
Collecting filelock
  Downloading filelock-3.12.2-py3-none-any.whl (10 kB)
Collecting tqdm>=4.27
  Downloading tqdm-4.65.0-py3-none-any.whl (77 kB)
     ━━━━━━━━━━━━━━━━━━━━━━━━━━━━━━━━━━━━━━━━ 77.1/77.1 KB 30.8 MB/s eta 0:00:00
Collecting typing-extensions>=3.7.4.3
  Downloading typing_extensions-4.7.1-py3-none-any.whl (33 kB)
Collecting fsspec
  Downloading fsspec-2023.6.0-py3-none-any.whl (163 kB)
     ━━━━━━━━━━━━━━━━━━━━━━━━━━━━━━━━━━━━━━━━ 163.8/163.8 KB 54.0 MB/s eta 0:00:00
Installing collected packages: tokenizers, safetensors, typing-extensions, tqdm, regex, packaging, numpy, fsspec, filelock, huggingface-hub, transformers
Successfully installed filelock-3.12.2 fsspec-2023.6.0 huggingface-hub-0.16.4 numpy-1.25.2 packaging-23.1 regex-2023.6.3 safetensors-0.3.1 tokenizers

Once all the packages are successfully installed, next run the below snippet to import the modules and classes you want to use from each package.


# Code to import modules
from dataclasses import dataclass,field
import torch
from datasets import load_dataset
from peft import LoraConfig
from transformers import AutoTokenizer, AutoModelForCausalLM, BitsAndBytesConfig

We use the torch module for the training pipeline. The ‘transformers’ library is a package of Hugging Face and provides us with various classes to help in LLM fine-tuning. Let’s take a quick look at each component.

  • AutoModelForCausalLM: This class will help us to load any pre-trained model available in Hugging Face. It is specific for casual language modelling.
  • AutoTokenizer: Tokenization is the process of converting the text input into tokens, which can be further provided to transformer models. There are many tokenizers available to do this task, which can be loaded by the ‘AutoTokenizer’ class.
  • BitsAndBytesConfig: It is to configure the parameters for the Bits and Bytes model, which is specialised to perform at low-resource availability.
  • TrainingArguments: This functionality provides us an easy way to configure the different parameters we would need to tune, like the number of epochs, learning rate, and so on.

Step 3: Set Up the Quantization Configuration

As the next step, we define arguments for the Bits and Bytes model, which is used to reduce the size of large models, like the Llama-7b in our case. 

Wondering What It Does?

The Llama model, by default, is used in 16-bit precision. The Bits and Bytes model will quantize the Llama model’s weights to 4-bit precision. This is a very handy technique when you have limited resources. You need to set the ‘load_in_4bit’ parameter as ‘True’ to enable this. 


# Run code to define quantization 
configurationquantiz_config=BitsAndBytesConfig(load_in_4bit=True, 
bnb_4bit_use_double_quant=True, 
bnb_4bit_quant_type="nf4", 
bnb_4bit_compute_dtype=torch.bfloat16)

Step 4: Prepare the Llama Model for Fine-tune

The next step is to load our pre-trained model, for which we use the AutoModelForCausalLM class. This class has a function ‘from_pretrained()’, which can be called to provide our input arguments. The first argument we pass is the model name, which is ‘meta-llama/Llama-2-7b-hf’. Note that you need to apply and fill a form to get access to use this model version released by meta. But, there are alternative public models of Llama 7b made available by various researchers in Huggingface (daryl149/llama-2-7b-hf).

The next parameter is the quantization configuration which we defined in the previous section. To load the model configuration and pre-trained weights from Hugging Face, you also need to pass the Hugging Face token. You can create your token for free! Sign up on Hugging Face if you don’t have an account, go to ‘Settings > Access Token’ and click on Create as shown in the below screenshot.

Once you have the token, run the below code. Ensure to replace the ‘PASTE YOUR TOKEN’ with your generated token before executing.


# Run code to define quantization configuration

llm_name= “daryl149/llama-2-7b-hf”
tokenizer = AutoTokenizer.from_pretrained(llm_name) 
model = AutoModelForCausalLM.from_pretrained(llm_name, quantization_config=quantiz_config, token=“PASTE YOUR TOKEN”)
model.config.pretraining_tp=1
Downloading (…)model.bin.index.json: 100%|███████████████████████████████████████████████| 26.8k/26.8k [00:00<00:00, 156MB/s]
Downloading shards:   0%|                                                                              | 0/2 [00:00

When you run the code, you should see the progress of download of the model files as shown above.To indicate that we want the model to use the pre-trained weights and not start from scratch, we set the pretraining_tp as 1. We have also initialised a tokenizer, to encode the text inputs into desirable format for the model. When we use the AutoTokenizer class with the model name as input, a tokenizer specific to our LLM will be initialised. For a tokenizer, we can specify a pad token to pad the input text to a fixed length. I have specified my pad token as EOS (End of Sentence) token.

Step 5: Use the LoRa Tuner

As we are using the LoRa tuner for fine-tuning, we need to specify the configuration for it. There are a few important parameters you should take note of:

  • lora_alpha: This parameter is to control by how much the LLM will adapt to the new task we are fine-tuning on. The higher you set its value to, the higher will the adaptation be and the number of trainable parameters.
  • lora_dropout: It is a regularisation parameter. It works just like how we add dropout layers in neural network training to avoid overfitting. This helps the model to not memorise the training examples, and generalise well to new data. 
  • r: This denotes the attention dimension, which will control the size of the attention window used by the LoRa tuner.
  • task_type: It is used to specify the kind of task we are fine-tuning for. The options are casual language modelling (causal_lm) and classification. In our case, we choose the former.

Run the below code to define the Lora tuner.


# Run code to define quantization configuration

finetuner_configuration = LoraConfig(
        lora_alpha=16,
        lora_dropout=0.1,
        r=64,
        task_type="CAUSAL_LM")

Step 6: Train the LLM

Now that we have prepared our model and fine-tuner, let's decide on the training arguments and get to training. The important parameters here are the following:

  • Learning rate: It is a hyperparameter that will decide the pace at which your model learns. It is advised to choose a slow rate to avoid overfitting and obtain better convergence.
  • Warmup_ratio: Before you exercise you do a warm-up, don’t you? Similarly, we want to start slow and then catch up to the learning rate defined over the initial few epochs. I have set it to 0.05, which means the learning rate will be increased over 5% of the training epochs and then it becomes stable.

Next, we load the dataset of our choice by using the ‘load_dataset’ functionality that comes with the datasets package of Hugging Face. I’m choosing a dataset on famous English quotes. This will help us build a bot that people can chat with while looking for inspirational quotes for lectures, social media content, and more.


# define finetune parameters

my_parameters = TrainingArguments(
    output_dir="./my_output",
    per_device_train_batch_size=5,
    gradient_accumulation_steps=5,
    learning_rate=0.01,
    max_steps=10,
    warmup_ratio=0.05,
    group_by_length=True,
    lr_scheduler_type="constant"
)

# download the dataset
quotes_data = load_dataset("Abirate/english_quotes") 
quotes_data = data.map(lambda samples: tokenizer(samples["quote"]), batched=True)
Loading checkpoint shards: 100%|███████████████████████████████████████████████████████████████| 2/2 [00:07<00:00,  3.52s/it]
Downloading readme: 100%|███████████████████████████████████████████████████████████████| 5.55k/5.55k [00:00<00:00, 7.18MB/s]
Downloading data: 100%|████████████████████████████████████████████████████████████████████| 647k/647k [00:01<00:00, 587kB/s]
Downloading data files: 100%|██████████████████████████████████████████████████████████████████| 1/1 [00:01<00:00,  1.10s/it]
Extracting data files: 100%|█████████████████████████████████████████████████████████████████| 1/1 [00:00<00:00, 2468.69it/s]
Generating train split: 2508 examples [00:00, 367486.97 examples/s]
Map: 100%|███████████████████████████████

Run the above code and you should be able to see the progress of download of your dataset as shown. It may take some time to extract 100% of files based on how huge your dataset is.

And here comes the final step! We can use the SFTTrainer class to wrap our model, quantization configuration, dataset and training arguments as shown below. If you call the train() function, the training would get started.  When the training is completed, you can save it to your output directory.


# train the LLM

from trl import SFTTrainer
trainer = SFTTrainer(
    model=model,
    train_dataset=quotes_data,
    peft_config=finetuner_configuration,
    tokenizer=tokenizer,
    args=my_parameters,

)

trainer.train()
trainer.model.save(‘./finetuned_chatbot_v1’)

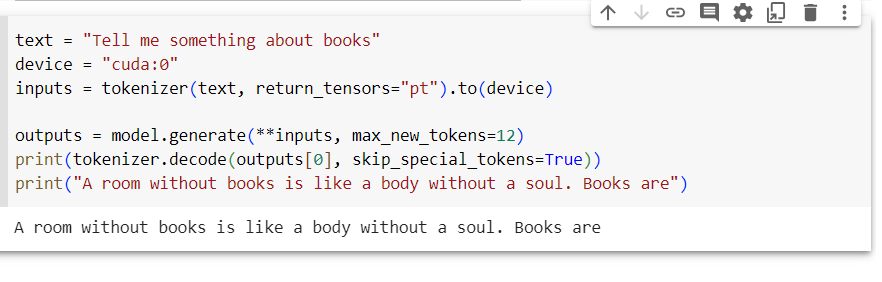
user_input = "Books are" 
inputs = tokenizer(text, return_tensors="pt")
outputs = model.generate(**inputs, max_new_tokens=20) print(tokenizer.decode(outputs[0], skip_special_tokens=True))

Setting `pad_token_id` to `eos_token_id`:0 for open-end generation

Books are your door to wisdom. Room without books is like body without

You can then load the saved model from the directory anytime you want.

Conclusion

In this blog, we went through the process of how to leverage transfer learning and fine-tune the Llama LLM on a custom Hugging Face dataset. If you have domain specific data, you can convert it into a CSV file and upload it on Hugging Face, and still use the functionalities available. Note that we use quantization techniques to reduce the model size, but it depends upon the size of the LLM and the dataset you are working with. If the size is large, it is advisable to work with multiple GPUs. Similar to this, you can implement LLM-powered chatbots for a wide range of tasks.

Latest Blogs
This is a decorative image for: A Complete Guide To Customer Acquisition For Startups
October 18, 2022

A Complete Guide To Customer Acquisition For Startups

Any business is enlivened by its customers. Therefore, a strategy to constantly bring in new clients is an ongoing requirement. In this regard, having a proper customer acquisition strategy can be of great importance.

So, if you are just starting your business, or planning to expand it, read on to learn more about this concept.

The problem with customer acquisition

As an organization, when working in a diverse and competitive market like India, you need to have a well-defined customer acquisition strategy to attain success. However, this is where most startups struggle. Now, you may have a great product or service, but if you are not in the right place targeting the right demographic, you are not likely to get the results you want.

To resolve this, typically, companies invest, but if that is not channelized properly, it will be futile.

So, the best way out of this dilemma is to have a clear customer acquisition strategy in place.

How can you create the ideal customer acquisition strategy for your business?

  • Define what your goals are

You need to define your goals so that you can meet the revenue expectations you have for the current fiscal year. You need to find a value for the metrics –

  • MRR – Monthly recurring revenue, which tells you all the income that can be generated from all your income channels.
  • CLV – Customer lifetime value tells you how much a customer is willing to spend on your business during your mutual relationship duration.  
  • CAC – Customer acquisition costs, which tells how much your organization needs to spend to acquire customers constantly.
  • Churn rate – It tells you the rate at which customers stop doing business.

All these metrics tell you how well you will be able to grow your business and revenue.

  • Identify your ideal customers

You need to understand who your current customers are and who your target customers are. Once you are aware of your customer base, you can focus your energies in that direction and get the maximum sale of your products or services. You can also understand what your customers require through various analytics and markers and address them to leverage your products/services towards them.

  • Choose your channels for customer acquisition

How will you acquire customers who will eventually tell at what scale and at what rate you need to expand your business? You could market and sell your products on social media channels like Instagram, Facebook and YouTube, or invest in paid marketing like Google Ads. You need to develop a unique strategy for each of these channels. 

  • Communicate with your customers

If you know exactly what your customers have in mind, then you will be able to develop your customer strategy with a clear perspective in mind. You can do it through surveys or customer opinion forms, email contact forms, blog posts and social media posts. After that, you just need to measure the analytics, clearly understand the insights, and improve your strategy accordingly.

Combining these strategies with your long-term business plan will bring results. However, there will be challenges on the way, where you need to adapt as per the requirements to make the most of it. At the same time, introducing new technologies like AI and ML can also solve such issues easily. To learn more about the use of AI and ML and how they are transforming businesses, keep referring to the blog section of E2E Networks.

Reference Links

https://www.helpscout.com/customer-acquisition/

https://www.cloudways.com/blog/customer-acquisition-strategy-for-startups/

https://blog.hubspot.com/service/customer-acquisition

This is a decorative image for: Constructing 3D objects through Deep Learning
October 18, 2022

Image-based 3D Object Reconstruction State-of-the-Art and trends in the Deep Learning Era

3D reconstruction is one of the most complex issues of deep learning systems. There have been multiple types of research in this field, and almost everything has been tried on it — computer vision, computer graphics and machine learning, but to no avail. However, that has resulted in CNN or convolutional neural networks foraying into this field, which has yielded some success.

The Main Objective of the 3D Object Reconstruction

Developing this deep learning technology aims to infer the shape of 3D objects from 2D images. So, to conduct the experiment, you need the following:

  • Highly calibrated cameras that take a photograph of the image from various angles.
  • Large training datasets can predict the geometry of the object whose 3D image reconstruction needs to be done. These datasets can be collected from a database of images, or they can be collected and sampled from a video.

By using the apparatus and datasets, you will be able to proceed with the 3D reconstruction from 2D datasets.

State-of-the-art Technology Used by the Datasets for the Reconstruction of 3D Objects

The technology used for this purpose needs to stick to the following parameters:

  • Input

Training with the help of one or multiple RGB images, where the segmentation of the 3D ground truth needs to be done. It could be one image, multiple images or even a video stream.

The testing will also be done on the same parameters, which will also help to create a uniform, cluttered background, or both.

  • Output

The volumetric output will be done in both high and low resolution, and the surface output will be generated through parameterisation, template deformation and point cloud. Moreover, the direct and intermediate outputs will be calculated this way.

  • Network architecture used

The architecture used in training is 3D-VAE-GAN, which has an encoder and a decoder, with TL-Net and conditional GAN. At the same time, the testing architecture is 3D-VAE, which has an encoder and a decoder.

  • Training used

The degree of supervision used in 2D vs 3D supervision, weak supervision along with loss functions have to be included in this system. The training procedure is adversarial training with joint 2D and 3D embeddings. Also, the network architecture is extremely important for the speed and processing quality of the output images.

  • Practical applications and use cases

Volumetric representations and surface representations can do the reconstruction. Powerful computer systems need to be used for reconstruction.

Given below are some of the places where 3D Object Reconstruction Deep Learning Systems are used:

  • 3D reconstruction technology can be used in the Police Department for drawing the faces of criminals whose images have been procured from a crime site where their faces are not completely revealed.
  • It can be used for re-modelling ruins at ancient architectural sites. The rubble or the debris stubs of structures can be used to recreate the entire building structure and get an idea of how it looked in the past.
  • They can be used in plastic surgery where the organs, face, limbs or any other portion of the body has been damaged and needs to be rebuilt.
  • It can be used in airport security, where concealed shapes can be used for guessing whether a person is armed or is carrying explosives or not.
  • It can also help in completing DNA sequences.

So, if you are planning to implement this technology, then you can rent the required infrastructure from E2E Networks and avoid investing in it. And if you plan to learn more about such topics, then keep a tab on the blog section of the website

Reference Links

https://tongtianta.site/paper/68922

https://github.com/natowi/3D-Reconstruction-with-Deep-Learning-Methods

This is a decorative image for: Comprehensive Guide to Deep Q-Learning for Data Science Enthusiasts
October 18, 2022

A Comprehensive Guide To Deep Q-Learning For Data Science Enthusiasts

For all data science enthusiasts who would love to dig deep, we have composed a write-up about Q-Learning specifically for you all. Deep Q-Learning and Reinforcement learning (RL) are extremely popular these days. These two data science methodologies use Python libraries like TensorFlow 2 and openAI’s Gym environment.

So, read on to know more.

What is Deep Q-Learning?

Deep Q-Learning utilizes the principles of Q-learning, but instead of using the Q-table, it uses the neural network. The algorithm of deep Q-Learning uses the states as input and the optimal Q-value of every action possible as the output. The agent gathers and stores all the previous experiences in the memory of the trained tuple in the following order:

State> Next state> Action> Reward

The neural network training stability increases using a random batch of previous data by using the experience replay. Experience replay also means the previous experiences stocking, and the target network uses it for training and calculation of the Q-network and the predicted Q-Value. This neural network uses openAI Gym, which is provided by taxi-v3 environments.

Now, any understanding of Deep Q-Learning   is incomplete without talking about Reinforcement Learning.

What is Reinforcement Learning?

Reinforcement is a subsection of ML. This part of ML is related to the action in which an environmental agent participates in a reward-based system and uses Reinforcement Learning to maximize the rewards. Reinforcement Learning is a different technique from unsupervised learning or supervised learning because it does not require a supervised input/output pair. The number of corrections is also less, so it is a highly efficient technique.

Now, the understanding of reinforcement learning is incomplete without knowing about Markov Decision Process (MDP). MDP is involved with each state that has been presented in the results of the environment, derived from the state previously there. The information which composes both states is gathered and transferred to the decision process. The task of the chosen agent is to maximize the awards. The MDP optimizes the actions and helps construct the optimal policy.

For developing the MDP, you need to follow the Q-Learning Algorithm, which is an extremely important part of data science and machine learning.

What is Q-Learning Algorithm?

The process of Q-Learning is important for understanding the data from scratch. It involves defining the parameters, choosing the actions from the current state and also choosing the actions from the previous state and then developing a Q-table for maximizing the results or output rewards.

The 4 steps that are involved in Q-Learning:

  1. Initializing parameters – The RL (reinforcement learning) model learns the set of actions that the agent requires in the state, environment and time.
  2. Identifying current state – The model stores the prior records for optimal action definition for maximizing the results. For acting in the present state, the state needs to be identified and perform an action combination for it.
  3. Choosing the optimal action set and gaining the relevant experience – A Q-table is generated from the data with a set of specific states and actions, and the weight of this data is calculated for updating the Q-Table to the following step.
  4. Updating Q-table rewards and next state determination – After the relevant experience is gained and agents start getting environmental records. The reward amplitude helps to present the subsequent step.  

In case the Q-table size is huge, then the generation of the model is a time-consuming process. This situation requires Deep Q-learning.

Hopefully, this write-up has provided an outline of Deep Q-Learning and its related concepts. If you wish to learn more about such topics, then keep a tab on the blog section of the E2E Networks website.

Reference Links

https://analyticsindiamag.com/comprehensive-guide-to-deep-q-learning-for-data-science-enthusiasts/

https://medium.com/@jereminuerofficial/a-comprehensive-guide-to-deep-q-learning-8aeed632f52f

This is a decorative image for: GAUDI: A Neural Architect for Immersive 3D Scene Generation
October 13, 2022

GAUDI: A Neural Architect for Immersive 3D Scene Generation

The evolution of artificial intelligence in the past decade has been staggering, and now the focus is shifting towards AI and ML systems to understand and generate 3D spaces. As a result, there has been extensive research on manipulating 3D generative models. In this regard, Apple’s AI and ML scientists have developed GAUDI, a method specifically for this job.

An introduction to GAUDI

The GAUDI 3D immersive technique founders named it after the famous architect Antoni Gaudi. This AI model takes the help of a camera pose decoder, which enables it to guess the possible camera angles of a scene. Hence, the decoder then makes it possible to predict the 3D canvas from almost every angle.

What does GAUDI do?

GAUDI can perform multiple functions –

  • The extensions of these generative models have a tremendous effect on ML and computer vision. Pragmatically, such models are highly useful. They are applied in model-based reinforcement learning and planning world models, SLAM is s, or 3D content creation.
  • Generative modelling for 3D objects has been used for generating scenes using graf, pigan, and gsn, which incorporate a GAN (Generative Adversarial Network). The generator codes radiance fields exclusively. Using the 3D space in the scene along with the camera pose generates the 3D image from that point. This point has a density scalar and RGB value for that specific point in 3D space. This can be done from a 2D camera view. It does this by imposing 3D datasets on those 2D shots. It isolates various objects and scenes and combines them to render a new scene altogether.
  • GAUDI also removes GANs pathologies like mode collapse and improved GAN.
  • GAUDI also uses this to train data on a canonical coordinate system. You can compare it by looking at the trajectory of the scenes.

How is GAUDI applied to the content?

The steps of application for GAUDI have been given below:

  • Each trajectory is created, which consists of a sequence of posed images (These images are from a 3D scene) encoded into a latent representation. This representation which has a radiance field or what we refer to as the 3D scene and the camera path is created in a disentangled way. The results are interpreted as free parameters. The problem is optimized by and formulation of a reconstruction objective.
  • This simple training process is then scaled to trajectories, thousands of them creating a large number of views. The model samples the radiance fields totally from the previous distribution that the model has learned.
  • The scenes are thus synthesized by interpolation within the hidden space.
  • The scaling of 3D scenes generates many scenes that contain thousands of images. During training, there is no issue related to canonical orientation or mode collapse.
  • A novel de-noising optimization technique is used to find hidden representations that collaborate in modelling the camera poses and the radiance field to create multiple datasets with state-of-the-art performance in generating 3D scenes by building a setup that uses images and text.

To conclude, GAUDI has more capabilities and can also be used for sampling various images and video datasets. Furthermore, this will make a foray into AR (augmented reality) and VR (virtual reality). With GAUDI in hand, the sky is only the limit in the field of media creation. So, if you enjoy reading about the latest development in the field of AI and ML, then keep a tab on the blog section of the E2E Networks website.

Reference Links

https://www.researchgate.net/publication/362323995_GAUDI_A_Neural_Architect_for_Immersive_3D_Scene_Generation

https://www.technology.org/2022/07/31/gaudi-a-neural-architect-for-immersive-3d-scene-generation/ 

https://www.patentlyapple.com/2022/08/apple-has-unveiled-gaudi-a-neural-architect-for-immersive-3d-scene-generation.html

Build on the most powerful infrastructure cloud

A vector illustration of a tech city using latest cloud technologies & infrastructure