Introduction
Large language models (LLMs) have revolutionized the field of natural language processing, enabling new capabilities such as text generation, translation, and question answering.
However, LLMs can be prone to hallucination, generating responses that are factually incorrect or irrelevant to the user query. This can be a problem when Enterprise Chatbots are built using LLM technology.
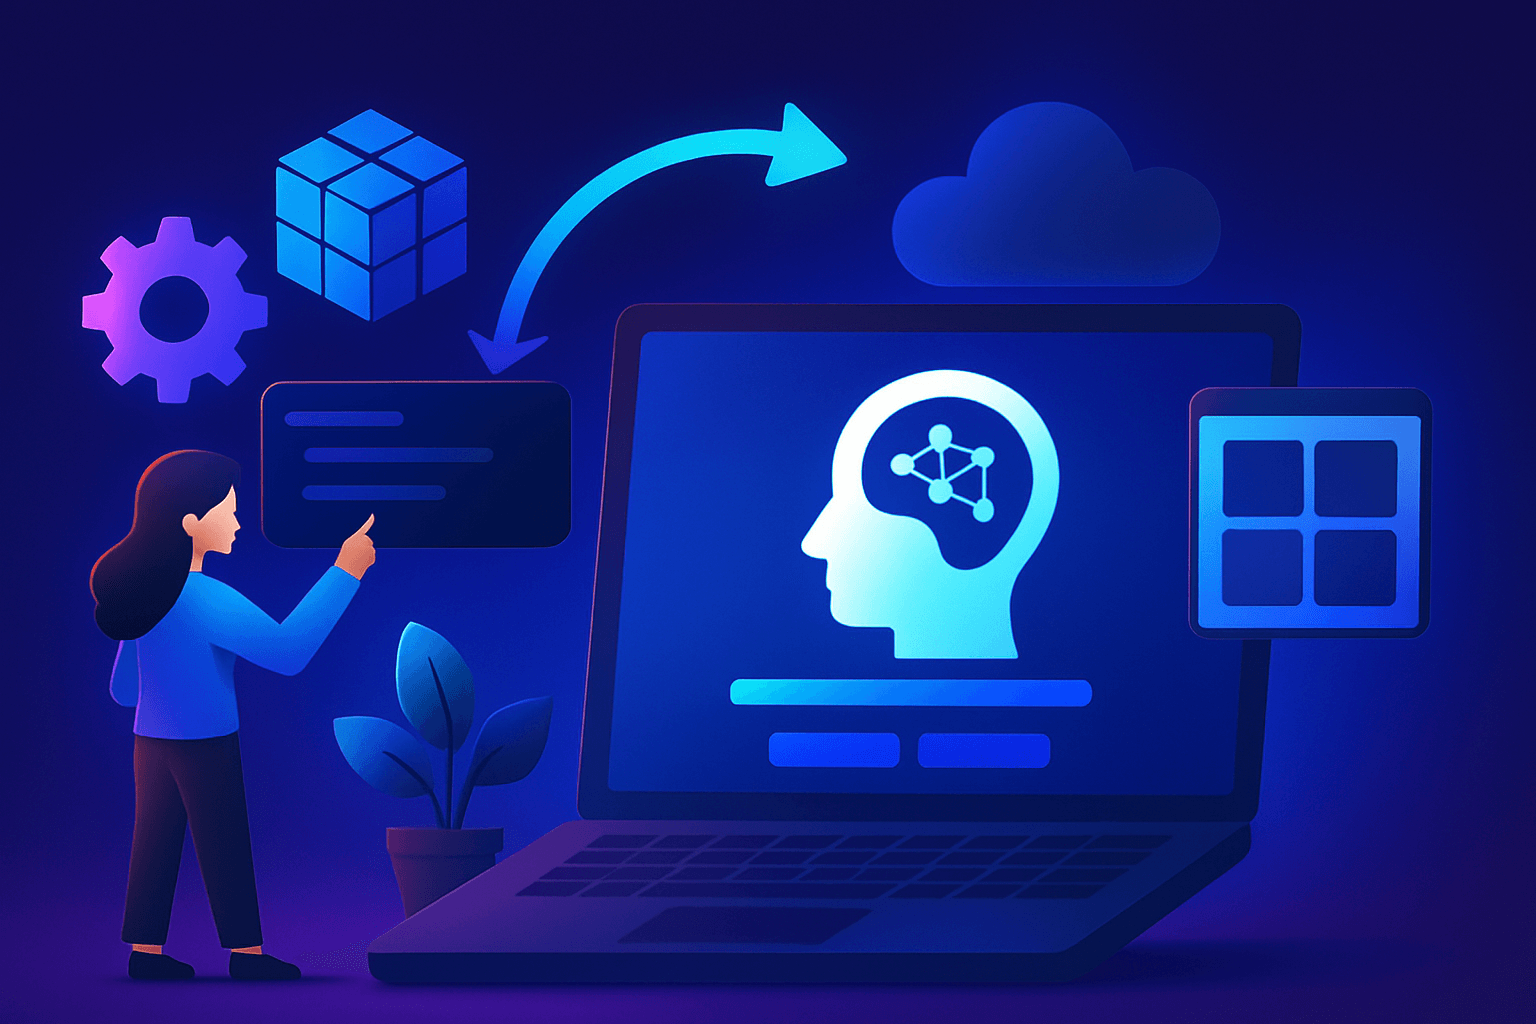
This tutorial will show you how to build a chatbot augmented by enterprise data to address this challenge. By connecting an LLM to a vector database containing your enterprise knowledge base, and harnessing the power of RAG, you can generate more factual and informative responses.
This tutorial is intended for developers with experience in Python and machine learning. No prior experience with LLMs or vector databases is required.
Approach
When a user sends a direct query to the open-source Large Language Model (LLM), there is an increased likelihood of receiving responses that may contain inaccuracies or information not directly related to the query.
However, by enriching the user's input with context extracted from a knowledge database, the LLM can more effectively craft a response that is grounded in factual information. This process can be described as Retrieval Augmented Generation.
For a more comprehensive understanding of architectures like this and their potential to enhance Natural Language Processing (NLP) tasks, you can refer to the following paper: "Retrieval-Augmented Generation for Knowledge-Intensive NLP Tasks."
Retrieval Augmented Generation (RAG) Architecture:
- Knowledge Base Integration into a Vector Database
- Start with a local directory containing proprietary data files – we will use a user-policy document from E2E Networks for this.
- Generate embeddings for each of these files using a pretrained open-source model.
- Store these embeddings, along with document IDs, in a Vector Database, facilitating semantic search.
- Enriching User Queries with Additional Context from the Knowledge Base
- When a user submits a question, search the Vector Database to identify documents that are semantically closest based on their embeddings.
- Retrieve context information based on document IDs and embeddings obtained from the search results.
- Generating Enhanced Prompts for the LLM
- Construct a prompt that incorporates the retrieved context and the user's question.
- Obtaining Factual Responses from the LLM
- Send the enhanced prompt to the LLM to generate a response grounded in factual content.
- Presentation in a Web Application
- Display the LLM response within a web application for the user.
Essentially, this approach leverages a knowledge base and semantic search to provide users with more accurate and contextually relevant responses from the LLM.
In this tutorial, we will walk you through the process of implementing a proof of concept LLM chatbot that can be trained on enterprise data, using V100 GPU nodes on E2E Cloud.
Prerequisites
E2E Cloud is one of the most affordable and a highly performant advanced GPU cloud provider, and will be our platform of choice for this tutorial.
As a first step, head over to MyAccount portal on E2E Cloud, and create an account / register if you already haven’t.
Once you have registered, click on the ‘Compute’ section in the left sidebar.
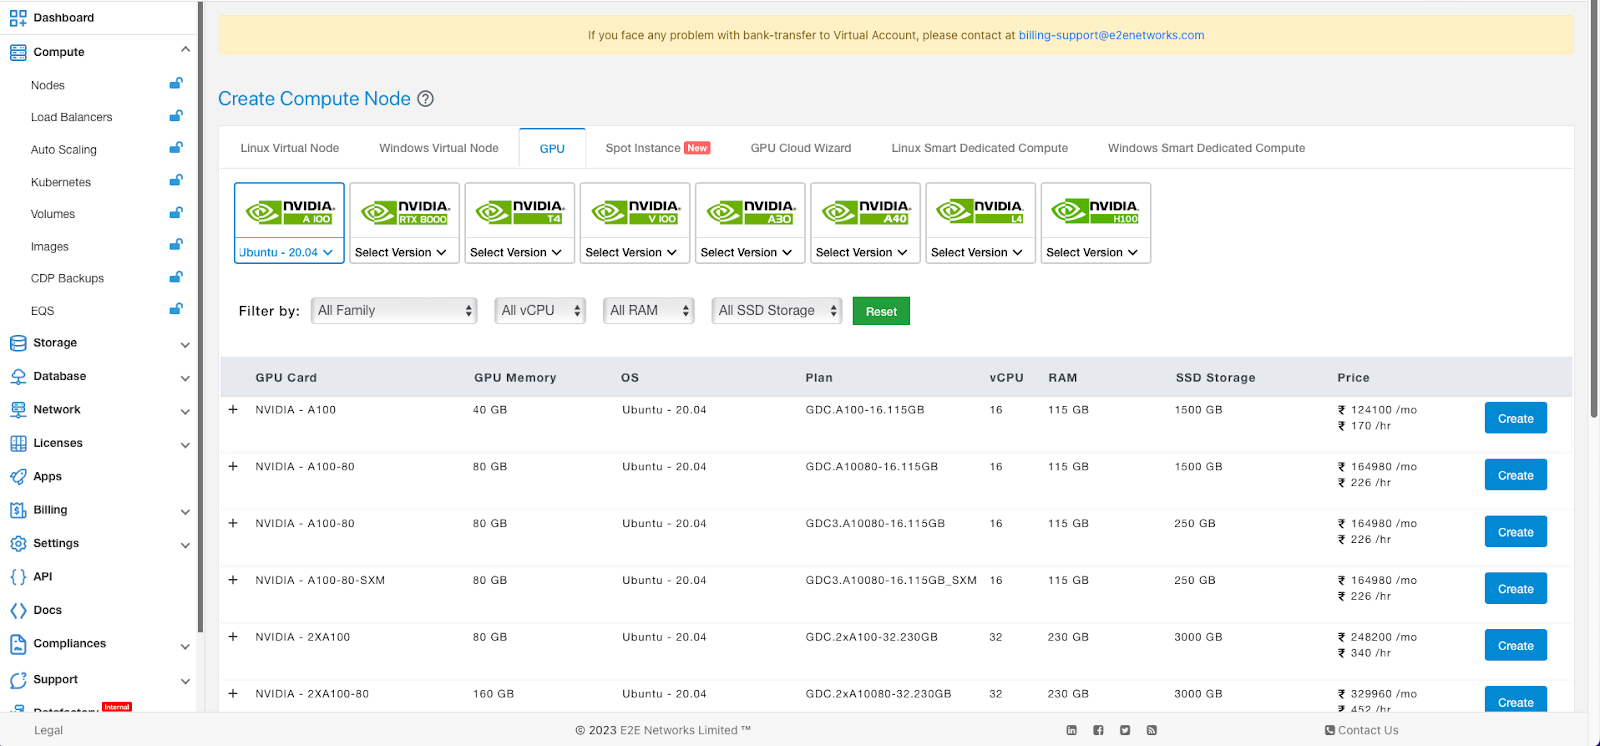
Select V100 GPU and the flavor of Linux you are comfortable with. We will select Ubuntu or Debian for this tutorial. Then click on Create.
The node should be up in a minute or two. You can choose hourly billed, or committed (which offers extra savings).
Once the node is up and running, you should assign it a Reserved IP address as well, and upload your SSH Key. These are to be found in the tabs ‘Network’ and ‘Node Security’.
For the rest of the tutorial, let’s assume the IP address assigned is 164.52.212.9.
Once you ssh into the machine using root username, create a user for development, say ‘aidev’, and allow it sudo and ssh access. Assuming you have completed these steps, let’s move to actual steps to implement the chatbot.
Step 1: Create Python Virtual Environment
For this project, we will need a vector database, for storing and retrieving the embeddings data. We will use Milvus.
We will also need Gradio, in order to quickly spin up an interface where you can test and play with the LLM.
Let’s proceed.
As is the recommended practice, you should first create a virtual environment for your project.
aidev@e2e-81-9:~$ mkdir envs
aidev@e2e-81-9:~$ cd envs/
aidev@e2e-81-9:~/envs$ python3 -m venv aienv
aidev@e2e-81-9:~/envs$ source aienv/bin/activate
Next, let’s create a directory for our project and install requirements.
(aienv) aidev@e2e-81-9:~$ mkdir e2e_llm_chatbot
(aienv) aidev@e2e-81-9:~$ cd e2e_llm_chatbot
Let’s now install the required python packages.
(aienv) aidev@e2e-81-9:~/e2e_llm_chatbot$ vim requirements.txt
…and add the following lines:
pandas==2.0.3
milvus==2.2.8
pymilvus==2.2.8
gradio==3.37.0
transformers==4.31.0
torch==2.0.1
accelerate==0.21.0
(aienv) aidev@e2e-81-9:~/e2e_llm_chatbot$ pip install -r requirements.txt
Once this is done, you should have everything you need for the next steps.
Step 2: Check GPU Capabilities (optional)
We will be using a GPU instance type that supports CUDA 5.0 or higher. The torch libraries used in this AMP necessitate a GPU with a CUDA compute capability of 5.0 or greater, such as V100, A100, or T4 GPUs.
While not strictly necessary, it’s always a good practice to test GPU capabilities, and ensure CUDA support.
You can create a python script for that.
(aienv) aidev@e2e-81-9:~/e2e_llm_chatbot$ vi check_gpu_capability.py
import torch
import sys


Check that the CUDA capability of the GPUs in this workspace meet minimum requirements for this experiment
version = torch.cuda.get_device_capability()
if version[0] < = 5:
   device = torch.cuda.get_device_name()
   msg = "CUDA Capability (%d.%d) of the GPU device (%s) "
       "is less than the required (5.0), please use a newer"
       "GPU instance type" % (version[0], version[1], device)
   sys.exit(msg)
else:
   print("GPU instance meets requirements")
Since we selected V100, the test should easily pass.
(aienv) aidev@e2e-81-9:/e2e_llm_chatbot$ python check_gpu_capability.py
GPU instance meets requirements
Step 3: Download Models
We will now download the LLM models required for this experiment. For this, create the following shell script.
(aienv) aidev@e2e-81-9:/e2e_llm_chatbot$ vi download_models.sh
This script is used to pre=download files stored with git-lfs in CML Runtimes which do not have git-lfs support
You can use any models that can be loaded with the huggingface transformers library.
EMBEDDING_MODEL_REPO="https://huggingface.co/sentence-transformers/all-MiniLM-L12-v2"
EMBDEDDING_MODEL_COMMIT="9e16800aed25dbd1a96dfa6949c68c4d81d5dded"
LLM_MODEL_REPO="https://huggingface.co/h2oai/h2ogpt-oig-oasst1-512-6.9b"
LLM_MODEL_COMMIT="4e336d947ee37d99f2af735d11c4a863c74f8541"
download_lfs_files () {
   echo "These files must be downloaded manually since there is no git-lfs here:"
   COMMIT=$1
   git ls-files | git check-attr --stdin filter | awk -F': ' '$3 ~ /lfs/ { print $1}' | while read line; do
       echo "Downloading ${line}"
       echo $(git remote get-url $(git remote))/resolve/$COMMIT/${line}
       curl -O -L $(git remote get-url $(git remote))/resolve/$COMMIT/${line}
       echo "Downloading ${line} completed"
   done
}
Clear out any existing checked out models
rm -rf ./models
mkdir models
cd models
Downloading model for generating vector embeddings
GIT_LFS_SKIP_SMUDGE=1 git clone ${EMBEDDING_MODEL_REPO} --branch main embedding-model
cd embedding-model
git checkout ${EMBDEDDING_MODEL_COMMIT}
download_lfs_files $EMBDEDDING_MODEL_COMMIT
cd ..
Downloading LLM model that has been fine tuned to handle instructions/q&a
GIT_LFS_SKIP_SMUDGE=1 git clone ${LLM_MODEL_REPO} --branch main llm-model
cd llm-model
git checkout ${LLM_MODEL_COMMIT}
download_lfs_files $LLM_MODEL_COMMIT
cd ..
You can trigger the download using the following:
(aienv) aidev@e2e-81-9:~/e2e_llm_chatbot$ sh ./download_models.sh
That will take some time. Once completed, you will see a folder called ‘models’ that would contain the downloaded models.
Remember that if you execute this again, it will delete the directory and restart. You can modify the above script to whatever suits your automation workflow.
Step 4: Embedding Utils
Now let’s create some helper modules that would assist in creating and inserting the embeddings into the vector db.
First, create a file called ‘model_embedding_utils.py’ and add the following:
Next, create another file that would help loading the LLM model, tokenizer and create a pipeline.
Let’s call this file - ‘model_llm_utils.py’.
from transformers import pipeline, AutoModelForCausalLM, AutoTokenizer, StoppingCriteria, StoppingCriteriaList
import torch
class KeywordsStoppingCriteria(StoppingCriteria):
   def init(self, keywords_ids:list):
       self.keywords = keywords_ids
   def call(self, input_ids: torch.LongTensor, scores: torch.FloatTensor, **kwargs) -> bool:
       if input_ids[0][-1] in self.keywords:
           return True
       return False
Load the model stored in models/llm-model
print(f"Starting to load the LLM model")
model = AutoModelForCausalLM.from_pretrained('models/llm-model', local_files_only=True, torch_dtype=torch.bfloat16, device_map="auto")
print(f"Starting to load the LLM tokenizer")
tokenizer = AutoTokenizer.from_pretrained('models/llm-model', local_files_only=True, padding_side="left")
print(f"Finished loading the model and tokenizer")
Now create a generator and a prompting function to ask a question to the LLM where the prompt sets context and attempts to massage some instructions to answer the question
generator = pipeline('text-generation', model=model, tokenizer=tokenizer)
Generate text using loaded LLM model
Total prompt size is limited to 2048 tokens with the included model
the prompt includes (prompt template, user input, retrieved context)
def get_llm_generation(prompt, stop_words, temperature=0.7, max_new_tokens=256, top_p=0.85, top_k=70, repetition_penalty=1.07, do_sample=False):
   stop_ids = [tokenizer.encode(w)[0] for w in stop_words]
   stop_criteria = KeywordsStoppingCriteria(stop_ids)
   generated_text = generator(prompt, max_new_tokens=max_new_tokens, do_sample=do_sample, temperature=temperature, top_p=top_p, top_k=top_k, repetition_penalty=repetition_penalty, pad_token_id=tokenizer.eos_token_id, stopping_criteria=StoppingCriteriaList([stop_criteria]),)[0]
   #return a response that cuts out the prompt
   return generated_text['generated_text'][len(prompt):]
You should now have two files, which will be used below:
- model_embedding_utils.py
- model_llm_utils.py
Next we will save context data.
Step 5: Context Data
To reduce hallucinations in the chatbot, we will need to augment with enterprise data. You will see in the following steps that the output that the LLM would give with and without this context will vastly vary.
Create a ‘data’ directory, and save the LLM context data as .txt files.
The python module that would insert the embeddings into the vector db, would look for the context data in the ‘data’ folder.
In this experiment, we have saved two .txt files in the data directory.
(aienv) aidev@e2e-81-9:~/workspace/llm_chatbots/e2e_llm_chatbot$ tree data/
data/
|-- about_e2e_2.txt
`-- about_e2e.txt
Step 6: Insert Embeddings into Vector DB
Create a python script ‘vector_db_insert.py’ and copy paste the following:
from milvus import default_server
from pymilvus import connections, FieldSchema, CollectionSchema, DataType, Collection, utility
import subprocess
import model_embedding_utils as model_embedding
import os
from pathlib import Path
def create_milvus_collection(collection_name, dim):
     if utility.has_collection(collection_name):
         utility.drop_collection(collection_name)
     fields = [
     FieldSchema(name='relativefilepath', dtype=DataType.VARCHAR, description='file path relative to root directory ', max_length=1000, is_primary=True, auto_id=False),
     FieldSchema(name='embedding', dtype=DataType.FLOAT_VECTOR, description='embedding vectors', dim=dim)
     ]
     schema = CollectionSchema(fields=fields, description='reverse image search')
     collection = Collection(name=collection_name, schema=schema)
     # create IVF_FLAT index for collection.
     index_params = {
         'metric_type':'IP',
         'index_type':"IVF_FLAT",
         'params':{"nlist":2048}
     }
     collection.create_index(field_name="embedding", index_params=index_params)
     return collection

Create an embedding for given text/doc and insert it into Milvus Vector DB
def insert_embedding(collection, id_path, text):
   embedding =  model_embedding.get_embeddings(text)
   data = [[id_path], [embedding]]
   collection.insert(data)

def main():
Reset the vector database files
 print(subprocess.run(["rm -rf milvus-data"], shell=True))
 default_server.set_base_dir('milvus-data')
 default_server.start()
 try:
   connections.connect(alias='default', host='localhost', port=default_server.listen_port)
   print(utility.get_server_version())
   # Create/Recreate the Milvus collection
   collection_name = 'e2e_docs'
   collection = create_milvus_collection(collection_name, 384)
   print("Milvus database is up and collection is created")
   # Read KB documents in ./data directory and insert embeddings into Vector DB for each doc
   # The default embeddings generation model specified in this AMP only generates embeddings for the first 256 tokens of text.
   doc_dir = './data'
   for file in Path(doc_dir).glob(f'**/*.txt'):
       print("Loading...")
       print(file)
       with open(file, "r") as f: # Open file in read mode
           print("Generating embeddings for: %s" % file.name)
           text = f.read()
           insert_embedding(collection, os.path.abspath(file), text)
   collection.flush()
   print('Total number of inserted embeddings is {}.'.format(collection.num_entities))
   print('Finished loading Knowledge Base embeddings into Milvus')
 except Exception as e:
   default_server.stop()
   raise (e)

  default_server.stop()
if name == "main":
   main()
If you execute this, you will see that milvus-data directory has now been created, and output along the following lines:
Milvus database is up and collection is created
Loading...
data/about_e2e_2.txt
Generating embeddings for: about_e2e_2.txt
Loading...
data/about_e2e.txt
Generating embeddings for: about_e2e.txt
Total number of inserted embeddings is 2.
Finished loading Knowledge Base embeddings into Milvus
Also, let’s create a module that allows for our LLM chatbot to start the vector db.
Create the file ‘vector_db_utils.py’ with following content:
from milvus import default_server
from pymilvus import connections, Collection, utility
Start Milvus Vector DB
default_server.stop()
default_server.set_base_dir('milvus-data')
default_server.start()
try:
   connections.connect(alias='default', host='localhost', port=default_server.listen_port)
except Exception as e:
   default_server.stop()
   raise e

print(utility.get_server_version())
So, now that you have the embeddings loaded from your context data into the milvus-data folder, you are ready to spin up the LLM and augment it with context.
Step 7: LLM Chatbot augmented with Data
We are now ready to set up the main chatbot function, which would be augmented with the embeddings data that has been loaded into the vector db.
Create a file - llm_chatbot.py and insert the following code into it:
import os
import gradio
from milvus import default_server
from pymilvus import connections, Collection
import model_llm_utils as model_llm
import vector_db_utils as vector_db
import model_embedding_utils as model_embedding
def main():
   # Configure gradio QA app
   print("Configuring gradio app")
   demo = gradio.Interface(fn=get_responses,
                           inputs=gradio.Textbox(label="Question", placeholder=""),
                           outputs=[gradio.Textbox(label="Asking LLM with No Context"),
                                    gradio.Textbox(label="Asking LLM with Context (RAG)")],
                           examples=["What is E2E Networks?",
                                     "What kind of work does E2E Networks do?",
                                     "What solutions does E2E Networks offer?"],
                           allow_flagging="never")
   # Launch gradio app
   print("Launching gradio app")
   demo.launch(share=True,
               enable_queue=True,
               show_error=True,
               server_name='127.0.0.1',
               server_port=9999)
   print("Gradio app ready")

Helper function for generating responses for the QA app
def get_responses(question):

   # Load Milvus Vector DB collection
   vector_db_collection = Collection('e2e_docs')
   vector_db_collection.load()

   # Phase 1: Get nearest knowledge base chunk for a user question from a vector db
   context_chunk = get_nearest_chunk_from_vectordb(vector_db_collection, question)
   vector_db_collection.release()

   # Phase 2: Create enhanced instruction prompts for use with the LLM
   prompt_with_context = create_enhanced_prompt(context_chunk, question)
   prompt_without_context = create_enhanced_prompt("none", question)

   # Phase 3a: Perform text generation with LLM model using found kb context chunk
   contextResponse = get_llm_response(prompt_with_context)
   rag_response = contextResponse

   # Phase 3b: For comparison, also perform text generation with LLM model without providing context
   plainResponse = get_llm_response(prompt_without_context)
   plain_response = plainResponse
   return plain_response, rag_response
Get embeddings for a user question and query Milvus vector DB for nearest knowledge base chunk
def get_nearest_chunk_from_vectordb(vector_db_collection, question):
   # Generate embedding for user question
   question_embedding =  model_embedding.get_embeddings(question)

   # Define search attributes for Milvus vector DB
   vector_db_search_params = {"metric_type": "IP", "params": {"nprobe": 10}}

   # Execute search and get nearest vector, outputting the relativefilepath
   nearest_vectors = vector_db_collection.search(
       data=[question_embedding], # The data you are querying on
       anns_field="embedding", # Column in collection to search on
       param=vector_db_search_params,
       limit=1, # limit results to 1
       expr=None,
       output_fields=['relativefilepath'], # The fields you want to retrieve from the search result.
       consistency_level="Strong"
   )

   # Print the file path of the kb chunk
   print(nearest_vectors[0].ids[0])

   # Return text of the nearest knowledgebase chunk
   return load_context_chunk_from_data(nearest_vectors[0].ids[0])
Return the Knowledge Base doc based on Knowledge Base ID (relative file path)
def load_context_chunk_from_data(id_path):
   with open(id_path, "r") as f: # Open file in read mode
       return f.read()

def create_enhanced_prompt(context, question):
   prompt_template = """:%s. Answer this question based on given context %s
:"""
   prompt = prompt_template % (context, question)
   return prompt
Pass through user input to LLM model with enhanced prompt and stop tokens
def get_llm_response(prompt):
   stop_words = [':', '\n:']
   generated_text = model_llm.get_llm_generation(prompt,
                                                 stop_words,
                                                 max_new_tokens=256,
                                                 do_sample=False,
                                                 temperature=0.7,
                                                 top_p=0.85,
                                                 top_k=70,
                                                 repetition_penalty=1.07)
   return generated_text
if name == "main":
   main()
In this script, we are also spinning up Gradio instance, which will allow us to interact with the LLM, and compare results that we get with and without context.
In the get_responses() function, we are querying the LLM with context, and without context.
To load data from vector db, the function get_nearest_chunk_from_vectordb() acts as a helper.
The function ‘create_enhanced_prompt()’ loads up the context and creates the prompt that would be fed into the LLM.
Finally, the display is handled by passing the responses back to the Gradio instance that we have spun up in the start.
Step 8: Execute and View Results!
In the previous step, we created the python script - llm_chatbot.py.
Now we are ready to test our LLM chatbot.
(aienv) aidev@e2e-81-9:~/e2e_llm_chatbot$ python llm_chatbot.py
You would eventually see a line which says:
Running on public URL: https://86b96d4bb0a1fb1ead.gradio.live
This link will be unique in each instance, and will be live only for 72 hours. Good enough for us to test and play around with.
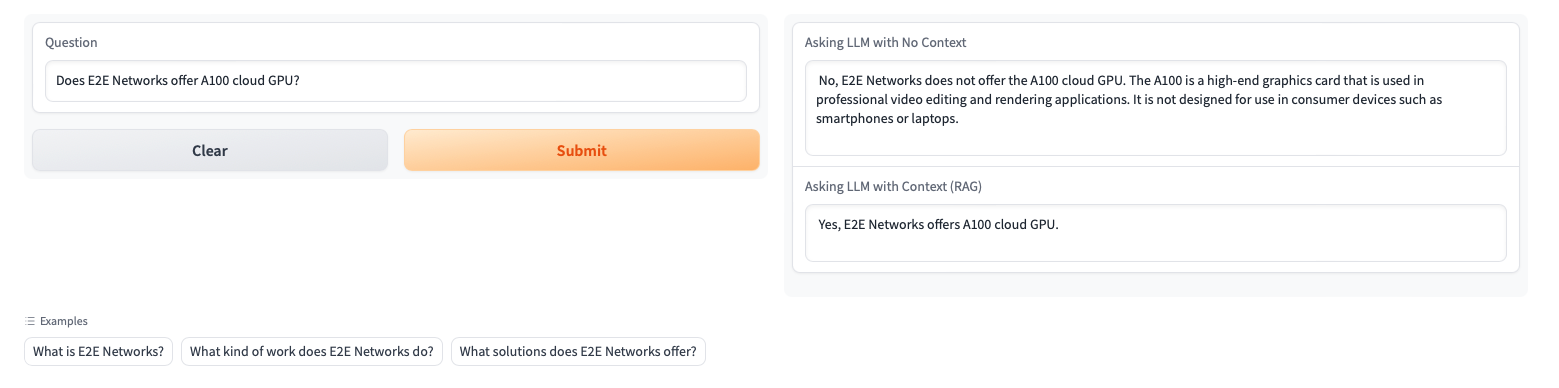
Once you open this on the browser, you would see the following:
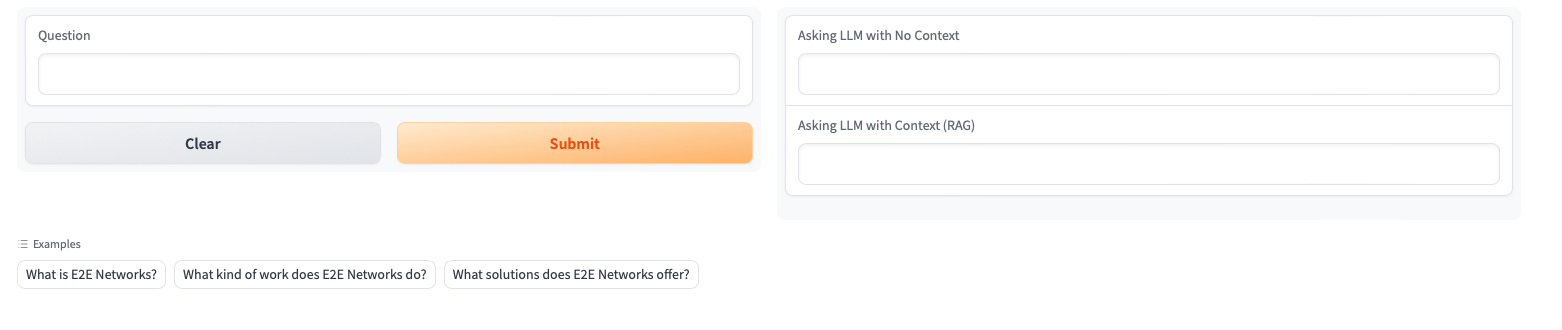
You can now ask a question, and view the results with and without augmentation. In our case, as in the screenshot below, the response ‘without context’ is completely hallucinatory.
This is the response without context, for the question ‘What is E2E Networks’:
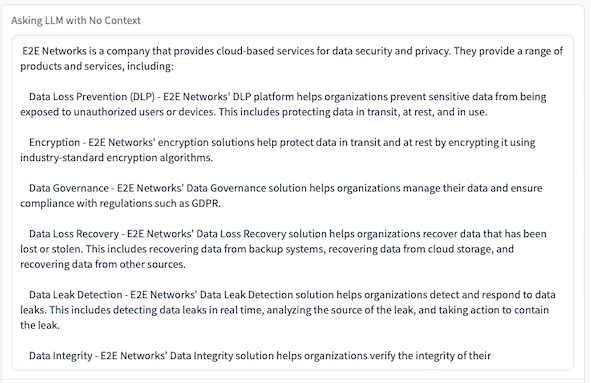
This is almost fully inaccurate.
Now, let’s compare it with the response generated with context (RAG):

Success! The results are much more accurate, and almost without hallucination. By refining the context data, you can achieve stellar results in many cases.
Let’s ask another question:
Conclusion
As we had mentioned in the beginning of this tutorial, LLMs have a tendency to hallucinate when it doesn’t have context data around knowledge-intensive questions.
RAG offers a powerful way to remove these hallucinations, thereby making it possible to create enterprise-grade chatbots that are far more accurate and provide a way to mitigate the risks from hallucinations.
Furthermore, one additional advantage of the approach of using open source LLMs which you deploy, train and build yourself, is that you don’t leak sensitive enterprise context data to proprietary LLMs, avoid vendor lock-in, and reduce your total cost of ownership in the long run.